
Makeup
Circular Saw Guide: 3 Easy Methods for Straight Cuts
Aug
A circular saw has plenty of power, portability, and enthusiasm. Unfortunately, it does not come with a built-in sense of directioil line can slowly wander away like a shopping cart with one bad wheel.
The good news is that you do not need a table saw or an expensive workshop setup to make accurate cuts. With a speed square, a clamped straightedge, or a simple zero-clearance cutting guide, an ordinary circular saw can produce clean, straight results in dimensional lumber, plywood, MDF, and other sheet materials.
This circular saw guide explains three easy methods for straight cuts, along with blade selection, setup, measurement, workpiece support, and troubleshooting tips. Whether you are building shelves, trimming a door, breaking down plywood, or tackling your first weekend project, these techniques will help you cut with more confidence and less creative sanding afterward.
Why Circular Saw Cuts Wander
A circular saw cuts straight only when its base, also called the shoe, travels in a straight path. The blade does not automatically correct your direction. A small steering error at the beginning can become a noticeable gap by the end of a long plywood cut.
Several common problems can make the saw drift:
- The workpiece moves because it is not clamped or supported properly.
- The blade is dull, damaged, dirty, or unsuitable for the material.
- The operator watches the blade instead of the saw’s cut-line indicator.
- The saw is pushed too quickly, causing the blade to deflect.
- The waste section sags and pinches the blade during the cut.
- The guide is positioned using the wrong blade-to-shoe offset.
A straight guide solves only part of the problem. You must also give the saw a stable surface, set the correct cutting depth, and allow the blade to work at its own pace. Manufacturers commonly recommend using a rip fence or straightedge when ripping because it improves accuracy and reduces the chance of the blade binding. n>
Prepare the Saw Before Making a Cut
Choose the Right Circular Saw Blade
The blade affects cutting speed, edge quality, and how easily the saw follows a guide. A low-tooth-count framing blade cuts construction lumber quickly but may leave a rougher edge. A fine-finish blade with more teeth generally produces cleaner crosscuts in plywood, veneered panels, and trim.
Use a blade designed for the material you are cutting. Wood blades should not be treated as universal problem solvers for metal, masonry, or fiber-cement products. Inspect the blade for missing teeth, cracks, excessive resin buildup, or visible warping. Sharp, properly maintained blades require less force and are less likely to contribute to binding or kickback. et the Cutting Depth
Unplug a corded saw or remove the battery before adjusting it. Set the blade so it extends only slightly beneath the workpiece, usually about one full tooth below the material. Excessive blade exposure does not make the saw cut better. It simply exposes more blade and can make the tool harder to control.
After adjusting the depth, tighten the depth-locking lever securely. Confirm that the base sits flat and that the bevel adjustment is locked at zero degrees unless the project calls for an angled cut.
Check the Blade Guard
The lower guard should move freely and return automatically when released. Never tie, wedge, or hold it open for a normal cut. Portable circular saws are designed with upper and lower guards, and the lower guard should return to its covering position when the tool leaves the workpiece. upport the Material Correctly
The workpiece must remain stable while both sides of the cut are allowed to separate. For plywood, a sheet of rigid foam insulation placed on the floor or a worktable provides continuous support and lets the blade cut slightly into the foam. For boards, support the keeper section securely and make sure the waste section cannot fall inward and pinch the blade.
Before starting, confirm that the blade will not hit sawhorses, screws, concrete, clamps, or the workbench. Circular saw blades are fast, but they are not impressed by surprise encounters with hardware.
Method 1: Use a Speed Square for Short Crosscuts
A speed square is one of the fastest ways to make straight 90-degree crosscuts in boards. It works especially well on framing lumber, deck boards, fence pickets, and other material narrow enough for the saw to cross in one controlled pass.
Best Uses
- Cutting 2x4s, 2x6s, and similar boards to length
- Squaring the end of a board
- Making quick framing cuts
- Producing short 90-degree or 45-degree cuts
How to Make the Cut
- Measure the board and place a clear pencil mark on the finished side.
- Use the square to draw a line across the board.
- Place the saw on the material with the blade on the waste side of the line.
- Slide the speed square against the edge of the board and against the side of the saw’s base.
- Hold or clamp the square firmly so it cannot rotate.
- Pull the saw back slightly so the blade does not touch the material.
- Start the saw and allow the blade to reach full speed.
- Keep the base flat while sliding it along the square in one smooth motion.
- Release the trigger after the blade clears the wood and wait for it to stop before setting the saw down.
Account for the Blade Kerf
The kerf is the strip of material removed by the blade. Do not center the blade directly on the measurement line unless the lost material does not matter. Position the blade so the teeth remove material from the waste side while preserving the full length of the finished piece.
For maximum accuracy, make a tiny reference notch at the edge of the board and check which side of the mark the blade will remove before starting the full cut.
Common Speed-Square Mistake
The most frequent error is allowing the saw base to drift away from the square halfway through the cut. Maintain gentle sideways pressure toward the guide, but do not push so hard that the saw binds. The square should direct the tool, not wrestle it into submission.
Method 2: Clamp a Straightedge to the Workpiece
A clamped straightedge is the most versatile low-cost method for long circular saw cuts. You can use a factory-cut strip of plywood, a straight board, a long level, or an aluminum guide rail. The saw’s base rides along the straightedge while the blade cuts parallel to it.
Best Uses
- Breaking down full sheets of plywood
- Trimming doors and countertops
- Making long rip cuts in boards
- Cutting MDF, particleboard, and shelving panels
- Creating straight cuts without buying a dedicated track saw
Measure the Saw’s Offset
The critical measurement is the distance from the blade to the edge of the saw base that will touch the straightedge. This is called the offset.
Place the unplugged saw on a flat surface and measure from the outer edge of a blade tooth to the chosen edge of the base. Measure from the tooth, not merely the blade plate, because the teeth determine the actual kerf.
Suppose your desired cut line is 12 inches from the edge of a plywood sheet and your saw offset is 1 1/2 inches. Position the straightedge 1 1/2 inches away from the cut line on the side opposite the blade. When the base follows the guide, the blade should track directly along the cut line.
Step-by-Step Straightedge Method
- Mark the cutting line at both ends of the material.
- Connect the marks using a straightedge or chalk line.
- Measure away from the cut line by the saw’s offset.
- Mark the guide position at both ends.
- Place the straightedge on those guide marks.
- Clamp it securely without placing clamps in the saw’s path.
- Position the saw at the starting edge and verify that the blade aligns with the waste side of the cut line.
- Start the saw before the blade contacts the material.
- Keep the base flat and maintain light pressure against the guide.
- Continue several inches beyond the material before turning away from the guide.
Make a Test Cut First
Measurements printed or molded onto a saw are useful, but a test cut is more trustworthy. Use scrap material to verify the offset before cutting an expensive cabinet panel or a door that took three weeks to arrive.
Commercial straightedge systems use the same basic principle, often adding built-in clamps, cut-line indicators, anti-slip strips, or rails designed to fit multiple saw orientations. revent Tear-Out
Most standard circular saw blades rotate upward through the top surface of the workpiece, so visible splintering is often worse on top. When appearance matters, place the best face down unless the saw or blade manufacturer directs otherwise.
You can also apply painter’s tape over the cut line, score the line with a sharp utility knife, or use a fine-finish blade. Make sure the tape does not hide your layout marks or prevent the guide from sitting flat.
Method 3: Build a Zero-Clearance Circular Saw Guide
A homemade zero-clearance guide is ideal when you regularly cut plywood, cabinet panels, doors, or shelving. Unlike a basic straightedge, this jig has an edge that shows exactly where the blade will cut. Once built, it eliminates repeated offset calculations.
What You Need
- A strip of 1/4-inch or 1/2-inch plywood for the base
- A straight factory-edged plywood or MDF strip for the fence
- Wood glue and short screws or brad nails
- Clamps
- Your circular saw
How to Build the Guide
- Cut a base strip wider than the saw’s blade-to-base offset.
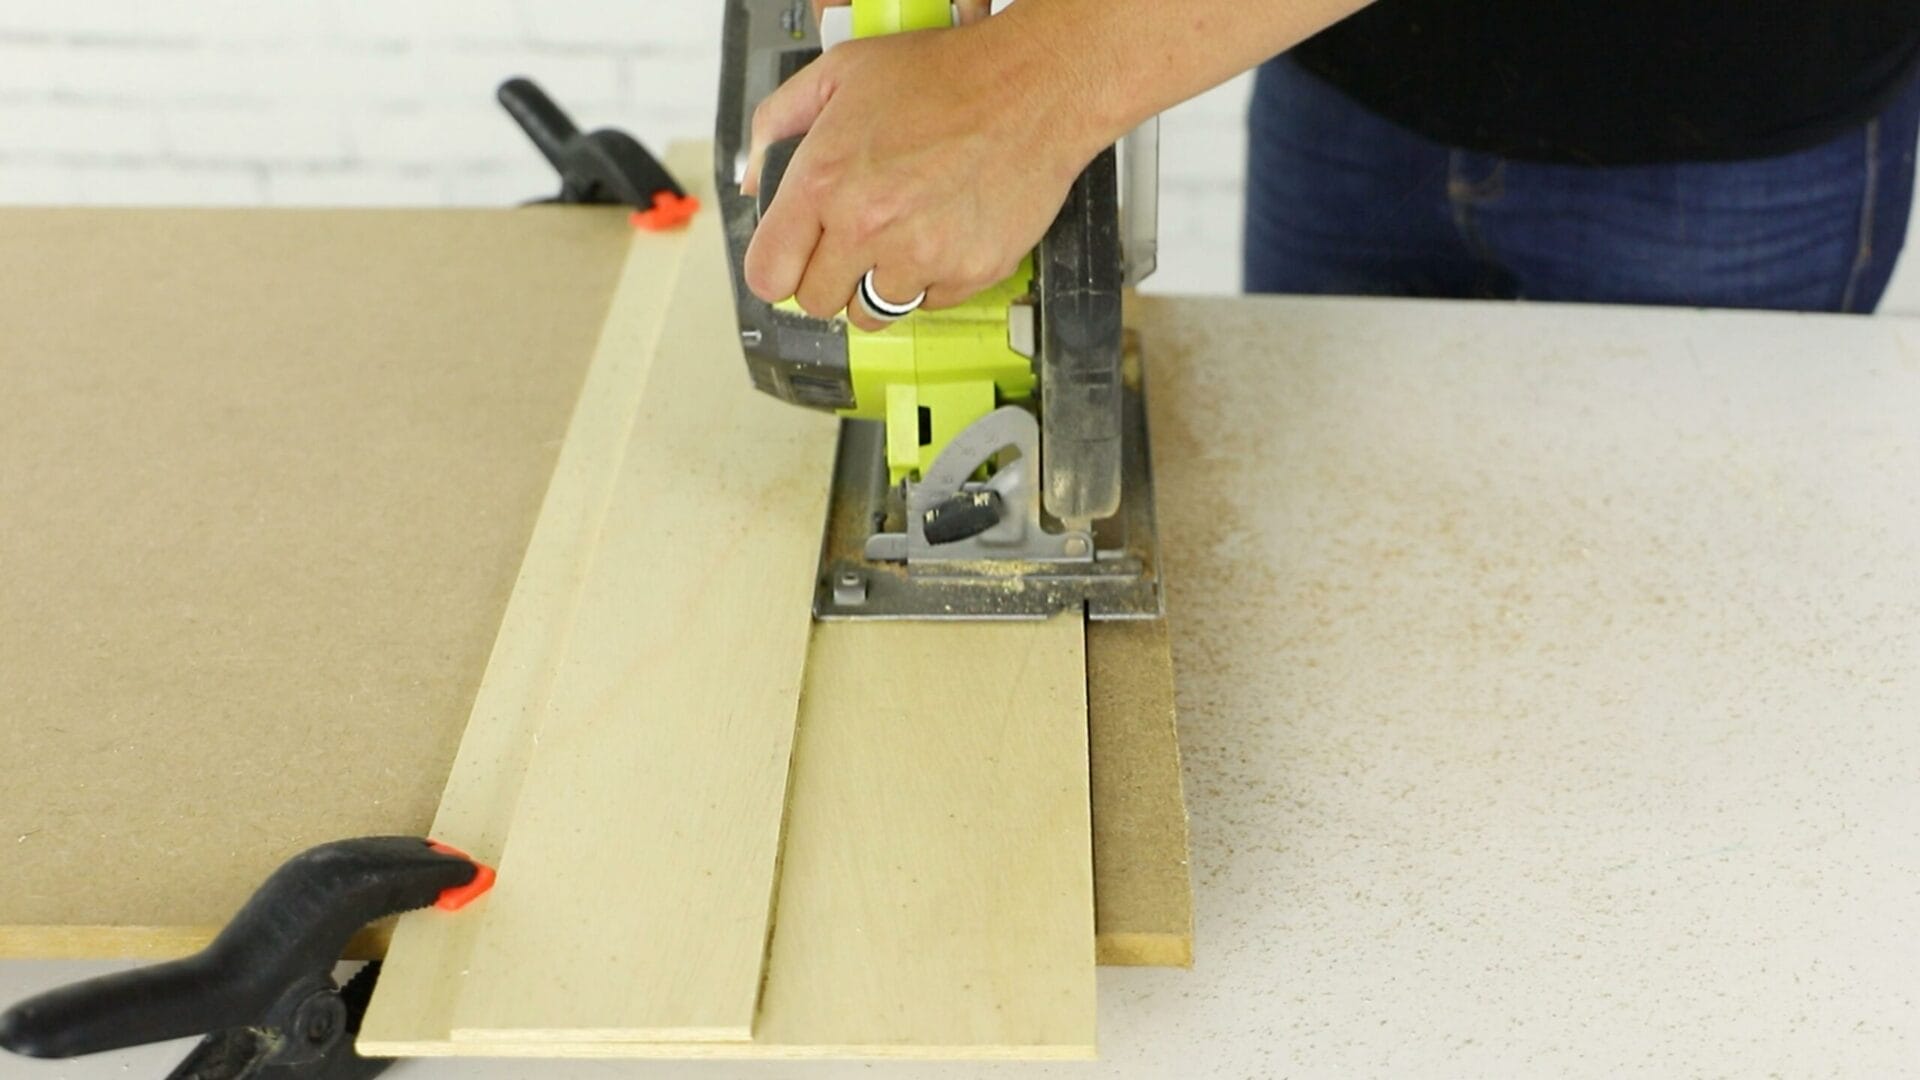
- Place the straight fence strip on top of the base, leaving enough base exposed for the saw to ride securely.
- Glue and fasten the fence to the base, ensuring the factory edge faces the saw.
- Allow the glue to set and check that no screw extends beneath the jig.
- Run the saw along the fence to trim the base.
That final trimming pass creates a reference edge exactly aligned with the blade. To use the jig later, place its trimmed edge directly on the desired cut line, clamp it, and run the same saw along the fence. No offset arithmetic is required.
This self-trimming design is widely used because the base edge becomes a precise indicator of the blade path. It also supports the surface near the cut, which can help reduce splintering. abel the Guide
A zero-clearance guide is calibrated to a particular relationship between the saw, blade, and side of the base. Label it with the saw model, blade side, and bevel setting. Changing to a blade with a noticeably different kerf may slightly alter the cut position.
Consider making one short guide for crosscuts and one long guide for full plywood sheets. Store them flat or hang them vertically so they do not warp.
Commercial Alternatives
Commercial edge guides and track systems can provide faster setup, built-in clamping, anti-splinter strips, and repeatable width settings. Some edge-mounted guides follow the factory edge of a sheet, while track-style systems guide the saw along a rail placed directly at the cut.
Dedicated track saws are engineered to ride on matching rails, but compatible circular saw guide systems can offer many of the same practical benefits for occasional DIY work. Guide rails are specifically intended to support straight, repeatable cuts in sheet goods and finish applications. n>
How to Feed a Circular Saw Smoothly
Once the guide is positioned, cutting technique determines whether the result remains clean and square.
Start With the Base Fully Supported
At the beginning of the cut, enough of the saw base should rest on the workpiece to keep the tool stable. Do not begin with most of the saw hanging in midair. For narrow stock, use a crosscut jig or speed square that gives the shoe a solid reference.
Let the Blade Reach Full Speed
Start the motor while the blade is clear of the material. Wait for the blade to reach operating speed, then move forward steadily. Starting with the blade touching the wood can cause the saw to jump or damage the edge.
Do Not Force the Saw
A circular saw should advance with firm but moderate pressure. If the motor slows noticeably, the saw burns the wood, or the tool requires heavy pushing, stop and investigate. The blade may be dull, the material may be pinching the kerf, or the guide may be misaligned.
Keep the Shoe Flat
Tilting or lifting the saw base changes the blade’s relationship to the guide. Keep both hands in their intended positions and maintain full contact between the shoe and the workpiece throughout the cut.
Finish Beyond the Edge
Continue moving straight until the blade completely exits the material. Beginners often turn the saw away too early, leaving a curved notch at the final inch. Finish the cut, release the trigger, and wait for the blade to stop before placing the saw down.
Circular Saw Safety Checklist
- Wear safety glasses and hearing protection.
- Use suitable respiratory protection when cutting dusty materials.
- Inspect the blade and confirm that it is installed in the correct direction.
- Remove the battery or unplug the tool before making adjustments.
- Keep both hands on the saw’s designated grips when possible.
- Keep the power cord away from the blade and cutting path.
- Clamp the workpiece rather than trying to hold it with a knee or foot.
- Stand slightly to the side instead of directly behind the blade path.
- Never reach beneath the workpiece while the saw is connected to power.
- Stop immediately if the kerf begins closing around the blade.
Kickback can occur when a blade becomes pinched, misaligned, or suddenly stopped. Proper support, a sharp blade, a functioning guard, and a stable guide reduce the conditions that contribute to loss of control. Keep your body out of the likely path of the tool and never attempt to pull a spinning blade backward through a cut.
Troubleshooting Crooked or Rough Cuts
The Cut Is Straight but in the Wrong Place
The guide offset was probably measured from the wrong edge or placed on the wrong side of the cut line. Make a test cut and create a labeled setup block equal to the exact offset of your saw.
The Saw Drifts Away From the Guide
Apply light sideways pressure against the guide and confirm that the straightedge is high enough for the saw base to contact without climbing over it. Check that the guide has not bowed between clamps.
The Blade Binds Near the End
The waste piece may be sagging and closing the kerf. Reposition the supports so both sides remain stable while the cut is free to open.
The Edge Is Burned
A dirty or dull blade, a feed rate that is too slow, or excessive sideways pressure may be causing friction. Clean or replace the blade and confirm that it is not rubbing against the guide-induced cut path.
The Top Veneer Splinters
Use a fine-finish blade, place the best face down, support the fibers with tape, or use a zero-clearance guide. Move steadily without pausing in the middle of the panel.
The Cut Is Not Square Through the Thickness
Check the bevel scale with a reliable square. A saw can indicate zero degrees while the blade is slightly tilted. Adjust the bevel stop according to the manufacturer’s instructions.
Field-Tested Experiences for Better Straight Cuts
The biggest lesson from repeated circular saw work is that accuracy begins before the trigger is pulled. Most disappointing cuts are not caused by a weak motor. They result from rushed layout, poor support, an unnoticed clamp position, or a guide that was never tested. Taking an extra minute during setup usually saves ten minutes of filling, sanding, trimming, or inventing a creative explanation for why a shelf has “character.”
Use a Setup Block Instead of Repeated Measuring
After determining the distance between the blade and the guide-side edge of the saw base, cut a scrap block to that exact width. To position a straightedge, place the block against the layout line and slide the guide against the block. Repeat at the opposite end, clamp the guide, and remove the block. This is faster and often more consistent than reading a tape measure twice for every cut.
Mark the Waste Side Clearly
Place a large X on the waste portion immediately after drawing the cut line. This tiny habit prevents cutting on the wrong side, particularly when several panels are marked at once. It also helps you position supports and clamps where they will not interfere with the keeper piece.
Make a Shallow Scoring Pass on Delicate Plywood
When working with veneered plywood, a light scoring pass can improve the visible edge. Set the blade only deep enough to cut through the surface veneer, run the saw along the guide, and then reset it for the full-depth pass. This requires an accurately secured guide because even a small movement between passes creates a stepped edge.
Watch the Guide Contact Point
Beginners naturally stare at the spinning blade. A better approach is to monitor where the saw base contacts the guide while remaining aware of the cut-line indicator. If the base stays flat and consistently touches a correctly positioned guide, the blade has little opportunity to wander.
Start With Easier Material
Practice on inexpensive plywood or construction lumber before cutting a finished door, hardwood panel, or costly cabinet-grade sheet. Make several crosscuts with a speed square, then practice a four-foot guided rip. Measure the finished pieces at both ends. Differences reveal whether the guide slipped, the saw drifted, or the original material was not square.
Support Full Sheets on Foam
Handling a full sheet of plywood on narrow sawhorses can feel like trying to fold a dining table while standing on it. A rigid foam sheet on the floor supports the entire panel and allows you to kneel beside the cut without balancing a heavy sheet. Set the blade only deep enough to enter the foam slightly. This arrangement reduces sagging and keeps both sections from dropping as the cut finishes.
Use the Same Saw With a Homemade Guide
A zero-clearance guide is most accurate when used with the saw that trimmed it. Another saw may have a different shoe width, blade position, or kerf. Even changing blades can shift the cut edge slightly. Labeling the guide prevents a future workshop mystery in which everything appears aligned but the cut stubbornly lands one-sixteenth of an inch away.
Stop When Something Feels Wrong
Experienced users do not force a saw through unusual resistance. They release the trigger, wait for the blade to stop, disconnect the power, and inspect the setup. A bowed guide, pinched kerf, hidden fastener, dull blade, or unsupported offcut can turn a routine cut into a dangerous one. Stopping is not failure. It is considerably more professional than continuing while hoping the saw resolves the disagreement.
Choosing the Best Straight-Cut Method
Use a speed square when making short crosscuts in boards. It is quick, compact, and requires almost no setup.
Use a clamped straightedge for occasional long cuts, door trimming, and plywood work. It is inexpensive and works with nearly any standard circular saw.
Use a zero-clearance guide or commercial rail when you need repeated accuracy, cleaner sheet-goods cuts, or faster setup. The reference edge shows the blade path directly and removes the need to calculate the offset every time.
None of these methods requires exceptional hand-eye coordination. The guide creates the straight path; your job is to keep the saw base flat, maintain steady contact, and avoid rushing.
Conclusion
A circular saw can make remarkably straight cuts when it has a reliable reference. For short board cuts, guide the base with a speed square. For long rips, clamp a straightedge at the correct offset. For repeatable plywood and finish work, build a zero-clearance guide or use a compatible commercial rail.
Combine the right guide with a sharp blade, shallow blade exposure, solid workpiece support, and a smooth feed rate. The result will be straighter cuts, tighter joints, cleaner projects, and far fewer emergency conversations with a belt sander.
Note: Always read and follow the instructions supplied with your specific circular saw, blade, guide system, and safety equipment before operating the tool.

