
Makeup
Upcycled Painted Signature Nightstands
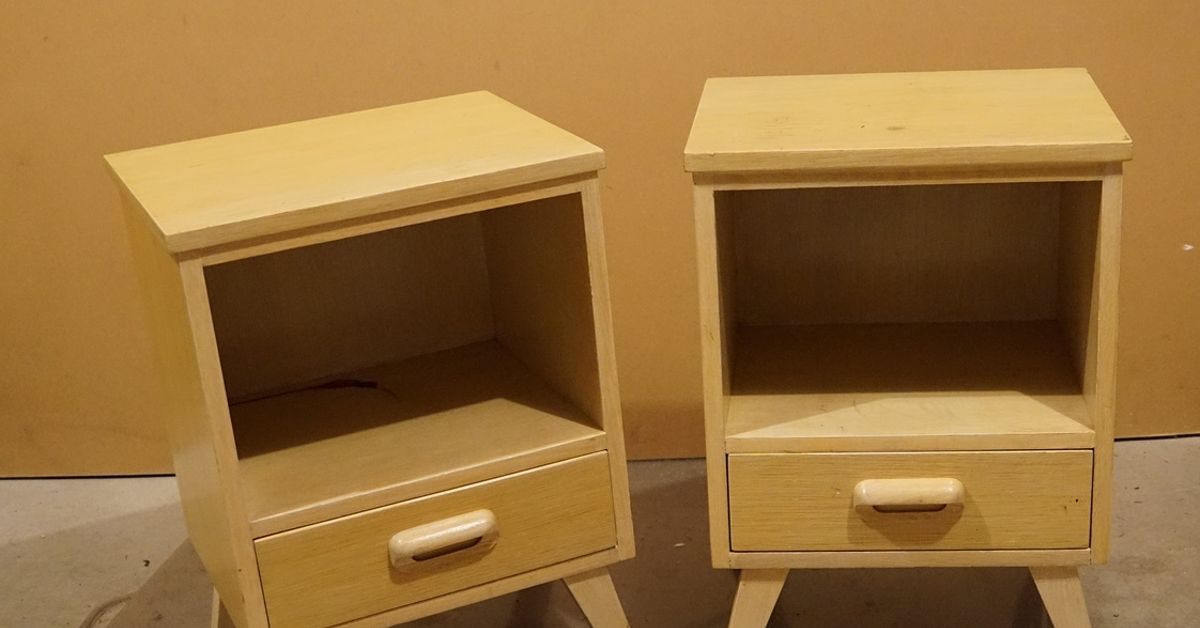
Aug
Nightstands are small pieces of furniture with suspiciously large responsibilities. They hold lamps, books, charging cables, midnight water, abandoned eyeglasses, and at least one object you have been meaning to put away since Tuesday. Unfortunately, many older bedside tables look more tired than the people sleeping beside them.
That is where upcycled painted signature nightstands earn their place in the bedroom. Instead of replacing a solid but dated table, you can repair it, paint it, customize the details, and turn it into a one-of-a-kind statement piece. The result can look more personal than mass-produced furniture while costing significantly less than a designer nightstand.
Upcycling also gives existing materials a longer useful life. According to the U.S. Environmental Protection Agency, Americans generated approximately 12.1 million tons of furniture and furnishings in municipal solid waste during 2018. Saving one pair of nightstands will not single-handedly rescue the planet, but it is a stylish vote against treating useful furniture as disposable.
What Makes a Nightstand a “Signature” Piece?
A signature nightstand is not simply an old table covered with whatever paint happened to be sitting in the garage. It has a recognizable design point of view. Its color, hardware, shape, texture, and decorative details work together to create a piece that feels intentional.
Your signature may be deep navy paint with brushed brass pulls. It could be a warm cream body with natural wood drawer fronts, a hand-painted botanical pattern, or a dramatic black finish with fluted trim. The goal is not to follow every decorating trend at once. Your nightstand should not look as though five different social media algorithms held a committee meeting on top of it.
Popular signature details include:
- A distinctive paint color that complements the bedroom
- Contrasting stained or natural-wood sections
- New knobs, pulls, feet, or decorative trim
- Painted drawer interiors
- Stenciled, striped, geometric, or hand-painted designs
- A subtle distressed finish that highlights the original shape
- A matching pair with small individualized differences
Painted bedroom furniture can act as either a focal point or a coordinating element. Soft green, navy, pale blue, gray, and blush finishes are commonly used to connect a nightstand with bedding, wall colors, rugs, or accent pillows without making the room feel overly matched.
Choosing the Right Nightstands to Upcycle
The best makeover starts with a structurally sound piece. Thrift stores, estate sales, flea markets, online marketplaces, garage sales, and architectural salvage shops can all produce excellent candidates. Habitat for Humanity ReStores also receive new and gently used furniture from individuals, remodels, businesses, and other community sources.
Look beyond an unattractive finish
Dark orange varnish, scratched stain, outdated brass hardware, and unfashionable paint colors are cosmetic problems. They can usually be changed. A well-built nightstand with ugly styling is often a better purchase than a fashionable table made from weak materials.
Inspect the frame, legs, drawer boxes, joints, and top. Open every drawer. Check whether the runners operate smoothly and whether the table rocks on a flat surface. Smell the interior, too. A faint “old house” aroma may disappear after cleaning, but strong mold, smoke, or pet odors can require extensive treatment.
Solid wood, veneer, laminate, or MDF?
Solid wood is forgiving because it can usually tolerate repair, sanding, paint, and repeated refinishing. Veneer can also be beautiful, but it consists of a thin wood layer over a substrate. Aggressive sanding may cut through it, leaving a bald patch that no amount of positive thinking will replace.
Laminate and glossy manufactured surfaces can be painted successfully, but they require thorough cleaning and an adhesion-promoting primer. Benjamin Moore specifically recommends a strong bonding primer for slick laminate surfaces, while Sherwin-Williams likewise emphasizes choosing products intended for laminate furniture.
Know when to walk away
Skip a nightstand with widespread rot, severe water swelling, active insects, major structural failure, or missing proprietary drawer components that cannot reasonably be replaced. A bargain stops being a bargain when it needs the woodworking equivalent of emergency surgery.
Supplies for an Upcycled Painted Nightstand
Your exact materials will depend on the existing finish and your desired design, but a reliable basic kit includes:
- Protective gloves, safety glasses, and an appropriate dust mask or respirator
- Drop cloths or protective floor covering
- Screwdrivers and small labeled bags for hardware
- Mild dish soap, clean water, and lint-free cloths
- Degreasing cleaner when necessary
- Wood filler and a putty knife
- Sanding sponges or sandpaper in medium and fine grits
- Vacuum, tack cloth, or microfiber cloth
- Primer suited to wood, veneer, laminate, or stain blocking
- Furniture, cabinet, acrylic enamel, mineral, milk, or chalk-style paint
- A quality angled brush and small fine-finish roller
- Painter’s tape, measuring tools, and a pencil
- Clear protective topcoat or furniture wax when required
- New knobs, pulls, feet, trim, or decorative appliqués
How to Paint and Upcycle Signature Nightstands
Step 1: Document and disassemble
Before removing anything, take photographs of the nightstand from several angles. These images help you remember where unusual brackets, drawer stops, and hardware belong. Remove knobs, pulls, doors, drawers, and detachable feet. Keep fasteners in labeled containers rather than allowing them to enter the mysterious dimension where loose screws apparently live.
If you are working on a pair, label the drawers and components “left” and “right.” Vintage furniture that appears symmetrical may have tiny construction differences.
Step 2: Clean before sanding
Furniture collects skin oils, dust, polish, candle residue, drink rings, and mystery grime. Sanding a dirty surface can push contaminants into the finish instead of removing them.
Start with a damp microfiber cloth and a small amount of mild dish soap in warm water. Avoid saturating wood, veneer, MDF, or particleboard. Wipe again with a clean damp cloth and dry the piece thoroughly. Martha Stewart’s wood-furniture guidance similarly recommends using a well-wrung cloth and making sure moisture does not remain on the surface.
Step 3: Complete repairs
Tighten loose screws and joints. Glue unstable trim, replace missing drawer stops, and fill unwanted holes or shallow dents with wood filler. Allow repairs to dry completely before sanding them level.
This is also the time to decide whether new hardware will use the existing holes. If your chosen pulls have a different center-to-center measurement, fill the old openings now. Measure twice. Drill once. Stare suspiciously at the ruler a third time for emotional reassurance.
Step 4: Sand or degloss appropriately
Most furniture does not need to be stripped to raw wood before painting. The purpose of scuff sanding is usually to dull the sheen, smooth damaged areas, and create a surface to which primer can adhere.
Use medium-grit sandpaper for rough repairs or badly deteriorated finishes, followed by fine-grit paper for smoothing. Apply gentle pressure on veneer and thin decorative edges. Sand flat surfaces evenly and work with the wood grain when it remains visible.
Home Depot and Lowe’s both recommend cleaning, sanding or deglossing, priming, and applying multiple paint coats for a durable furniture finish. Fine sanding after primer can also reduce ridges and create a smoother final surface.
Step 5: Apply the correct primer
Primer improves adhesion, creates a consistent base, and can prevent tannins, stains, or an old dark finish from bleeding into the new color. Use a stain-blocking primer when working with woods known to release tannins or with furniture that has water marks and unexplained discoloration.
For laminate, glossy factory finishes, and other slick surfaces, choose a bonding primer. Apply a thin, even coat rather than attempting to bury the nightstand beneath a primer glacier. Once dry, inspect the piece under bright light and sand away dust nibs or brush ridges with fine-grit paper.
Step 6: Create the painted signature
Begin with detailed areas, corners, and edges using an angled brush. Cover broad, flat sections with a small fine-finish roller. Work in thin coats and avoid repeatedly brushing paint after it begins to set.
Two thin coats generally look cleaner and cure more evenly than one heavy coat. This Old House recommends brushing detailed sections, rolling larger surfaces, allowing every layer to dry, and applying at least two thin coats when painting MDF furniture. The same basic technique works well on many nightstand surfaces.
After the base color is dry, add the details that make the design recognizable:
- Paint a contrasting border around drawer fronts.
- Create narrow stripes with carefully measured painter’s tape.
- Use a stencil for an Art Deco, botanical, or geometric motif.
- Leave the top or drawer fronts natural for a two-tone finish.
- Apply a darker glaze in carved details for dimension.
- Add slim wood molding or half-round dowels for texture.
- Paint the drawer interiors in a surprising accent color.
Step 7: Distress only where wear makes sense
A distressed finish can add character, especially to farmhouse, cottage, vintage, and European-inspired furniture. Focus on corners, feet, drawer edges, and other areas that would naturally receive contact.
Randomly attacking the center of a drawer with coarse sandpaper may produce distress, but mostly in the emotional sense. Subtle, believable wear usually looks more sophisticated.
Step 8: Protect the finish
Whether a separate protective coat is necessary depends on the paint system. Some cabinet and furniture enamels are designed to cure into a durable finish without an additional sealer. Chalk-style, milk, highly matte, decorative, or frequently handled surfaces may benefit from wax or a compatible clear topcoat.
A nightstand top should resist water glasses, lamp bases, books, alarm clocks, and charging devices. A clear topcoat can provide additional protection from scratches and chips, but it must be compatible with the underlying paint. Always follow the manufacturer’s recoat, ventilation, and application directions.
Step 9: Allow real curing time
Dry paint and fully cured paint are not the same thing. A surface may feel dry while remaining soft underneath. General Finishes notes that some water-based finishes can take about 21 days to reach full cure under ideal conditions, while certain oil-based finishes may require about 30 days. Product formulas vary, so the instructions on your specific paint or topcoat remain the authority.
Reassemble the nightstand carefully and use it lightly during the early curing period. Avoid placing rubber-backed objects, heavy lamps, wet glasses, or adhesive organizers on the fresh surface.
How to Choose a Memorable Color Scheme
Moody and modern
Navy, charcoal, forest green, oxblood, and soft black create depth and work especially well with brass, bronze, or wood hardware. Dark colors can make an inexpensive nightstand look visually substantial, although careful preparation is essential because dust and surface flaws may be more noticeable.
Warm and timeless
Cream, mushroom, putty, warm white, and muted taupe complement traditional, farmhouse, organic-modern, and transitional bedrooms. These colors allow carved details and unusual hardware to receive more attention.
Cheerful and expressive
Mustard, coral, terracotta, powder blue, sage, and dusty pink add personality without requiring a complete bedroom renovation. Pull one supporting color from the bedding or artwork rather than matching every textile exactly.
Two-tone sophistication
Combining painted sections with natural wood is one of the easiest ways to make an upcycled piece look custom. Try a painted frame with stained drawers, a natural top over a colored base, or painted drawer fronts surrounded by exposed wood.
Hardware: The Jewelry of the Nightstand
New hardware can shift a nightstand from country to contemporary in minutes. Slim bar pulls feel modern, cup pulls suit vintage designs, ceramic knobs bring cottage charm, and sculptural brass pieces create a boutique look.
Scale matters. A tiny knob can look lost on a broad drawer, while an oversized pull may overwhelm a narrow table. Before drilling, make paper templates of the hardware and tape them to the drawer fronts. View the nightstand from across the room and from bed height.
You can also restore original hardware. Clean it carefully, preserve an attractive patina, or repaint it with a product suitable for metal. Original pulls often provide character that inexpensive replacements cannot imitate.
Common Nightstand Makeover Mistakes
Painting over wax, polish, or grease
Paint cannot form a dependable bond over a contaminated surface. Clean first, even when a paint label describes the product as requiring minimal preparation.
Using the wrong primer
A general primer may not grip laminate or block wood tannins. Match the primer to both the substrate and the problem you are trying to solve.
Applying thick coats
Heavy paint layers encourage drips, ridges, slow drying, and soft finishes. Thin coats demand more patience but considerably less regret.
Ignoring drawer clearances
Paint adds thickness. Heavy buildup along drawer edges or inside openings can cause sticking. Apply light coats in tight-clearance areas and test the fit before the finish fully cures.
Decorating before the paint cures
A lamp may leave a permanent ring in a finish that feels dry but remains soft. Give the coating the full cure time recommended by its manufacturer.
Safety Considerations for Older Furniture
Use eye protection and control dust whenever you sand. Work in a well-ventilated area and follow the safety instructions for cleaners, deglossers, primers, paints, stains, and topcoats.
Paint on older furniture may contain lead. Do not aggressively dry-sand, scrape, or heat an unknown historic coating without first assessing the risk. Federal safety guidance warns that simply covering a lead hazard with ordinary paint is not a permanent control method and recommends lead-safe practices and properly trained professionals when significant hazards are present.
Keep tools, sanding dust, paint, solvents, and removed hardware away from children and pets. If the project involves an antique, a valuable designer piece, or potentially hazardous coatings, professional evaluation may be the wisest form of DIY expertise.
A Composite Hands-On Experience: What the Project Really Feels Like
A typical upcycled nightstand project begins with unreasonable optimism. The tables look small, the paint can looks large, and the entire makeover appears perfectly achievable before lunch. Then the first drawer is removed, revealing three unmatched screws, a loose runner, an unidentified sticky patch, and enough dust to suggest the nightstand once stored a small desert.
The cleaning stage usually creates the first dramatic improvement. Warm water, mild soap, and patient wiping reveal details that were hidden beneath years of polish and grime. A scratched surface may suddenly look less hopeless. The original hardware may also turn out to be better than expected once it is removed and cleaned.
Sanding is where enthusiasm meets reality. Flat sections move quickly, but molded edges and narrow corners require handwork. The most valuable lesson is that sanding does not need to become an archaeological excavation. The objective is a clean, dull, stable surfacenot the complete removal of every molecule applied since 1974.
Primer often creates an awkward stage. The nightstands may look patchy, pale, and less attractive than when the project began. This is normal. Primer is the rehearsal, not opening night. Small dents and ridges also become easier to see against the uniform surface, allowing one final round of filling and fine sanding.
The first color coat restores confidence. A dated brown nightstand painted deep green or smoky blue begins to look intentional, although the initial layer may still appear streaky. The second coat usually delivers the satisfying transformation seen in makeover photographs. Brush marks soften, repaired sections disappear, and the pair finally begins to look related rather than merely acquainted.
Design details require restraint. It is tempting to add stripes, gold leaf, floral transfers, new feet, molding, patterned paper, and three different metallic finishes. Testing ideas on paper first helps. In many successful projects, one memorable choicesuch as warm brass pulls against matte navy paintdoes more than six competing embellishments.
Reassembly provides another practical lesson: label everything. Drawers that seemed identical before painting may fit only their original openings. Hardware screws can differ by a fraction of an inch, which is apparently enough to inspire an extended conversation with an inanimate object.
The final stage demands patience because a freshly painted table looks ready before it truly is. Gentle handling during the curing period prevents impressions, scratches, and stuck drawers. Once the finish hardens, styling can begin with a lamp, a small tray, a book, and perhaps a coaster placed prominently enough that everyone understands it is not optional.
The best part of the experience is not simply the lower cost. It is seeing overlooked furniture become useful and distinctive again. Small imperfections remain, but they become part of the piece’s story. The finished nightstands feel less like generic products and more like objects chosen, repaired, and designed for a particular room.
Conclusion
Upcycled painted signature nightstands combine practical furniture repair with creative interior design. A well-chosen secondhand table can be cleaned, repaired, prepared, painted, protected, and customized into a bedroom feature that is difficult to duplicate.
The most professional results usually come from ordinary disciplines: careful cleaning, appropriate sanding, the correct primer, thin paint coats, compatible protection, and sufficient curing time. Bold colors and beautiful hardware are important, but preparation is what keeps the transformation attached to the furniture.
Whether your signature style is moody modern, cheerful vintage, quiet organic, or unapologetically glamorous, begin with a solid piece and make a few deliberate choices. Your nightstand does not need to be flawless. It needs to be functional, durable, and unmistakably yours.

