Beauty Tools & Accessories
How to Identify Shark Teeth: 15 Steps
Jun
Finding a shark tooth feels like winning the beach lottery, except the prize is not moneyit is a tiny, ancient dagger from an animal that once treated the ocean like an all-you-can-eat buffet. Whether you found a glossy black triangle in the sand, inherited a jar of mysterious “sea treasures,” or bought a fossil tooth and now want to know what exactly is staring back at you, learning how to identify shark teeth is both science and detective work.
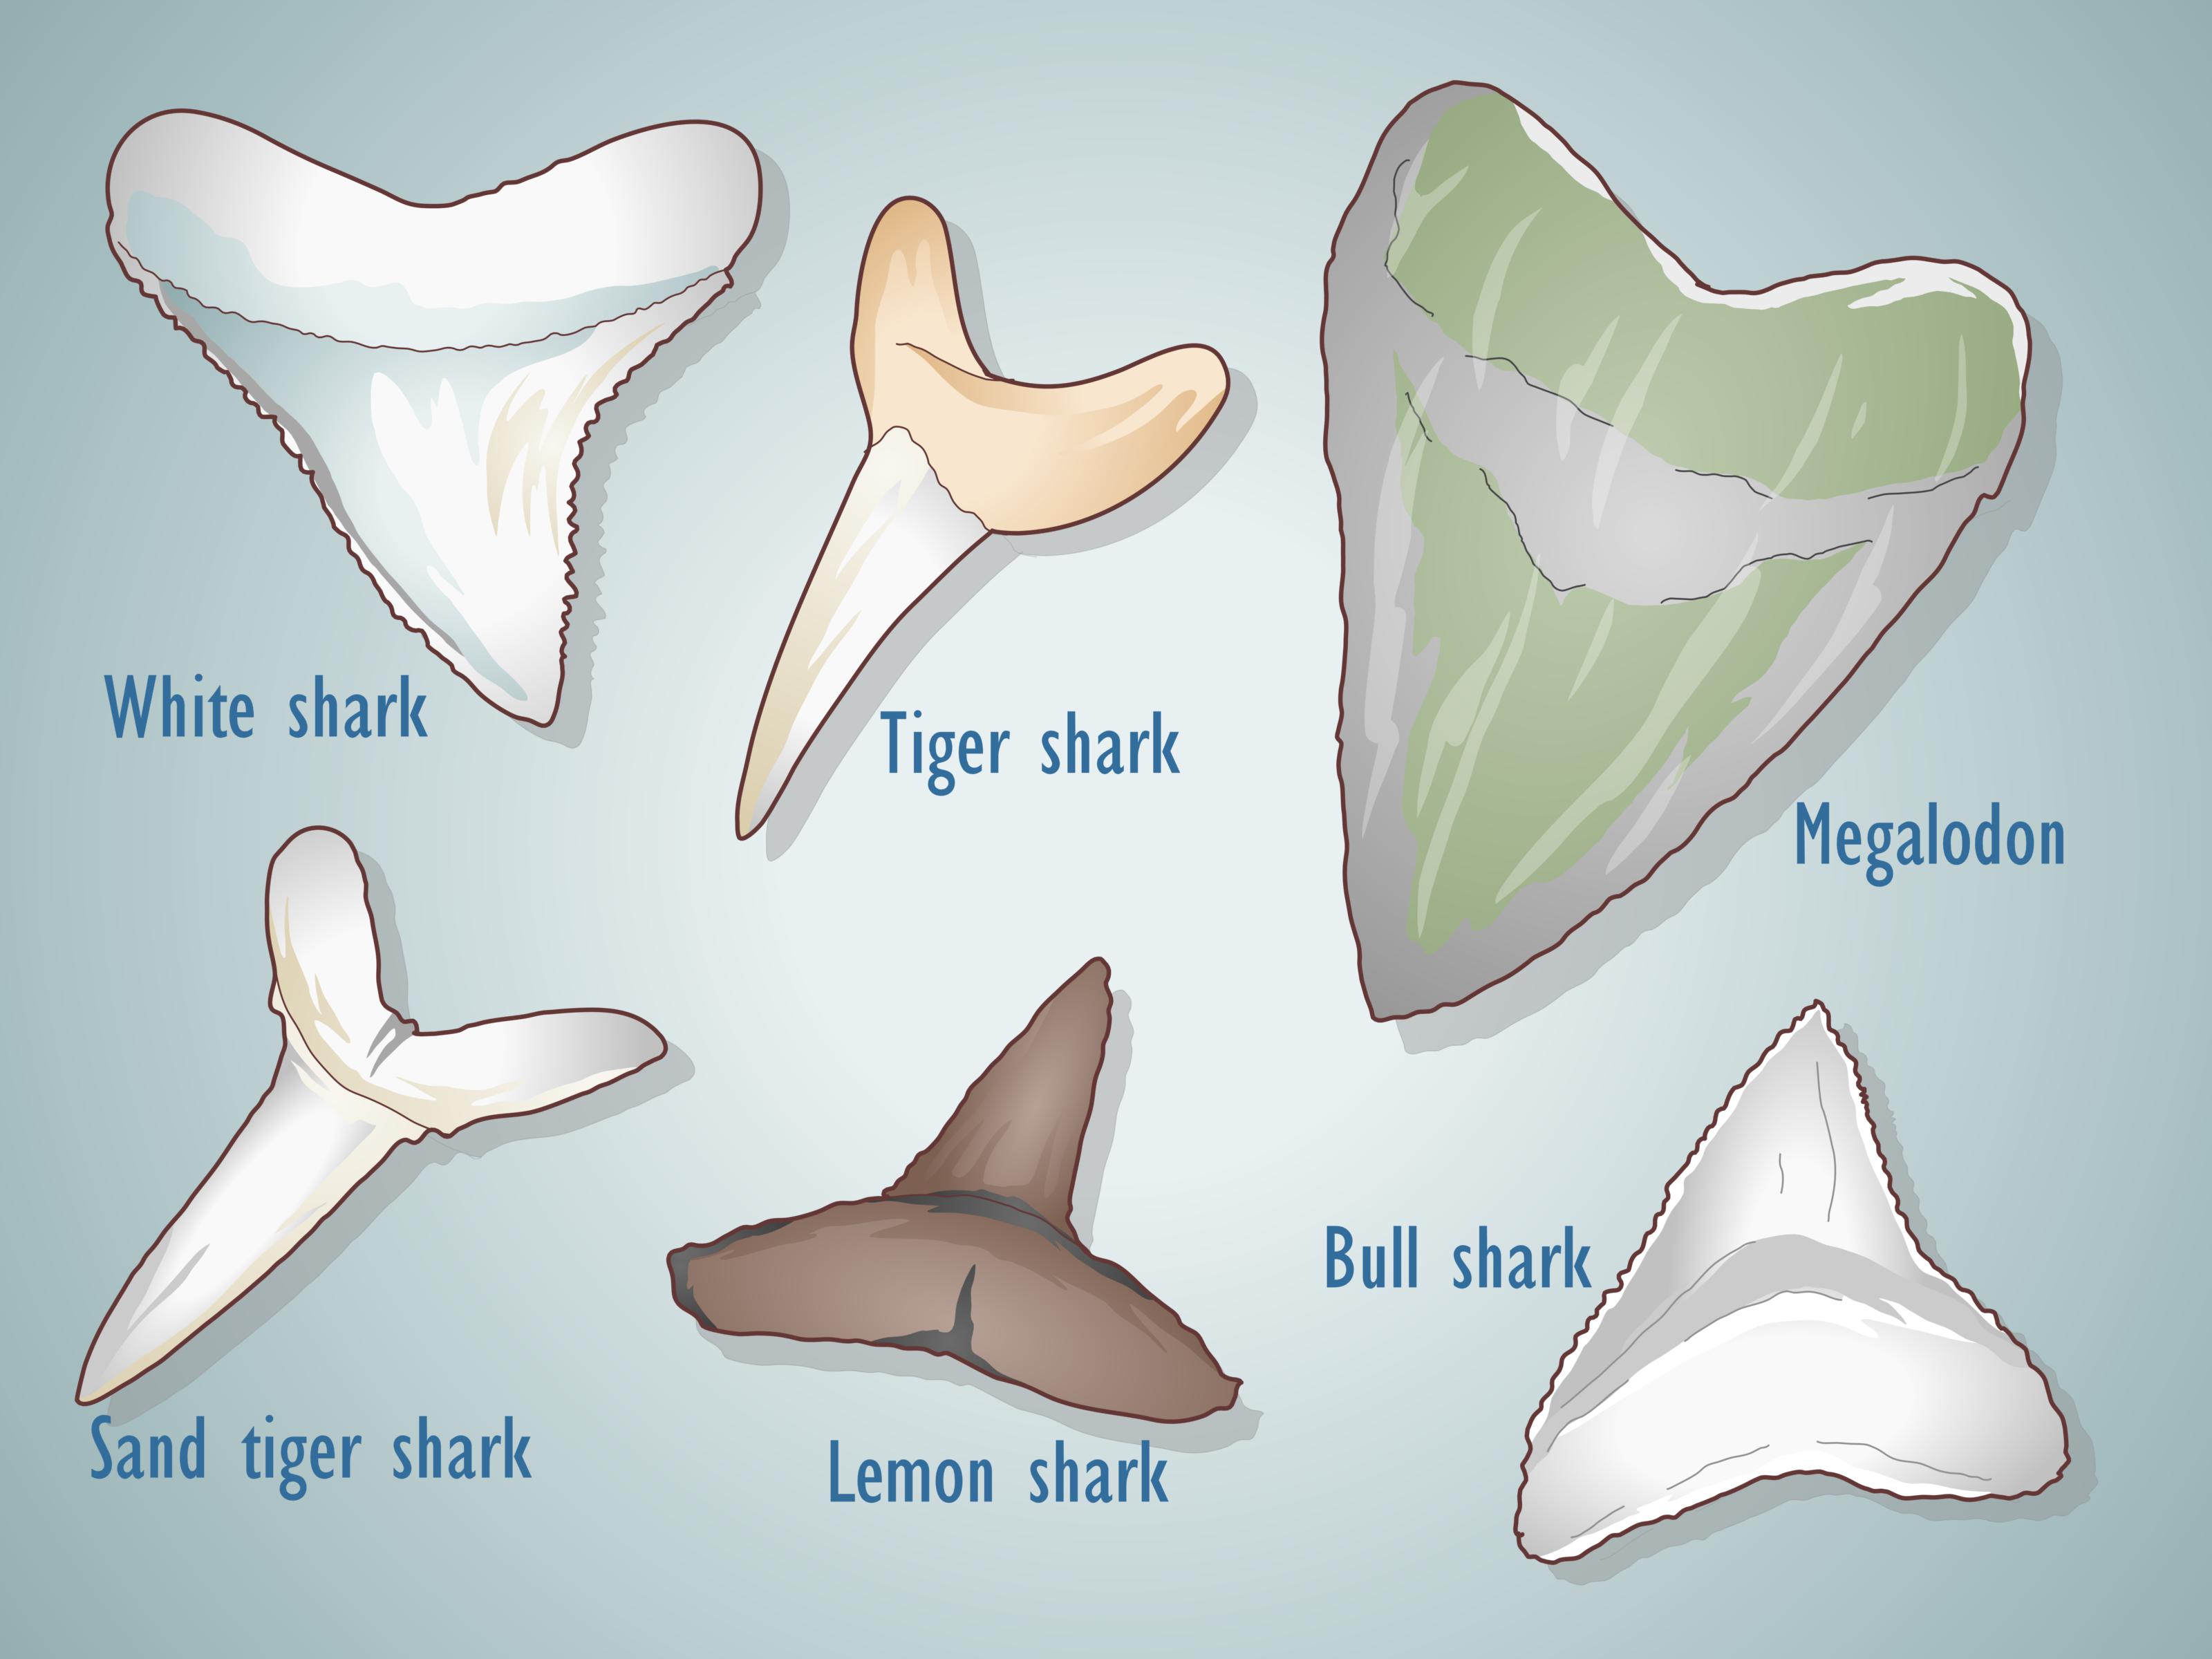
Shark teeth identification is not just about saying, “Yep, that looks pointy.” Real identification looks at shape, size, serrations, root structure, color, curvature, and where the tooth was found. A megalodon tooth, for example, is usually large, thick, triangular, and serrated. A sand tiger shark tooth is long, narrow, and needle-like, often with small side cusplets. A tiger shark tooth can look dramatically angled, almost like a can opener designed by nature after too much coffee.
This guide breaks the process into 15 practical steps, using real fossil-hunting principles, common shark tooth features, and beginner-friendly examples. You do not need a laboratory, a museum badge, or a dramatic documentary voice. A ruler, good light, patience, and curiosity will get you surprisingly far.
Why Shark Teeth Are So Common as Fossils
Sharks are cartilaginous fish, meaning their skeletons are made mostly of cartilage rather than bone. Cartilage usually does not fossilize as easily as hard bone. Teeth, however, are tougher and more mineralized, so they survive much better in sediment. Sharks also replace their teeth throughout life, losing and growing many teeth as they feed. That is why beaches, riverbeds, phosphate mines, and marine fossil sites can contain so many shark teeth compared with full shark skeletons.
Many fossil shark teeth are dark gray, brown, black, blue, or reddish because minerals in the sediment slowly replace or stain the tooth over time. Color is interesting, but it is not a reliable species ID by itself. A black tooth is not automatically megalodon, and a brown tooth is not automatically “less fossil.” The shape tells the real story; color is mostly the tooth’s fashion choice after spending thousands or millions of years underground.
How to Identify Shark Teeth: 15 Steps
Step 1: Confirm That It Is Actually a Tooth
Before naming the shark, first make sure the object is truly a shark tooth. Shark teeth usually have a distinct crown, which is the pointed enamel-covered blade, and a root, which is the wider base that anchored the tooth in the jaw. Shell fragments, crab claws, fish bones, and broken rocks can fool beginners, especially when wet and shiny.
A real shark tooth often has symmetry or repeated structure. Even if broken, it may show a smooth enamel surface, cutting edges, and a root with two lobes. If the object has no crown, no root, no cutting edge, and no tooth-like texture, it may be a very confident rock pretending to have a marine biology degree.
Step 2: Identify the Crown
The crown is the blade-like part of the tooth. Look at whether it is triangular, needle-shaped, curved, broad, narrow, serrated, or smooth. The crown gives major clues about what the shark ate and how it captured prey.
Broad triangular crowns usually suggest cutting teeth, commonly seen in sharks that sliced larger prey. Long, narrow crowns are better for gripping slippery fish. Angled or notched crowns may point toward tiger shark relatives. When identifying shark teeth, crown shape is one of the first features to examine carefully.
Step 3: Examine the Root
The root is the base of the tooth. Some roots are thick and blocky; others are thin, delicate, or divided into obvious lobes. Megalodon teeth often have heavy roots. Many smaller requiem shark teeth, such as those from bull, dusky, or gray sharks, have more compact roots.
Look for a root notch, also called a nutrient groove in some teeth. This indentation can help separate one group from another. However, roots are commonly damaged, especially after tumbling in surf or gravel, so do not panic if the root looks like it survived a washing machine full of seashells.
Step 4: Measure the Tooth Correctly
Measure from the tip of the crown to the farthest point of the root. This is usually called tooth height or slant height, depending on the method. Use a ruler with inches and millimeters if possible.
Size matters, but it can mislead beginners. A giant tooth may suggest megalodon, but young megalodons had smaller teeth, and some other fossil sharks also had impressive teeth. Likewise, a tiny tooth is not “unimportant.” Small fossil shark teeth can be easier to identify because delicate features, like cusplets and serrations, may remain visible.
Step 5: Check for Serrations
Serrations are tiny saw-like teeth along the cutting edge. Use a magnifying glass or phone camera zoom. Serrated teeth were useful for cutting flesh, while smooth-edged teeth often helped grasp prey.
Great white shark teeth are typically triangular and serrated. Megalodon teeth are also serrated, usually with a thick body and robust root. Mako-type teeth are often smooth-edged and pointed. If your tooth has clear serrations, note whether they are fine, coarse, worn, or uneven. A tooth with “almost invisible” serrations may simply be worn down, so check both edges under good light.
Step 6: Look for Side Cusplets
Cusplets are small points or mini-teeth beside the main crown. They are especially helpful when identifying sand tiger shark teeth and some older shark species. Sand tiger teeth often have a long central spike with small side cusplets near the root.
Some juvenile shark teeth can also show cusplets that adults may lack. This is one reason identification can feel tricky: shark teeth change by species, age, jaw position, and sometimes individual variation. Nature apparently did not design sharks for convenient labeling.
Step 7: Notice Whether the Tooth Is Symmetrical
Symmetry is a useful clue. Great white and megalodon teeth are often broadly triangular, though upper and lower teeth can differ. Sand tiger teeth are long and slender, often fairly symmetrical. Tiger shark teeth, on the other hand, are famously asymmetrical, with a slanted crown and a notched cutting edge.
If one side of the crown is dramatically longer, curved, or angled, do not force it into the “triangle tooth” category. That odd shape may be exactly what helps identify it.
Step 8: Study the Curvature
Hold the tooth sideways and look at how it curves. Some teeth lean backward, some twist slightly, and some remain fairly flat. Lower jaw teeth may be narrower and more upright, while upper jaw teeth may be broader or angled depending on the species.
Curvature can separate teeth that look similar at first glance. For example, a narrow smooth tooth might resemble a mako tooth, but the degree of curve, root shape, and thickness can change the likely identification.
Step 9: Compare Upper and Lower Jaw Teeth
A single shark can produce different-looking teeth in different parts of its mouth. Upper teeth and lower teeth may vary in width, angle, and shape. Great white lower teeth, for instance, tend to be narrower than upper teeth. Many sharks also have front, side, and rear teeth that look different.
This is where beginners often get confused. They compare one tooth to one perfect internet photo and say, “Mine does not match.” The better approach is to compare your find with multiple verified examples from the same species and jaw position.
Step 10: Use Location as a Clue
Where the tooth was found matters. A tooth from Florida, South Carolina, Maryland’s Calvert Cliffs, North Carolina, Georgia, or California’s marine fossil beds may come from different formations and time periods. Fossil shark teeth are often linked to ancient marine sediments, river deposits, phosphate beds, and eroding coastal cliffs.
Location will not identify the tooth by itself, but it narrows the possibilities. If a fossil site is famous for Miocene shark teeth, species common in that deposit become more likely. If the tooth was purchased, ask for collection location. “From somewhere near water” is not exactly museum-grade documentation.
Step 11: Separate Modern Teeth from Fossil Teeth
Modern shark teeth are usually white or cream-colored because they have not absorbed minerals over long periods. Fossil shark teeth are often darker and heavier-feeling. However, color alone is not proof of age. Some fossil teeth are light, and some modern teeth can become stained.
A modern white tooth may have a fresh, clean appearance, while a fossil tooth often has mineral staining, worn edges, and a dense feel. If you find a tooth on a beach known for fossils, it is more likely fossilized, but careful observation still beats guessing.
Step 12: Identify Common Shark Tooth Types
Here are several common types beginners should learn first:
- Megalodon: Large, thick, triangular tooth with serrated edges, a heavy root, and often a visible bourlette, which is a darker band between the crown and root.
- Great white shark: Broad triangular tooth with serrations, generally thinner than megalodon and lacking the same heavy bourlette structure.
- Mako shark: Long, pointed, smooth-edged tooth, often sleek and dagger-like.
- Sand tiger shark: Narrow, needle-like crown with smooth edges and small side cusplets.
- Tiger shark: Strongly angled, notched, serrated tooth that looks built for slicing.
- Cow shark: Comb-like tooth with multiple cusps, very different from the classic triangle shape.
- Gray or requiem sharks: Smaller triangular teeth, often harder to identify to exact species without expert comparison.
Learning these categories gives you a practical foundation. You may not identify every tooth perfectly, but you will stop calling everything “baby megalodon,” which is a major milestone in fossil maturity.
Step 13: Check for a Bourlette on Megalodon-Type Teeth
A bourlette is a band of material between the crown and root, often visible on megalodon and related megatooth shark teeth. It can look like a chevron-shaped strip. On worn teeth, the bourlette may be faint or missing.
Do not rely on size alone for megalodon identification. A strong megalodon ID usually considers size, thickness, serrations, triangular form, root structure, and the possible presence of a bourlette. A tooth that is big but smooth-edged may belong to another extinct shark, such as a mako-type or broad-toothed form.
Step 14: Watch for Damage and Wear
Fossil teeth often break. Tips snap off, roots erode, serrations wear down, and enamel cracks. A tooth that once had clear features may now look rounded and mysterious. This does not make it worthless; it just makes identification harder.
When a tooth is damaged, focus on the remaining clues. Does the crown seem broad or narrow? Are any serrations left near the base? Is the root thick or delicate? Is there evidence of cusplets? Even a partial tooth can often be placed into a general shark group.
Step 15: Compare with Reliable Guides and Ask Experts
After making observations, compare your tooth with reliable fossil identification guides, museum examples, university resources, and regional fossil references. Use several images, not just one. If you found the tooth at a known site, look for guides specific to that area.
For unusual teeth, local museums, fossil clubs, university paleontology departments, and natural history educators may be able to help. Provide clear photos from the front, back, side, and root, plus a ruler for scale and the location where it was found. A blurry photo of a black triangle in someone’s palm is charming, but it makes experts quietly reach for coffee.
Key Features to Record Before You Identify a Shark Tooth
Good identification begins with good notes. Before asking for help or comparing online, record these details:
- Tooth height and width
- Color and surface texture
- Crown shape
- Presence or absence of serrations
- Root shape and root thickness
- Side cusplets, if present
- Curvature or twist
- Collection location, if known
- Whether it was found loose, sifted, purchased, or inherited
These notes turn a random beach find into a real specimen record. Even casual collectors benefit from this habit because memory fades quickly. After three beach trips, “the black one from near the shells” becomes about as useful as a treasure map drawn by a seagull.
Common Mistakes Beginners Make
Mistake 1: Assuming Every Large Tooth Is Megalodon
Megalodon teeth are famous, valuable, and exciting, so beginners often want every large tooth to be one. But other extinct sharks also had large teeth. Look for the full combination of traits: triangular shape, serrations, heavy root, thickness, and possible bourlette.
Mistake 2: Using Color as the Main Identification Tool
Black does not mean megalodon. Brown does not mean tiger shark. Blue-gray does not mean “rare ocean wizard tooth.” Mineral color depends heavily on local sediment chemistry. Shape and structure matter more.
Mistake 3: Ignoring Broken Features
A broken root or missing tip can hide important clues. Always inspect what remains. Partial teeth can still reveal serrations, enamel texture, and original crown shape.
Mistake 4: Comparing Only One Photo
Shark teeth vary by jaw position, age, and species. Compare multiple examples from trusted collections. A single photo can lead you confidently in the wrong direction, which is still wrong, just with better posture.
Where People Commonly Find Shark Teeth
In the United States, fossil shark teeth are commonly found along certain beaches, riverbanks, dredge spoil areas, coastal cliffs, and marine fossil deposits. Well-known fossil regions include parts of Florida, South Carolina, North Carolina, Maryland, Virginia, Georgia, and California. Some beaches produce tiny teeth after storms, while river gravel beds may hold darker, heavier fossils.
Always check local collecting rules. Some parks, protected beaches, cliffs, and public lands restrict collecting, digging, or removing fossils. Safety matters too. Avoid unstable cliffs, deep mud, strong currents, private property, and areas where tides can trap you. No shark tooth is worth starring in a rescue report.
Field Experience: What Identifying Shark Teeth Feels Like in Real Life
The first time you search for shark teeth, your eyes will probably betray you. Every black shell fragment looks like a tooth. Every triangular rock seems promising. You bend down twenty times, pick up nineteen pieces of gravel, and begin to suspect the ocean is personally pranking you. Then, suddenly, you spot one. It has a clean point, a glossy crown, and a root that looks too organized to be random. That tiny moment is why people get hooked.
Experienced collectors often say that shark tooth hunting is about “training your eye.” At first, you search for objects. Later, you search for patterns. Shark teeth often stand out because they have a specific geometry: a pointed crown, a different-textured root, smooth enamel, or a triangular silhouette. Once your brain learns that shape, teeth seem to appear where you previously saw only sand and shell hash.
One useful habit is to search slowly along the shell line after waves retreat. Fossil teeth may collect with heavier material such as shell fragments, phosphate pebbles, bone pieces, and small stones. In rivers or creeks, gravel bars can hold teeth because moving water sorts objects by size and weight. Many collectors use screens where legal, but surface hunting can be just as satisfying, especially for beginners.
Lighting changes everything. Early morning and late afternoon sunlight can make enamel shine, while harsh overhead light can flatten details. Wet teeth are easier to spot because enamel reflects light. After rain, dark fossils may stand out beautifully against pale sand. Of course, wet shell fragments also become more dramatic, so you will still pick up plenty of impostors. Consider them practice fossils with commitment issues.
When you find a possible tooth, resist the urge to immediately scrub it. Rinse gently with clean water and inspect it first. Aggressive cleaning can damage fragile roots, worn serrations, or delicate cusplets. A soft toothbrush may be enough for sturdy specimens, but never use harsh chemicals on fossils unless you know exactly what you are doing. The goal is to identify the tooth, not give it a spa treatment that removes half the evidence.
Another real-world lesson: bring a small container. Pockets are where fossils go to become laundry legends. A plastic vial, padded box, or small bag keeps teeth from breaking. Label finds by location and date. Even simple labels like “Venice Beach, FL, June 2026” or “Calvert area, surface find” make your collection more meaningful later.
Identification also becomes easier when you sort your finds at home. Place all narrow teeth together, all triangular serrated teeth together, all broken roots together, and all “what on earth is this?” objects in a mystery pile. The mystery pile is important. Every collector has one. It keeps humility alive.
Over time, you will notice that not every tooth needs a perfect species name to be valuable. Sometimes “sand tiger-type tooth” or “requiem shark tooth” is a responsible identification. Fossil experts often use cautious language because tooth shape can overlap between species. Being accurate is better than being flashy. A correctly labeled common tooth is more impressive than a wildly guessed “rare megalodon cousin” based on pure enthusiasm and a dramatic thumbnail.
The best experience comes from combining field observation, careful measurement, comparison, and curiosity. Shark teeth are small records of ancient oceans. Each one tells a story about feeding, evolution, sediment, water movement, and deep time. Also, they look cool in a display case, which is not scientific language, but it is absolutely true.
Conclusion
Learning how to identify shark teeth is a practical skill that gets better with observation. Start by confirming the object is a tooth, then study the crown, root, serrations, cusplets, size, symmetry, curvature, and collection location. Compare your find with reliable examples and remember that exact species identification can be tricky, especially with worn or broken fossils.
The most important rule is simple: let the tooth’s features lead the way. Shape beats color. Structure beats guesswork. Good notes beat memory. And patience beats grabbing every black pebble on the beachalthough, honestly, everyone does that at first.
Whether your find turns out to be a megalodon tooth, a sand tiger tooth, a tiger shark tooth, or a humble mystery fossil, you are holding a small piece of marine history. That is the real thrill of shark tooth identification: the ocean leaves clues, and you get to solve the case.
Note: This article is written for educational web publishing and synthesized from established museum, university, fossil identification, and marine science knowledge. Always follow local fossil-collecting laws and safety guidelines.
