
Beauty Tools & Accessories
A Classic Rocking Horse Twist: DIY Wooden Rocking Toy Dog Plans
Sep
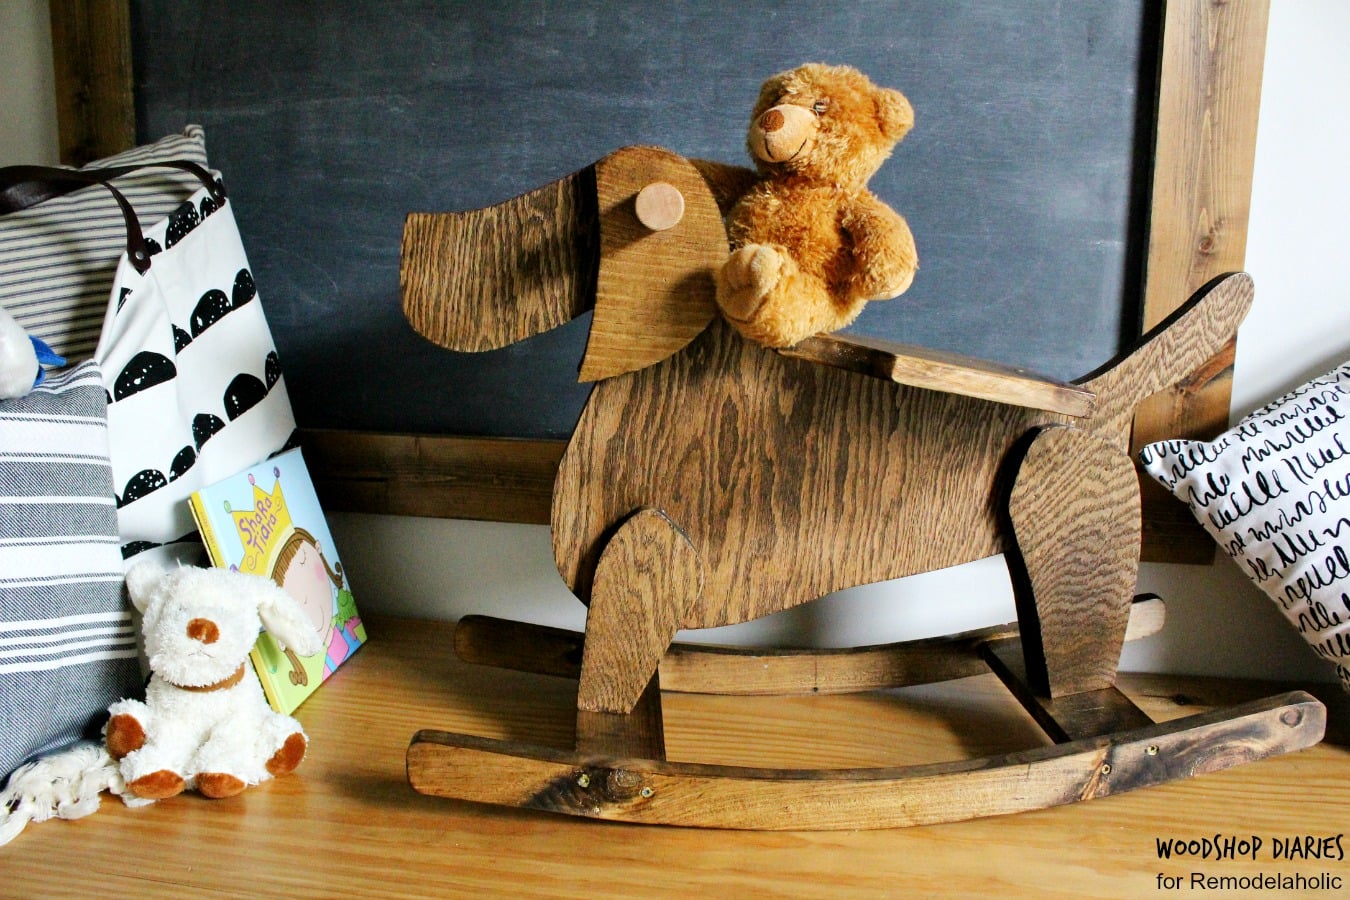
Some toys beep. Some toys flash. Some toys require seventeen tiny batteries, a prayer, and an engineering degree just to make the left ear blink. Then there is the wooden rocking toy: simple, sturdy, charming, and blessedly silent unless the rider provides the soundtrack. Better yet, a DIY wooden rocking toy dog gives the traditional rocking horse a playful twist. It keeps the nostalgic motion kids love, but swaps the usual pony for a loyal wooden pup that looks ready to guard the playroom and occasionally supervise snack time.
Building a wooden rocking dog is the kind of weekend woodworking project that feels both practical and sentimental. It can become a birthday gift, nursery centerpiece, holiday surprise, or heirloom toy that outlasts plastic trends by several decades. The design is approachable for confident beginners, especially if you use a printed template, a jigsaw, and patient sanding. The final result is not just a ride-on toy; it is a handmade object with personality, balance, and just enough dog-shaped charm to make adults say, “I could totally build that,” right before they go looking for clamps.
This guide walks through the planning, materials, construction approach, safety considerations, finishing options, and real-world lessons behind DIY wooden rocking toy dog plans. Think of it as a friendly shop companion: helpful, honest, slightly sawdusty, and very serious about rounding sharp edges.
Why Build a Rocking Dog Instead of a Rocking Horse?
The classic rocking horse has earned its place in childhood history. It is elegant, familiar, and endlessly giftable. But a rocking dog adds instant personality. A dog shape feels friendlier for toddlers, easier to stylize, and more flexible for decoration. You can make it look like a floppy-eared hound, a cheerful retriever, a spotted dalmatian, or a mystery breed known only as “garage terrier.”
From a woodworking perspective, a dog silhouette can also be simpler than a traditional horse. The head and body can be cut from sheet goods or solid boards using a template. The ears, tail, and face details can be painted rather than carved. The seat can remain flat and comfortable, while the rocker rails provide the familiar back-and-forth motion. In short, it gives you the emotional payoff of a classic wooden rocking toy without requiring advanced sculpture skills.
Planning the DIY Wooden Rocking Toy Dog
Start With the Rider
Before choosing wood or drawing a pattern, think about the child who will use the toy. A rocking dog for a toddler needs a low seat, wide stance, stable rockers, smooth edges, and secure handles. A decorative nursery rocker can be lighter and more stylized, but a ride-on toy must be designed for active use. Children do not “gently test” toys. They conduct field research with enthusiasm.
A practical toddler-friendly design often uses a seat height around 12 to 14 inches, a total length around 30 to 36 inches, and rocker rails wide enough to resist tipping. These are not universal rules, but they are a sensible starting point. The toy should allow the child’s feet to reach the floor or rest securely, and the rocking motion should feel controlled rather than wild. If it launches forward like a tiny wooden rodeo machine, revise the curve.
Choose a Build Style
There are two common ways to build a wooden rocking dog. The first uses layered plywood or solid panels cut into matching side profiles. These profiles form the dog’s body and connect with crosspieces, a seat, handles, and rocker rails. The second style uses separate legs, body panels, and a shaped head, more like a traditional rocking horse. The side-profile approach is usually easier for home woodworkers because both sides can be cut together, sanded together, and assembled symmetrically.
For most DIY builders, a template-based plywood plan is the friendliest option. It reduces guesswork and makes it easier to repeat curves. If you can trace a pattern, cut outside the line, sand to the line, and resist the urge to rush, you can produce a very respectable rocking dog.
Best Materials for a Wooden Rocking Dog
Wood Choices
Quality plywood is a smart choice for the main dog body and rocker rails. Look for cabinet-grade plywood with smooth faces and minimal voids. Baltic birch plywood is excellent when available because it has strong, consistent layers and clean edges. Standard 3/4-inch hardwood plywood can also work well if the edges are sealed and smoothed.
For solid wood details, maple, birch, poplar, beech, oak, or cherry are common choices. Poplar is easy to paint and budget-friendly. Maple and birch are durable and clean-looking. Oak is strong but has a more open grain. Avoid splintery, cracked, pressure-treated, or mystery scrap wood. Reclaimed wood can be charming, but for a child’s toy, you need to know it is clean, structurally sound, and free from old lead paint or questionable coatings.
Hardware and Fasteners
Use quality wood screws, dowels, and wood glue suitable for interior woodworking. For handles, a hardwood dowel around 1 inch to 1 1/4 inches in diameter is comfortable for small hands and strong enough for normal use. Screws should be countersunk and plugged or filled so no sharp metal edges remain exposed. If a part can loosen, wiggle, or become a small detachable piece, redesign it before a child discovers it with superhero determination.
Suggested Materials List
- One sheet or partial sheet of 3/4-inch cabinet-grade plywood for dog body panels and rockers
- Solid wood board for the seat, such as 1×8 or laminated hardwood
- Hardwood dowel for handles and optional footrests
- Wood glue rated for strong interior joints
- Wood screws, countersink bit, and plugs or filler
- Sandpaper in 80, 120, 180, and 220 grits
- Non-toxic paint, stain, or clear finish appropriate for children’s furniture or toys
- Painter’s tape, pencil, pattern paper, and optional carbon paper for transferring templates
Tools You Will Need
You do not need a professional shop to build a DIY wooden rocking toy dog, but you do need tools that can cut curves accurately and smooth edges thoroughly. A jigsaw is the most accessible tool for cutting the dog profile and rocker curves. A bandsaw is faster and cleaner if you have one. A router with a roundover bit makes the project look polished, though a sanding block can also soften edges if patience is your superpower.
- Jigsaw or bandsaw
- Drill and bits
- Clamps, preferably more than you think you need
- Orbital sander or sanding block
- Router with roundover bit, optional but helpful
- Measuring tape, square, pencil, and straightedge
- Safety glasses, hearing protection, and dust mask
Designing the Dog Shape
The silhouette is where the project becomes fun. Sketch a side view with a long body, friendly head, sturdy neck, and simple tail. Avoid thin, delicate shapes that may break. Floppy ears can be painted on rather than cut as fragile projections. A rounded snout, large painted eyes, and a curved tail can make the dog expressive without creating weak parts.
If drawing from scratch, use a grid. Draw a rectangle roughly the finished length and height of the dog body, then divide it into equal squares. Sketch the dog profile over the grid, keeping the belly high enough for the rocker assembly and the seat area flat enough for comfort. Once you like the shape, enlarge it onto pattern paper or cardboard. Cardboard templates are excellent because you can hold them up, squint, adjust, and pretend you are a toy designer from a charming old workshop.
Make Matching Parts
Symmetry matters. Clamp the two side panels together and cut them at the same time if your saw can handle the thickness safely. If not, cut one clean master piece, then trace it onto the second panel. Sand both together afterward so the profiles match. Matching sides help the seat sit level and the rocker rails track evenly.
Building the Rocker Rails
The rocker rails are the soul of the toy. Their curve determines whether the motion is gentle and soothing or dramatic enough to concern the family dog. A shallow arc usually creates a calmer ride. A very steep arc can feel unstable. For a child’s rocker, gentle is better.
Draw the rocker rail curve using a long flexible strip of wood, a string-and-pencil method, or a printed template. Make both rockers identical. The front and back tips should extend beyond the body enough to prevent tipping, but they should not be so long that they become tripping hazards. Rounded stop-like ends can help limit the motion. Every edge on the rails should be softened because small feet will find them.
Test the Rock Before Final Assembly
Dry-fit the body, seat, cross supports, and rocker rails before glue-up. Place the toy on a flat surface and gently rock it with weight on the seat. The motion should be smooth, and the dog should return naturally without twisting. If one rocker touches before the other, check for uneven curves, misaligned supports, or a garage floor that is secretly shaped like a potato chip.
Step-by-Step Assembly Overview
Step 1: Transfer and Cut the Templates
Trace the dog body, rocker rails, and any decorative pieces onto the wood. Cut slightly outside the lines. This gives you room to sand to the final shape. Rushing the cut line is how a cute puppy becomes a suspicious woodland creature.
Step 2: Sand the Profiles
Sanding is not the glamorous part, but it is the difference between “handmade heirloom” and “splinter delivery device.” Begin with 80 or 120 grit to refine the curves, then move to 180 and 220 grit. Smooth every edge that a child can touch: body, rails, seat, handle ends, and the underside.
Step 3: Build the Seat Support
Install cross supports between the two dog body panels. These supports create the toy’s width and give the seat something solid to attach to. Keep them square. Use glue and screws, then countersink the screw heads. The seat should be wide enough for comfort but not so wide that it encourages side-to-side tipping.
Step 4: Attach the Rocker Rails
Position the rockers evenly on both sides. Many builders use vertical supports or legs between the body and rails. The goal is a strong connection that distributes weight across the rail rather than concentrating stress at one screw. Dry-fit, measure, clamp, and check alignment before fastening permanently.
Step 5: Add Handles and Footrests
A hardwood dowel through the head or neck area makes a natural handle. Drill clean holes, test the fit, glue the dowel, and make sure both ends are rounded. Optional footrests can be added lower on the body, but only if they do not interfere with rocking motion. Keep all dowel ends large, smooth, and securely attached.
Step 6: Detail the Dog
Now comes the personality. Paint a nose, eyes, ears, collar, spots, or a name tag. Avoid glued-on buttons, beads, plastic eyes, or small decorations that can detach. Painted details are safer and more durable. A wooden dog does not need rhinestones to have charisma. It already has a tail.
Safety Considerations for a Ride-On Wooden Toy
Safety should guide every design choice. Build for strength, stability, smoothness, and age-appropriate use. A rocking toy should never have sharp points, sharp edges, pinch points, loose hardware, or small removable parts. If the toy is intended for children under three, be especially cautious about anything that could break off and become a choking hazard.
Round over every exposed edge. Sand thoroughly. Seal plywood edges so they do not splinter. Check the toy under real pressure before giving it to a child. Push, pull, rock, twist, and inspect. If something creaks ominously, do not call it “rustic character.” Fix it.
Stability Checklist
- The rocker rails are identical and sit flat on the floor.
- The toy does not tip easily to either side.
- The seat is centered and securely attached.
- Handles cannot rotate or pull out.
- All screws are countersunk, plugged, or otherwise inaccessible.
- No decorative part can detach during normal use.
- The rocking motion is gentle and controlled.
Finishing Options: Paint, Stain, or Natural Wood?
The finish protects the wood and defines the look. For a colorful playroom toy, paint is the easiest way to create a friendly dog. Use a non-toxic paint appropriate for children’s items, and allow it to cure fully according to the manufacturer’s directions. For a natural heirloom look, use a clear finish that highlights the wood grain. Water-based polyurethane is popular for indoor projects because it dries clear and provides durable protection. Natural oil-and-wax finishes can look beautiful, though they may need more maintenance.
Whatever finish you choose, read the label carefully. Look for products intended for interior furniture, children’s furniture, toys, or surfaces that may be handled frequently. Apply thin coats, sand lightly between coats if recommended, and allow a full cure before use. Dry to the touch is not the same as fully cured. Toddlers are basically quality-control inspectors with applesauce on their hands, so give the finish time to harden.
Customization Ideas
A DIY wooden rocking dog is easy to personalize. Add the child’s name on the collar or side panel. Paint the dog to resemble a family pet. Use neutral nursery colors for a modern look, or go full storybook with bright spots and a red collar. You can even make matching mini versions as shelf decor if you have leftover wood and a healthy tolerance for tiny sanding.
For a timeless design, keep the main body natural and paint only the ears, nose, and collar. For a playful design, use bold colors and simple shapes. For a farmhouse style, use white paint with lightly distressed edges, but avoid heavy distressing on areas the child will touch because rough texture can become uncomfortable.
Common Mistakes to Avoid
Making the Rockers Too Curvy
A dramatic curve may look fun on paper, but it can create a ride that feels unstable. Keep the arc gentle and test it before final assembly.
Skipping the Dry Fit
Dry-fitting catches problems before glue makes them permanent. Assemble the major pieces with clamps first, check square, and test the balance.
Using Weak Decorative Details
Thin ears, tiny tails, glued-on eyes, and small buttons may look cute but can break. Use strong shapes and painted details instead.
Underestimating Sanding Time
Wooden toys need extra smoothing. If you think you are done sanding, run your hand over every edge. If it feels even slightly sharp, keep going. Your future self will thank you, and so will every small rider wearing shorts.
Experience Notes: What Building a Rocking Toy Dog Teaches You
Building a DIY wooden rocking toy dog is one of those projects that looks simple until you realize it combines furniture making, toy design, sculpture, and child safety into one cheerful little animal. The first lesson is that templates are your best friend. Freehand confidence is admirable, but matching curves on two sides of a ride-on toy requires consistency. A cardboard template lets you adjust the head shape, seat position, and rocker curve before committing to wood. It is much easier to erase a pencil line than to explain why the finished dog looks like it just heard surprising news.
The second lesson is that the rocker curve matters more than most beginners expect. A beautiful dog body will not save a toy that rocks awkwardly. During test fitting, place weight on the seat and watch how the rails contact the floor. The motion should feel smooth from front to back, with no sudden drop at the ends. If the dog lunges forward, flatten the curve or add subtle stops. If it barely moves, increase the arc slightly. The best rocking motion feels gentle enough for a toddler but lively enough to be fun.
The third lesson is that sanding is where the toy becomes lovable. Fresh-cut plywood can have sharp edges, fuzzy grain, and tiny splinters. After routing or hand-rounding the edges, the whole project changes character. It goes from “shop project” to “toy.” Spend extra time on the handles, seat front, rocker ends, and anywhere feet might rub. A smooth handle is especially important because children grip hard when they rock. They are not politely holding a teacup; they are piloting a wooden dog across the living room frontier.
The fourth lesson is to keep decoration simple. Painted eyes and a painted collar are safer than glued-on parts. A bold silhouette often looks better than fussy detail. One of the nicest approaches is to let the wood show and add only a few painted accents: black nose, soft ears, white chest patch, and a collar with the child’s name. The result feels handmade without becoming visually noisy.
The fifth lesson is emotional: handmade toys carry stories. The little imperfections that might bother you in the shop often become the details people love later. A slightly wavy painted spot, a visible plug, or a hand-shaped curve reminds everyone that this was built by a person, not stamped out by a machine. Of course, “handmade charm” does not apply to loose screws, sharp edges, or wobbly rails. Those are not character. Those are homework.
Finally, this project teaches patience. Let glue dry. Let finish cure. Test everything twice. The reward is a toy that can sit in a child’s room like a friendly wooden companion and still be sturdy enough for everyday play. A DIY wooden rocking dog is not just a twist on a rocking horse; it is a reminder that good toys do not need screens, sounds, or complicated features. Sometimes all they need is a smooth curve, a wagging tail, and someone willing to make sawdust on purpose.
Conclusion
A classic rocking horse will always have its place, but the DIY wooden rocking toy dog brings a fresh, funny, and deeply personal spin to the tradition. It is approachable enough for a careful weekend woodworker and meaningful enough to become a keepsake. With a strong template, stable rocker rails, smooth rounded edges, safe finishes, and sturdy joinery, you can build a ride-on toy that looks adorable and performs reliably.
The heart of the project is not perfection. It is thoughtful making. Choose good wood, avoid small detachable parts, test the balance, and give the finish time to cure. Add a painted nose, a friendly eye, maybe a collar with a name, and suddenly a few boards become a companion. That is the magic of woodworking: one minute you are covered in dust, and the next you have built a dog that rocks but never barks at the mail carrier.
SEO Tags

