Beauty Tools & Accessories
How to Make a Cute Bottle Cap Reindeer Ornament
Jun
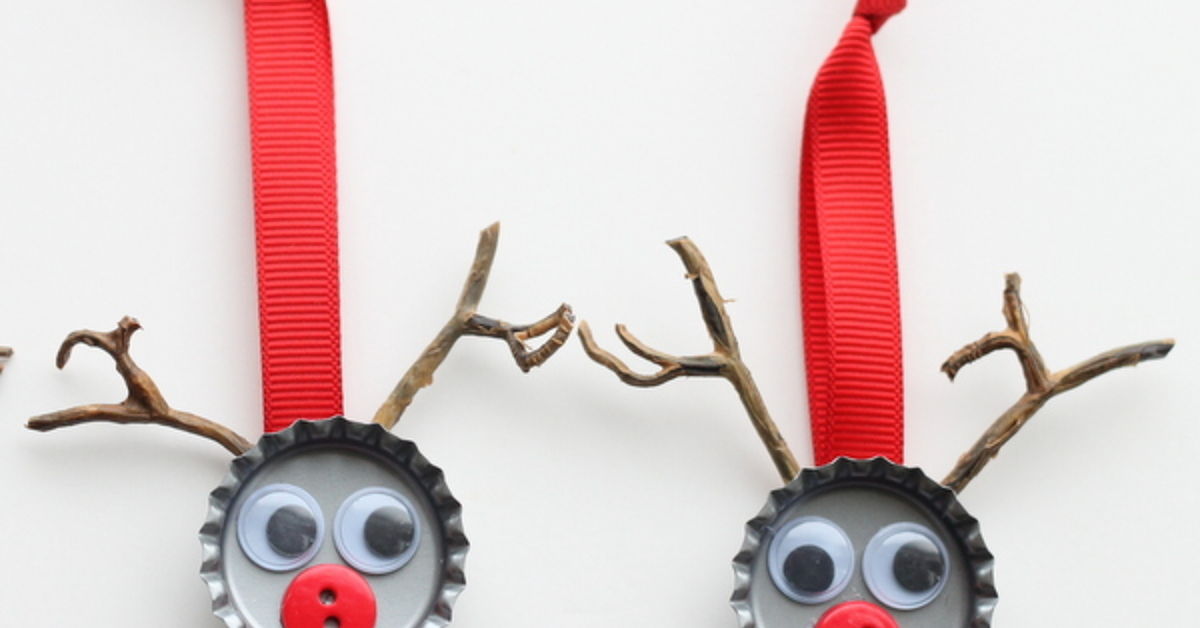
There is something wonderfully sneaky about turning a humble bottle cap into Christmas decor. One minute it is sitting in the recycling bin, minding its own business. The next, it has googly eyes, a bright red nose, curly antlers, and a reserved seat on the tree. A cute bottle cap reindeer ornament is one of those tiny holiday crafts that looks far more impressive than it is difficult.
This DIY Christmas ornament is inexpensive, easy to personalize, and ideal for a craft night, classroom activity, family gathering, or rainy December afternoon. Better yet, every finished reindeer has a slightly different expression. Some will look cheerful. Some will look surprised. One may look like it has just discovered it is scheduled to pull a sleigh across the sky on Christmas Eve.
Below is a simple, practical guide to making a bottle cap reindeer ornament that looks polished enough to hang on the tree, tie onto a gift, or tuck into a stocking. You only need a few supplies, a little patience, and the willingness to let your reindeer develop some personality.
Why Make a Bottle Cap Reindeer Ornament?
A bottle cap reindeer ornament checks several holiday boxes at once. It is an upcycled bottle cap craft, a handmade keepsake, a quick decorating project, and a clever way to use tiny leftover supplies such as pom-poms, ribbon scraps, felt, paint, and pipe cleaners. You can make a single ornament in a short sitting, but the project is even more fun when you create a whole herd.
The small size is part of the charm. A reindeer made from a bottle cap does not need perfect antlers or artist-level painting skills. Its little imperfections make it feel handmade. The goal is not to create a museum-quality woodland creature. The goal is to create a reindeer so cute that guests notice it before they notice the expensive ornaments.
Supplies You Will Need
Gather the following materials for each bottle cap reindeer ornament:
- One clean metal bottle cap
- Brown acrylic craft paint
- A small paintbrush or foam brush
- Two small googly eyes, black paint dots, or a black paint marker
- One small red pom-pom for the nose
- Brown pipe cleaner, craft wire, or thin felt for antlers
- Twine, ribbon, embroidery floss, or thin cord for the hanger
- Low-temperature hot glue or a strong craft adhesive suitable for metal
- Optional details: white paint, glitter, mini bells, felt scraps, clear sealer, name tags, or metallic paint
Choose bottle caps that are not heavily bent, rusty, or jagged. A cap with a clean circular shape gives your ornament the best face shape. If you are making several ornaments, collect caps in advance and wash them together. This is much easier than stopping mid-craft to hunt for another cap because your first reindeer somehow turned into an abstract moose.
How to Prepare Bottle Caps for Crafting
Start by rinsing the caps and washing them with warm, soapy water. Let them dry completely before painting or gluing. Paint and adhesive both behave better on a clean, dry surface, and nobody wants their handmade ornament to smell like yesterday’s soda.
Check the interior of each cap. If the liner is loose or peeling, remove only the loose pieces. If it is firmly attached, you can leave it in place and cover it with felt, glue, or a small backing circle later. Avoid caps with sharp, damaged edges. It is better to choose another cap than to wrestle with one that seems determined to become a tiny medieval weapon.
Step-by-Step: Make a Cute Bottle Cap Reindeer Ornament
1. Paint the Reindeer Face
Place the bottle cap with its flat exterior facing up. This will become the front of your reindeer’s face. Apply a thin coat of brown acrylic paint over the flat surface and around the ridged edge. Let it dry, then add a second light coat if needed.
Thin coats are better than one thick coat. A thick layer can fill the cap’s ridges and make the ornament look more like a chocolate coin than a reindeer. You can use classic brown, caramel, tan, copper, or even white for a snowy reindeer look. There are no official North Pole paint rules, so have fun with it.
2. Make and Attach the Antlers
Cut a short piece of brown pipe cleaner, about 3 to 4 inches long. Fold it in half to create a soft V shape. Twist two tiny pieces of pipe cleaner around each side to form branches. These do not need to be symmetrical. Real antlers are not identical, and your reindeer will not file a complaint.
Turn the cap over so the interior faces up. Add a small dot of adhesive near the upper inside edge and press the folded center of the antlers into place. Hold them steady until the glue begins to set. Add a second small dot of glue over the base if needed for reinforcement.
For a flatter ornament, cut antlers from brown felt or cardstock instead. Glue the felt antlers to the back of the cap, with the tips extending above the top edge. This version works especially well for gift tags and greeting cards because it does not stick out as far.
3. Add the Eyes and Nose
Turn the bottle cap back over so the painted side faces you. Glue two small googly eyes toward the upper half of the cap. Leave enough room below them for the nose. If you prefer a more modern look, use a black paint marker to draw two simple dot eyes with tiny curved lashes or eyebrows.
Glue a red pom-pom near the lower center of the face. This is the moment your ornament officially becomes a reindeer instead of a suspiciously cheerful bottle cap. A red nose gives a classic Rudolph-inspired look, but pink, gold, silver, or plaid fabric circles also work beautifully.
Optional: Use a fine-tip paint marker to add tiny white highlights in the eyes, a small smile, rosy cheeks, or freckles. Keep the details simple. The cap is tiny, and too many details can make the reindeer look like it is preparing for a holiday red-carpet event.
4. Create a Secure Hanging Loop
Cut a 4- to 5-inch piece of twine, ribbon, or thin cord. Fold it in half and bring the loose ends together. Glue the loose ends to the upper inside back of the cap, right below the antlers. This creates a loop for hanging.
For extra support, glue a small felt circle over the ribbon ends after the first layer of adhesive has set. The felt hides the glue and gives the back a neater finish. Let the ornament rest flat until everything has dried well. Do not test the hanger too early unless you enjoy watching your reindeer attempt a very short flight.
5. Add a Finishing Touch
You can leave the ornament simple or add one extra detail. Tie a tiny ribbon bow below one antler. Glue on a mini bell. Add a small felt scarf. Paint the cap edge gold. Write the year on the back with a permanent marker. These small additions turn a basic reindeer Christmas craft into a keepsake that feels personal.
Once the glue and paint are fully dry, hang your bottle cap reindeer ornament on the tree, attach it to a wrapped present, or display several on a mini tabletop tree. A group of five or six looks especially charming because every reindeer will have its own expression and wildly different antler confidence.
Fun Bottle Cap Reindeer Ornament Variations
Classic Rudolph
Use brown paint, black eyes, a bright red pom-pom nose, and simple pipe-cleaner antlers. Add a tiny green ribbon bow for a traditional Christmas look.
Rustic Woodland Reindeer
Use tan or muted brown paint, jute twine, felt antlers, and a small plaid scarf. A dab of white paint around the edge can make the ornament look lightly dusted with snow.
Glam Reindeer
Paint the cap metallic gold, bronze, silver, or rose gold. Use glitter pipe cleaners for antlers and a rhinestone or shiny bead for the nose. This version is perfect for a tree with coordinated ornaments and zero tolerance for boring decor.
Personalized Family Herd
Write each family member’s name on the back of a reindeer ornament, then add the year. Create one for every child, pet, grandparent, or friend. Over time, your tree can become a full reindeer roster with more personality than some office meetings.
Common Problems and Easy Fixes
The paint looks streaky: Let the first coat dry completely, then add a second thin coat. Avoid loading too much paint onto the brush.
The antlers keep shifting: Use a smaller amount of glue and hold the antlers in position until the adhesive begins to set. A felt backing circle can help secure the base.
The ornament hangs crooked: Move the hanging loop slightly closer to the top center of the cap. Test it by holding the loop before the glue fully cures, then adjust carefully.
The pom-pom falls off: Make sure the painted surface is dry before gluing. Use an adhesive that works on both metal and fabric or foam materials, and allow enough curing time before hanging the ornament.
The reindeer looks too plain: Add only one or two details, such as a scarf, bow, bell, painted cheeks, or a little sparkle. Tiny ornaments can get crowded quickly, so think “festive accent” rather than “holiday supply explosion.”
How to Store Handmade Bottle Cap Ornaments
Place each ornament in a small compartmented box, egg carton, or tissue-lined container after the holidays. Keep them away from moisture and direct sunlight, especially if you used paint, glitter, or paper details. If the antlers are made from pipe cleaners, avoid stacking heavy decorations on top of them unless you want every reindeer to look as though it just finished a very stressful winter commute.
Handmade ornaments also make sweet gift toppers. Tie one onto a wrapped present, write the recipient’s name and the year on the back, and let the ornament become part of the gift. It is a thoughtful touch that costs very little but feels surprisingly special.
Hands-On Experiences: Why This Tiny Craft Becomes a Big Holiday Memory
Making a cute bottle cap reindeer ornament is one of those small holiday experiences that tends to grow into something bigger than expected. At first, it feels like a simple craft project: paint a cap, glue on a nose, twist some antlers, and call it done. But once several people are sitting around a table with ribbon scraps, paintbrushes, and a bowl full of bottle caps, the project turns into a miniature holiday event.
The best part is that everyone approaches the same materials differently. One person carefully measures each antler branch as though they are designing a luxury reindeer condominium. Another person uses glitter on absolutely everything. Someone will insist their reindeer needs sunglasses. Someone else will create a reindeer with three eyes by accident and decide it is “from a magical alternate forest.” That is where the real charm lives.
This project also works well because it has a low-pressure rhythm. You do not need expensive equipment, complicated patterns, or a craft room that looks like it belongs in a magazine. A kitchen table, a few old newspapers, and a handful of supplies are enough. People can talk, snack, listen to music, and craft at the same time. The ornament becomes a small marker of that shared moment.
For families, bottle cap ornaments can become an annual tradition. Save caps throughout the year, then make a new reindeer for each person every December. Write names, dates, inside jokes, or memorable events on the back. Years later, those tiny decorations can tell a story. One might remind you of a child’s first school holiday concert. Another might bring back memories of a snowy vacation, a new pet, a favorite song, or the year everyone became obsessed with matching pajamas.
There is also something satisfying about transforming an everyday object into a keepsake. Bottle caps are easy to overlook. They are usually tossed away without a second thought. Turning one into a handmade reindeer ornament gives it a strange little second career. Suddenly, it is no longer packaging. It is decoration, memory, personality, and proof that even the smallest things can become part of a celebration.
For teachers, party hosts, and gift-makers, the craft offers another advantage: it is easy to adapt. You can prepare the caps in advance, offer a few decoration choices, and let each person finish at their own pace. The result is never identical, which is exactly the point. A handmade ornament should look handmade. Perfectly matching reindeer are nice, but a lopsided antler or oversized red nose often becomes the one everyone remembers.
When the holiday season feels rushed, a tiny craft like this creates a reason to slow down. It gives your hands something simple to do while your mind takes a break from shopping lists, cooking plans, and calendar reminders. In the end, your tree gets a new ornament, but you also get a small memory attached to it. That is a pretty good return for one bottle cap, a pom-pom, and a little glue.
Conclusion
A bottle cap reindeer ornament proves that holiday decorating does not need to be expensive, complicated, or perfectly polished to be meaningful. With a clean cap, a little paint, a red pom-pom nose, and creative antlers, you can make a charming DIY Christmas ornament in no time. Make one for yourself, create a whole reindeer herd with family, or use them as personalized gift toppers. The best ornaments are often the ones with a story behind them, even when that story begins in the recycling bin.
