Beauty Tools & Accessories
Using The 555 For Everything
Jun
The 555 timer IC is the electronic equivalent of duct tape, a pocket knife, and that one friend who somehow owns every tool. Need a blinking LED? Use a 555. Need a delay before a relay turns on? Use a 555. Need a tone generator, a pulse train, a crude synthesizer, a PWM motor controller, a missing-pulse detector, or a tiny circuit that seems smarter than it has any right to be? You already know where this is going: use the 555.
Since its introduction in the 1970s, the 555 timer has become one of the most beloved integrated circuits in electronics. The classic NE555 and LM555 versions are inexpensive, forgiving, easy to breadboard, and capable of doing timing jobs from very short pulses to long delays when paired with the right resistors and capacitors. Newer CMOS versions, such as low-power 555 timers, make the same basic idea friendlier for battery-powered projects.
This guide looks at why makers, engineers, repair tinkerers, students, and professional circuit designers keep reaching for the 555 timer IC. More importantly, it explains how one humble 8-pin chip can act like a timer, oscillator, latch, pulse generator, PWM source, LED flasher, sound maker, and general-purpose “please make this happen after a while” device.
What Is the 555 Timer IC?
The 555 timer is a small integrated circuit designed to generate accurate time delays and oscillating signals. In plain English, it helps a circuit decide when to turn something on, when to turn it off, and how often to repeat that behavior. That may sound simple, but timing is everywhere in electronics. A blinking light, a door alarm, a debounced push button, a tone generator, and a pulsed motor driver all need timing.
Inside the chip are comparators, a flip-flop, a discharge transistor, and a resistor divider that creates reference voltage levels. Those internal parts work together with external resistors and capacitors. The external capacitor charges and discharges, and the chip watches the voltage rise and fall. When the voltage crosses certain thresholds, the output changes state. That is the 555’s basic magic trick.
The beauty of the 555 timer circuit is that it does not ask you to write code, install libraries, flash firmware, or argue with a USB driver at midnight. You choose a resistor, choose a capacitor, connect a few pins, and the chip does the job. It is analog enough to feel physical and digital enough to feel decisive. That is why beginners learn from it and experts still respect it.
Why People Joke About Using the 555 for Everything
The phrase “using the 555 for everything” exists because the chip is ridiculously versatile. It is not always the perfect solution, but it is often a solution. That distinction matters. A microcontroller may be better for complex logic. A crystal oscillator may be better for precision timing. A dedicated LED driver may be better for polished lighting products. But when you need a simple, cheap, rugged circuit that works with a handful of parts, the 555 timer is hard to beat.
Part of its charm is availability. You can find 555 timers in hobby kits, repair drawers, school labs, online component shops, and dusty bins labeled “probably useful someday.” The standard DIP-8 package is friendly to breadboards, which makes it perfect for learning. Surface-mount versions fit modern compact designs. Dual versions, often called 556 timers, place two timers in one package, and related multi-timer parts extend the idea even further.
The other reason is confidence. Once you understand the three main 555 modesmonostable, astable, and bistableyou start seeing projects as timing problems. A night light becomes a threshold-and-delay problem. A siren becomes an oscillator problem. A toy becomes a pulse problem. Suddenly, the 555 is not just a chip. It is a tiny problem-solving philosophy with legs.
The Three Big 555 Timer Modes
Monostable Mode: The One-Shot Timer
In monostable mode, the 555 produces one output pulse when triggered. This is why it is often called a one-shot circuit. Press a button, trip a sensor, or send a trigger pulse, and the output turns on for a set amount of time before returning to its normal state.
The length of the pulse is determined by a resistor and capacitor. A common design rule is that the pulse width is approximately 1.1 × R × C. Increase the resistor or capacitor and the pulse gets longer. Decrease them and the pulse gets shorter. This makes monostable mode useful for delay timers, push-button extenders, camera triggers, relay timers, and circuits where a brief input needs to become a clean, predictable output.
Example: imagine a door sensor that only closes for a split second. A 555 timer in monostable mode can stretch that tiny signal into a two-second alarm pulse. It is like telling the circuit, “I know the door just whispered, but please shout about it for a moment.”
Astable Mode: The Free-Running Oscillator
In astable mode, the 555 does not wait for a trigger. It runs continuously, switching its output high and low over and over. This produces a rectangular wave, which is useful for blinking LEDs, generating tones, creating clock pulses, driving counters, and producing simple pulse-width modulation effects.
The frequency and duty cycle depend on two resistors and one capacitor. A common frequency approximation is 1.44 divided by the product of the capacitor and the resistor combination. In practice, you can use calculators, formulas, or experimentation to choose values. That last option is especially popular among hobbyists, because turning a potentiometer and watching an LED blink faster is more satisfying than it has any scientific right to be.
Astable mode is where the 555 becomes a little rhythm machine. Slow it down and it flashes lights. Speed it up into the audio range and it makes tones. Use it to feed another IC and it becomes a clock source. Pair two 555 timers together and you can create warbling sirens, stepped tones, or blinking patterns that look like your breadboard is trying to communicate with aliens.
Bistable Mode: The Simple Latch
In bistable mode, the 555 acts like a set-reset latch. It has two stable states: on and off. One input can set the output high, and another can reset it low. Unlike monostable mode, it does not time out automatically. It stays where you put it until another signal changes it.
This makes bistable mode useful for push-button toggles, simple memory functions, switch debouncing, and control circuits. It is not a replacement for complex digital logic, but for a simple latch, it is delightfully practical. Think of it as the 555 saying, “Tell me once, and I’ll remember until told otherwise.” Not bad for a chip that costs less than many vending-machine snacks.
Popular 555 Timer Projects
LED Flashers and Blinkers
The classic first 555 timer project is the blinking LED. In astable mode, the output repeatedly turns on and off, making an LED flash. Add a potentiometer and you can control the blink rate. Add two LEDs in opposite output paths and you can make alternating flashes.
This circuit teaches several important concepts at once: resistor current limiting, capacitor charging, output states, frequency, and duty cycle. It is simple enough for beginners but still useful in real projects, such as indicators, warning lights, model vehicles, signage, or attention-grabbing gadgets.
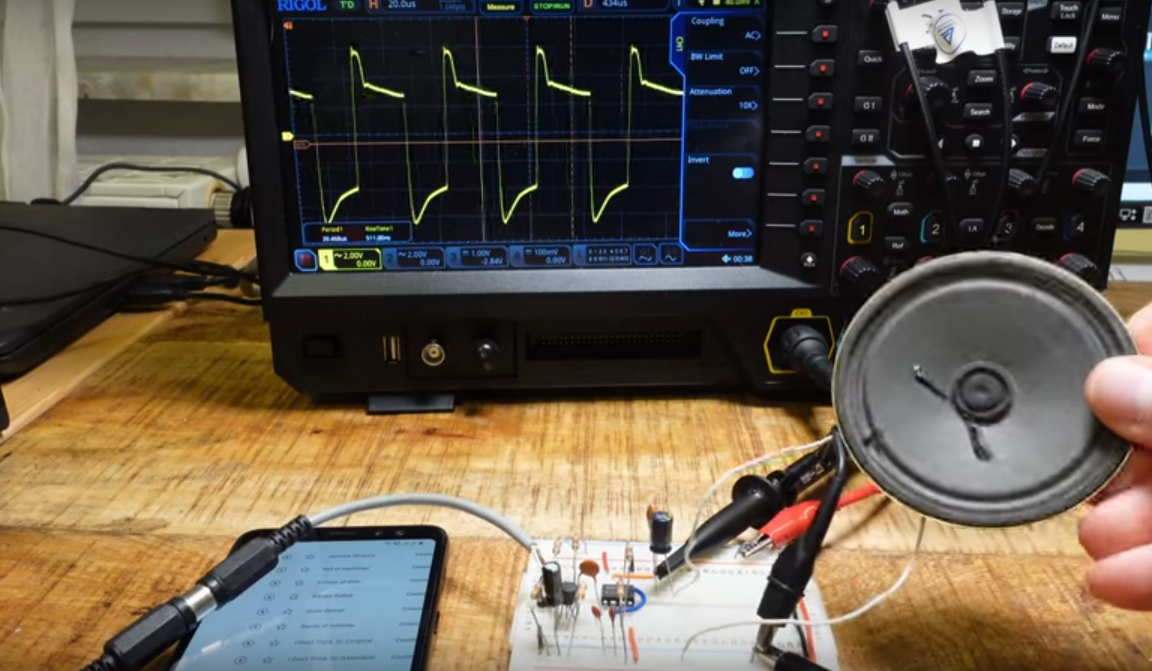
Buzzers, Beepers, and Tone Generators
When the 555 oscillates fast enough, it can produce audio-frequency signals. Connect the output through a suitable capacitor and resistor to a small speaker or piezo buzzer, and you have a basic tone generator. Change the resistor or capacitor values and the pitch changes.
This is useful for alarms, continuity testers, simple electronic instruments, toys, and learning projects. If one 555 makes a steady tone, two 555 timers can make a siren: one slow oscillator modulates another faster oscillator. The result sounds like a tiny emergency vehicle got trapped in your project box.
Delay Timers and Relay Drivers
In monostable mode, the 555 can delay switching actions. For example, a sensor can trigger the 555, and the output can drive a transistor that controls a relay. This is useful for timed lights, fan run-on circuits, alarms, and short-duration control systems.
One important rule: do not ask the 555 to directly drive heavy loads. The classic bipolar 555 can source or sink a useful amount of current, but motors, relay coils, LED strips, solenoids, and lamps can demand more than the chip should handle directly. Use a transistor, MOSFET, or driver stage. Add a flyback diode across inductive loads such as relays and motors. The 555 can be the brain, but it should not be forced to become the weightlifter.
PWM Motor Speed and LED Dimming
Pulse-width modulation, or PWM, turns power on and off rapidly while varying the percentage of time the output stays on. A 555 timer can create PWM signals for basic DC motor speed control or LED dimming. The load receives pulses, and the average delivered power changes as the duty cycle changes.
For a small experiment, a 555 timer, potentiometer, transistor, diode, and DC motor can demonstrate speed control beautifully. For serious motor control, use proper driver circuits, heat management, and protection components. The 555 is excellent at creating the control signal; the power stage should be designed for the actual load.
Switch Debouncing
Mechanical switches are messy. Press a button and the contacts may bounce several times before settling. Digital circuits can misread that as multiple presses. A 555 timer can clean up the signal by producing a single stable pulse from a noisy button press.
This is especially useful in counters, toggles, clocks, and simple logic systems. It is also a great lesson in real-world electronics: the physical world is not as neat as a schematic. Switches bounce, wires pick up noise, capacitors leak, and breadboards occasionally behave like they have strong opinions.
How the 555 Timer Works Without Making Your Brain Melt
At the heart of the 555 is a voltage-watching system. The chip compares the timing capacitor’s voltage against internal reference levels. In a typical 555, those levels are around one-third and two-thirds of the supply voltage. When the capacitor voltage crosses one threshold, the output changes. When it crosses the other threshold, the output changes again.
In astable mode, the capacitor charges through resistors and then discharges through the discharge pin. That repeating charge-discharge cycle creates oscillation. In monostable mode, a trigger starts one charge cycle, and when the capacitor reaches the threshold, the output returns to its resting state.
This is why resistor and capacitor selection matters so much. The resistor controls how quickly current flows into or out of the capacitor. The capacitor controls how much charge must accumulate before the voltage changes enough to trigger the next state. Together, they form the timing network.
Once that clicks, the 555 stops being mysterious. It becomes a traffic cop for capacitor voltage. The capacitor slowly walks up or down the voltage hill, and the 555 blows the whistle whenever it reaches the marked lines.
Choosing Between Bipolar and CMOS 555 Timers
The classic NE555 or LM555 is usually a bipolar timer. It is rugged, common, and capable of driving modest loads. It also tends to draw more supply current than CMOS versions and may create noticeable current spikes during output transitions. For many bench projects, that is not a problem. For battery-powered gadgets, it can matter.
CMOS 555 timers are designed for lower power consumption and often operate over a wide voltage range. They are a smart choice for portable devices, low-current sensors, and circuits where battery life matters. They may also perform better at higher frequencies depending on the part.
So which one should you use? For breadboard learning, LED blinkers, and general experiments, a standard NE555 is perfect. For battery-powered devices, modern low-power designs, or sensitive circuits, consider a CMOS 555. For higher current loads, neither should directly drive the load without help; use a transistor or MOSFET.
Design Tips for Reliable 555 Timer Circuits
Use a Decoupling Capacitor
Place a small capacitor, often 0.1 µF, across the supply pins near the 555. This helps tame supply noise and keeps the chip stable. It is a small part with a big attitude: ignore it and your circuit may behave like it drank espresso.
Mind the Control Voltage Pin
Pin 5, the control voltage pin, is often bypassed to ground with a small capacitor, commonly around 0.01 µF. This can improve noise immunity. You can also use this pin creatively to modulate timing, but for basic circuits, bypassing it is a good habit.
Do Not Abuse the Output Pin
The 555 output can source and sink current, but that does not make it invincible. Use a current-limiting resistor for LEDs. Use a driver transistor or MOSFET for motors, relays, solenoids, lamps, and LED strips. Add protective diodes for inductive loads. Smoke is not a debugging signal; it is your circuit resigning.
Use Realistic Timing Values
Very long delays require large resistors or capacitors, and that can introduce leakage, tolerance errors, and drift. If you need a delay of seconds or minutes, the 555 can be excellent. If you need a calendar-accurate delay or multi-hour precision, use a microcontroller, real-time clock, or dedicated timer circuit.
Expect Component Tolerance
Capacitors and resistors are not perfect. A capacitor labeled 10 µF may vary significantly depending on type, tolerance, temperature, and age. If timing accuracy matters, use tighter-tolerance parts and test the actual circuit. The 555 is reliable, but it is not psychic.
When the 555 Is the Right Tool
The 555 timer is ideal when the job is simple, local, and timing-based. It shines in circuits that need a delay, pulse, blink, beep, latch, oscillator, or basic PWM signal. It is especially helpful when you want instant hardware behavior without programming.
Use a 555 when you want a circuit that is cheap, understandable, repairable, and easy to prototype. Use it when you are teaching electronics and want students to see the connection between resistance, capacitance, voltage, and time. Use it when the circuit only needs to do one or two timing jobs and does not require a microcontroller’s flexibility.
When Not to Use the 555 for Everything
As wonderful as the 555 timer is, “everything” should be understood with a wink. It is not the best choice for every design. If you need complex decision-making, communication protocols, data logging, display control, wireless connectivity, or precise long-term timing, a microcontroller is usually better.
If you need extremely stable frequency generation, use a crystal oscillator or dedicated clock source. If you need efficient high-power LED control, use a proper LED driver. If you need advanced motor control, use a motor driver. The 555 can start the conversation, but sometimes another component should finish the sentence.
Still, the 555 remains useful even in a world full of microcontrollers. It boots instantly. It does not crash because of firmware. It does not need code updates. It can survive in simple analog environments where a programmable chip would be overkill. Sometimes the smartest design is not the fanciest one; it is the one that works with fewer parts and fewer surprises.
Real-World Examples of Using the 555 for Everything
Garage Reminder Light
A magnetic reed switch detects that a garage door has opened. A 555 timer in monostable mode turns on a bright LED for a fixed time. This gives a visible reminder without needing software, Wi-Fi, or an app that wants to know your location for some suspicious reason.
Mini Metronome
A 555 in astable mode drives a piezo buzzer. A potentiometer adjusts the beat rate. Add a knob, mark a few tempo ranges, and you have a simple practice tool for music students or anyone who wants a tiny circuit to judge their rhythm.
Model Railroad Flasher
An astable 555 drives alternating LEDs through suitable resistors or transistor stages. The result is a railroad crossing light effect. The same idea works for model emergency vehicles, warning panels, and sci-fi props.
Simple Touch Alarm
A touch plate or sensor triggers a monostable 555, which activates a buzzer for several seconds. This circuit can demonstrate triggering, timing, and output driving in a way that feels immediately useful.
Fan Run-On Timer
A switch or sensor triggers the 555 so a small fan continues running briefly after the main device turns off. With proper driver circuitry, this can help with cooling in hobby enclosures or workshop projects.
Why the 555 Is Still Great for Learning Electronics
The 555 timer teaches electronics in a wonderfully hands-on way. You can see the LED blink. You can hear the tone change. You can turn a potentiometer and feel cause and effect. You can swap a capacitor and watch the timing slow down. That physical feedback builds intuition faster than a paragraph of theory alone.
It also introduces the practical side of circuit design. You learn that polarity matters. You learn that electrolytic capacitors have opinions about being installed backward. You learn that LEDs need resistors. You learn that motors are electrically noisy. You learn that breadboard wiring can turn into spaghetti faster than expected.
Most importantly, the 555 rewards curiosity. Once you build one circuit, you naturally ask, “What happens if I change this part?” That question is the engine of electronics learning. The 555 gives you permission to experiment without needing a full development board, laptop, compiler, and three cups of coffee.
Practical Experience: Living With the 555 on the Bench
After working with 555 timer circuits for a while, you start to notice that the chip has a personality. It is friendly, but it expects basic manners. Give it clean power, keep your wiring sensible, use the right capacitor polarity, and do not hang a motor directly off the output pin like you are testing its gym membership. Treat it well and it will behave beautifully.
One of the most satisfying experiences is building a basic LED flasher on a breadboard. At first, it looks almost too simple: one chip, a couple of resistors, a capacitor, an LED, and power. Then the LED starts blinking, and suddenly the abstract idea of an oscillator becomes real. You can slow it down by increasing the capacitor. You can speed it up by reducing resistance. Add a potentiometer and the circuit becomes interactive. It is a tiny laboratory for understanding time.
The next experience is usually sound. Connect a 555 oscillator to a piezo buzzer and you get a tone. Adjust the resistance and the pitch slides up and down. Add a second 555 to control the first, and the tone begins to wobble like a toy police siren. Is it elegant audio engineering? Absolutely not. Is it fun? Deeply. It is the kind of circuit that makes a beginner grin and makes an experienced engineer pretend not to grin.
The 555 also teaches humility. A circuit that works perfectly on paper may misbehave on a breadboard because of a loose jumper, a missing ground, a reversed capacitor, or a power rail that is not connected across the board gap. Sometimes the output refuses to blink because pin 4, the reset pin, is floating instead of tied high. Sometimes the timing is not what the formula predicted because the capacitor tolerance is wider than expected. These little frustrations are not failures; they are the tuition fees of practical electronics.
In repair and prototyping, the 555 is useful because it can create test signals quickly. Need a square wave to check a counter? Build a 555 oscillator. Need a pulse to trigger a circuit? Build a one-shot. Need to blink an indicator while testing a power stage? The 555 can do it before a microcontroller project has finished opening its software update window.
The best lesson from using the 555 for everything is not that you should literally use it for everything. The lesson is that simple building blocks matter. A timer, a capacitor, a resistor, and a transistor can solve a surprising number of problems. The 555 encourages you to think in functions: delay, repeat, latch, pulse, modulate, trigger. Once you think that way, electronics becomes less mysterious. It becomes a toolbox.
And yes, eventually you will reach for a microcontroller, a dedicated driver, or a precision clock. That is healthy. But even then, the 555 remains the chip you keep in the drawer because it is fast, cheap, understandable, and ready. In a world where devices keep getting more complex, there is something refreshing about an 8-pin classic that still says, “Relax. I can blink that.”
Conclusion
Using the 555 for everything is partly a joke, partly a design habit, and partly a tribute to one of the most useful chips ever made. The 555 timer IC can generate delays, pulses, oscillations, tones, blinking patterns, PWM signals, and simple latch behavior with very few external components. It is beginner-friendly without being childish, old without being obsolete, and simple without being boring.
For modern electronics projects, the smartest approach is to understand where the 555 fits. Use it when you need practical timing, visible learning, fast prototyping, or low-cost control. Use something else when the design needs precision, programmability, communication, or high-power management. The 555 is not magic, but it is close enough to have earned its reputation.
Note: This article is for low-voltage educational electronics projects. When working with mains voltage, high current, batteries, motors, relays, or heat-producing loads, use proper protection parts and follow safe design practices.
