
Makeup
3 Ways to Make a Paper Glider
Jul
Learning how to make a paper glider is one of those wonderfully low-budget hobbies that proves civilization has not peaked at expensive gadgets. You need one sheet of paper, a little patience, and the confidence to throw something across the room while pretending it is science. The best part? It actually is science.
A paper glider is different from a random crumpled paper missile. A good glider uses balanced folds, smooth wings, and a stable center of gravity to move through the air instead of immediately nosediving like it just remembered it forgot its homework. Whether you want a simple classroom flyer, a long-distance paper airplane, or a strange-looking hoop glider that makes people say, “Wait, that flies?” this guide gives you three easy methods.
Below, you will learn three ways to make a paper glider using common materials. Each design includes clear steps, flight tips, troubleshooting advice, and practical examples so you can test, adjust, and improve your aircraft like a tiny aerospace engineer with zero budget and unlimited curiosity.
Why Paper Gliders Fly
Before folding, it helps to understand what your paper aircraft is trying to do. A glider has no engine, so it depends on the energy from your throw and the pull of gravity. Once released, the glider moves forward while air flows around its wings. The wings help create lift, while drag slows the plane down. Weight pulls it toward the ground. Your job as the designer is to help lift and stability win the argument for as long as possible.
Four ideas matter most when making a paper glider: symmetry, weight balance, wing shape, and launch technique. If one wing is folded higher than the other, the glider will turn, roll, or perform an unplanned drama scene. If the nose is too heavy, it dives. If the back is too heavy, it stalls and flutters. If the wings are too wrinkled, drag increases and the flight becomes more “falling leaf” than “aircraft.”
A small upward angle in the wings, called dihedral, often makes a paper glider more stable. Imagine the wings forming a very shallow “V” when viewed from the front. This shape helps the plane correct itself during flight. It is a tiny detail, but tiny details are where paper airplanes stop being toys and start acting smug.
Materials You Need
- Standard letter-size paper, 8.5 x 11 inches
- A flat surface for folding
- A ruler or fingernail for sharp creases
- Optional paper clips for balance testing
- Optional tape for the hoop glider method
- Optional straw for the hoop glider frame
Regular printer paper is usually the best starting point. It is light enough to glide but stiff enough to hold a crease. Construction paper can work, but it is heavier and may need stronger throws. Notebook paper is light and fun, though it can wrinkle quickly. Fancy cardstock looks impressive until it drops like a business card with wings.
Method 1: Make a Classic Paper Glider
The classic paper glider is the best design for beginners. It has broad wings, a balanced body, and a gentle flight path. This model is excellent for indoor flying, classroom activities, and anyone who wants a reliable glider without folding something that resembles a NASA blueprint.
Step-by-Step Instructions
- Place one sheet of letter-size paper vertically on a table.
- Fold the paper in half lengthwise, then unfold it. This center crease is your guide.
- Fold the top left and top right corners down so they meet at the center crease.
- Fold the new slanted edges toward the center crease again. The nose should become sharper but not too skinny.
- Fold the paper in half along the original center crease, keeping the folds inside.
- Create the first wing by folding one top edge down so it lines up with the bottom edge of the body.
- Flip the plane over and repeat on the other side.
- Open the wings slightly so they form a shallow upward “V.”
How to Fly It
Hold the glider near the bottom of the body, just behind the nose. Use a smooth, level throw rather than a hard baseball pitch. Aim slightly upward, about 5 to 10 degrees. If you throw too hard, the plane may twist or dive. A paper glider likes confidence, not violence.
How to Adjust It
If the glider dives, gently bend the back edges of the wings upward. These small flaps act like elevators. If the glider climbs too sharply and then stalls, bend the back edges slightly downward or reduce your launch angle. If it turns left or right, check whether both wings are the same size and angle. Most flight problems begin with uneven folds, also known as “paper betrayal.”
Method 2: Make a Long-Distance Paper Glider
The long-distance paper glider is built for speed and range. It has a narrower shape than the classic glider, which reduces drag and helps it cut through the air. This design is ideal for hallways, gyms, or calm outdoor spaces. Do not launch it toward lamps, pets, or people who already question your hobbies.
Step-by-Step Instructions
- Start with one sheet of letter-size paper placed vertically.
- Fold it in half lengthwise and unfold it to make a center crease.
- Fold the top corners down to meet the center crease.
- Fold the angled edges into the center crease again, making a long, narrow nose.
- Fold each side inward one more time if the paper allows it, keeping the folds even and sharp.
- Fold the plane in half along the center crease.
- Make slim wings by folding each side down, leaving a narrow body underneath.
- Press all creases firmly, then open the wings slightly.
Why This Design Works
A long-distance glider needs a good balance between speed and stability. Narrow wings create less drag, so the plane can travel farther after a strong launch. However, narrow wings also create less lift than broad wings, so this model needs a cleaner throw. Think of it as the sports car of paper gliders: fast, dramatic, and occasionally rude if handled poorly.
Best Launch Technique
For this design, use a slightly stronger throw than you would use for the classic glider. Hold it firmly near the center of the body and release it smoothly. A long-distance glider often performs best when thrown straight and slightly upward. Avoid flicking your wrist too much. Wrist flicks can send the plane into a spiral, which looks cool for half a second and then becomes a floor inspection.
Tuning for Distance
If the plane dives early, add a tiny upward bend to both rear wing edges. If it veers, adjust one wing at a time. If it rolls upside down, increase the upward angle of the wings. You can also add a small paper clip near the nose to improve forward balance, but use caution. Too much nose weight turns your glider into office artillery.
Method 3: Make a Paper Hoop Glider
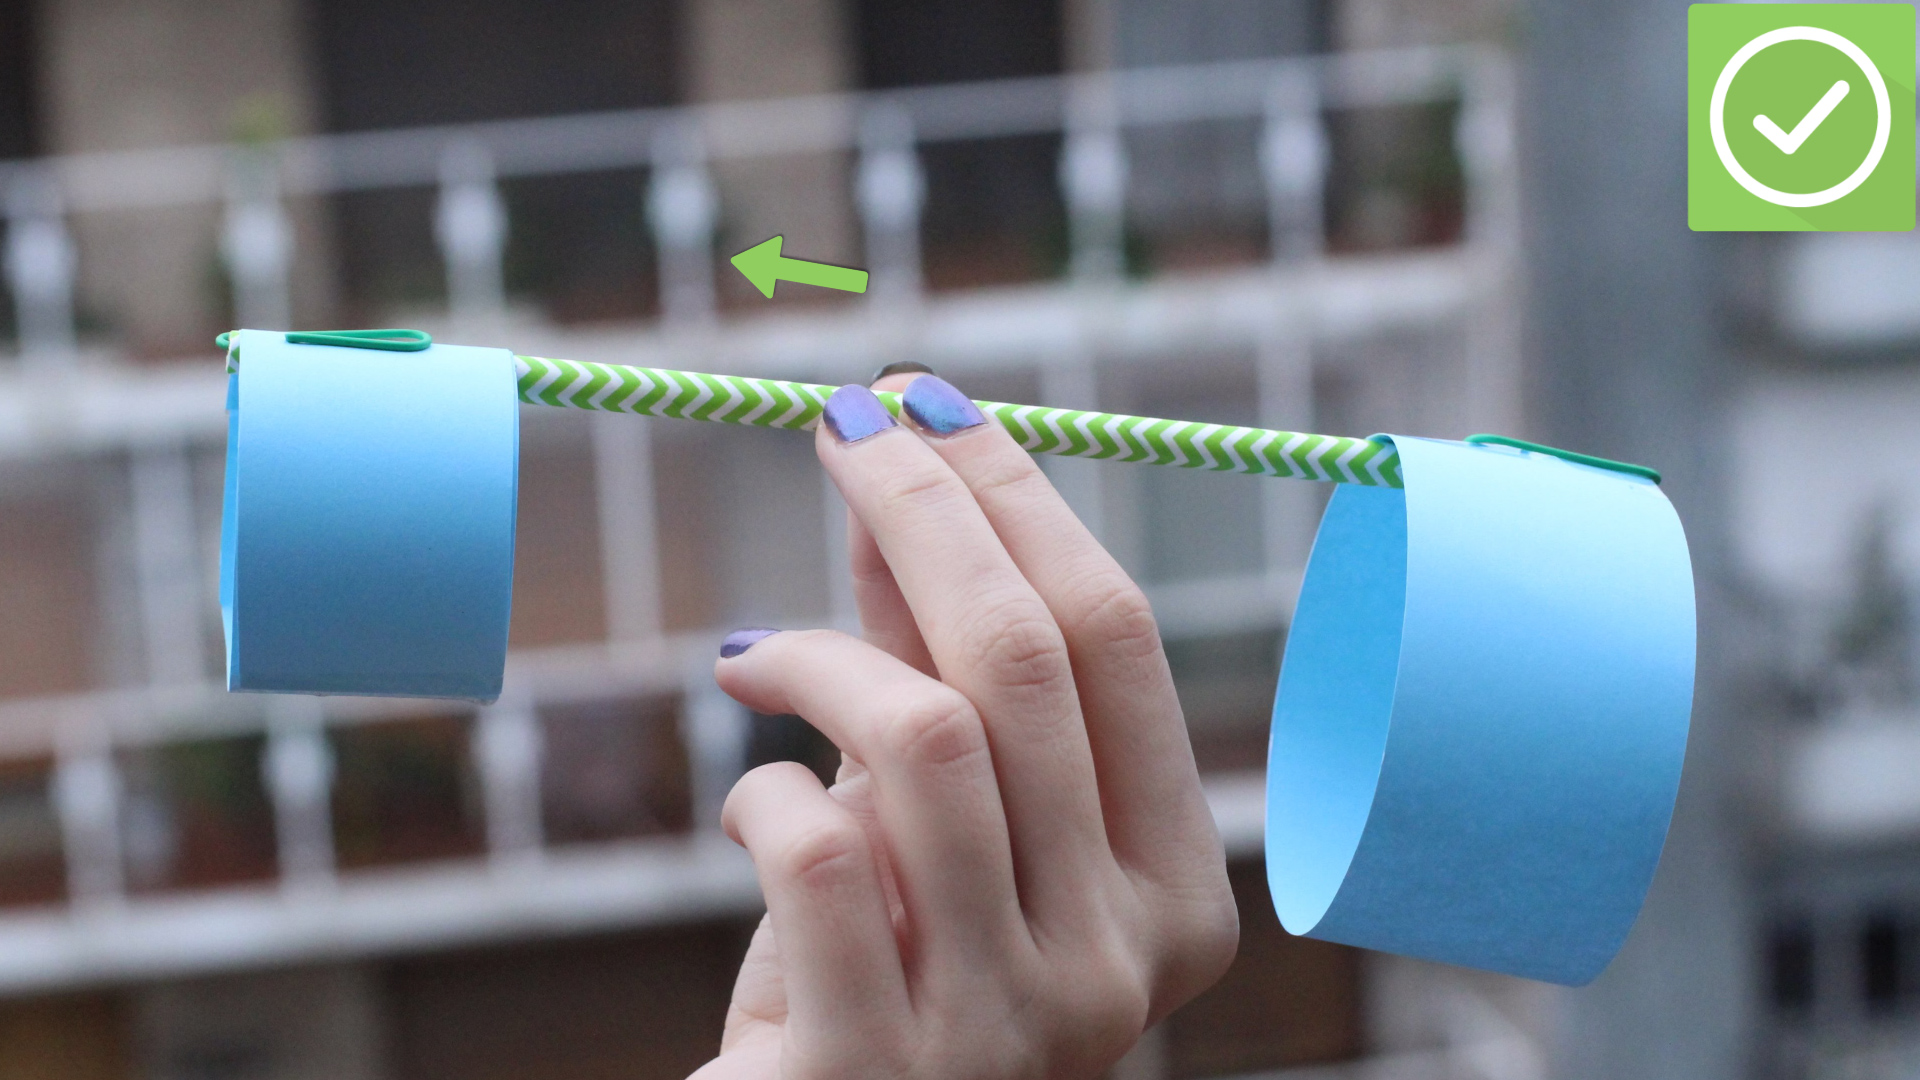
The hoop glider looks less like a traditional airplane and more like something invented during a lunch break by a genius with tape. Instead of flat wings, it uses paper hoops attached to a straw or rolled paper body. Surprisingly, it can fly beautifully because the hoops stabilize the air path and help the glider move forward smoothly.
Materials for the Hoop Glider
- One sheet of paper
- One straw or a tightly rolled paper tube
- Tape
- Scissors
Step-by-Step Instructions
- Cut two strips of paper. Make one strip about 1 inch wide and 5 inches long. Make the second strip about 1 inch wide and 8 inches long.
- Curve each strip into a loop and tape the ends together. You should now have one small hoop and one larger hoop.
- Take a straw or rolled paper tube and place the small hoop near one end.
- Tape the small hoop securely to the straw.
- Attach the larger hoop to the opposite end of the straw.
- Make sure both hoops line up vertically with each other.
- Hold the glider in the middle with the small hoop facing forward.
- Throw it gently like a dart.
Why the Hoop Glider Flies
The small hoop in front helps guide the glider, while the larger hoop in back adds stability. The straw or paper tube acts as the fuselage. When thrown correctly, the hoops keep the glider balanced as it moves through the air. It may look like a craft project that escaped from a recycling bin, but it teaches real lessons about drag, balance, and stability.
Hoop Glider Troubleshooting
If your hoop glider flips, check that the hoops are aligned. If it dives, move the large hoop slightly forward or lighten the front. If it stalls, throw it more level and reduce the upward angle. If it refuses to fly at all, make sure the hoops are round and not crushed. A sad oval hoop is not aerodynamic; it is just paper expressing disappointment.
Paper Glider Science: What to Test
Once you know how to make a paper glider, the next step is testing. Try launching each design from the same spot and measuring the distance. Use tape on the floor to mark where each flight lands. Make three to five throws per design and average the results. This gives you better data than one lucky throw that may have been blessed by the air-conditioning vent.
You can test wing width, paper weight, nose shape, launch angle, and flap position. Change only one thing at a time. For example, do not change the paper type, wing angle, and throwing style all at once unless your goal is confusion with charts. Real testing works best when you isolate one variable and compare results.
Simple Experiments to Try
- Compare printer paper, notebook paper, and construction paper.
- Add a paper clip to the nose and observe the change in distance.
- Bend both rear wing edges up and compare the glide path.
- Change the wing angle from flat to slightly raised.
- Throw the same glider gently, moderately, and strongly.
These experiments help you see how paper airplane aerodynamics work in real life. The lesson is simple: good design matters, but careful adjustment matters just as much. A poorly folded plane with a great throw can still fail, while a well-balanced glider can float across the room with very little effort.
Common Mistakes When Making Paper Gliders
Using Uneven Folds
Uneven folds are the fastest way to ruin a paper glider. If one wing is larger or heavier, the glider will turn toward one side. Always line up edges carefully before pressing the crease. Accuracy beats speed. This is paper aviation, not a burrito-folding contest.
Throwing Too Hard
Many beginners think more force means more distance. Sometimes it does, but only if the glider is designed for it. A broad-wing glider usually needs a gentle launch. A narrow distance glider can handle more speed. Throwing every paper aircraft as if it owes you money usually ends badly.
Ignoring the Wings
Wings are not just decorative flaps. They control lift, stability, and direction. Keep them smooth, even, and slightly raised. If your paper glider keeps rolling, adjust the wing angle before blaming physics. Physics is innocent most of the time.
Skipping Test Flights
The first flight is rarely perfect. Expert paper airplane makers test, tweak, and test again. Small adjustments can make a huge difference. A tiny bend at the rear of the wing can turn a nose-diving disaster into a smooth, floating glide.
Which Paper Glider Design Is Best?
The best paper glider depends on your goal. For easy flying, the classic paper glider is the most forgiving. For distance, the long-distance glider is usually better because it has less drag and a sharper nose. For experiments and demonstrations, the hoop glider is fantastic because it shows that flying machines do not always need to look like regular airplanes.
If you are teaching kids, start with the classic glider. It is simple, fast, and satisfying. If you are hosting a competition, include categories such as longest distance, longest time in the air, straightest flight, and most creative design. The last category is important because someone will absolutely decorate a glider like a dragon, and that person deserves recognition.
Safety Tips for Flying Paper Gliders
- Never throw paper gliders at someone’s face.
- Use soft paper for younger children.
- Avoid adding sharp objects or heavy metal clips.
- Fly indoors only in open spaces away from breakable items.
- Ask permission before launching gliders in classrooms, offices, or living rooms.
Paper gliders are safe when used responsibly, but even paper can be annoying when it flies directly into someone’s coffee. Choose your runway wisely.
Real-World Experience: What I Learned from Making Paper Gliders
After making many paper gliders, one lesson becomes obvious: the paper remembers everything. A rushed crease, a bent corner, a wrinkled wing, or a slightly crooked fold will show up during flight. At first, that can feel frustrating. You follow the instructions, launch the glider, and it immediately dives into the floor like it has urgent business with the carpet. But once you start adjusting instead of restarting, the process becomes much more fun.
The classic paper glider is usually the most satisfying for beginners because it gives quick feedback. If the nose dips, raise the back edges a little. If it stalls, lower them. If it turns, compare the wings. This design teaches patience without punishing you too much. It also works well in small rooms because it does not need a powerful throw. A gentle push is enough to send it gliding across a hallway or classroom.
The long-distance glider feels more exciting but also more demanding. I found that sharp creases matter a lot with this design. A soft, loose fold creates extra drag and makes the plane wobble. A crisp fold helps it hold its shape under speed. Launch angle matters too. Too high, and the plane climbs, stalls, and falls backward in embarrassment. Too low, and it becomes a paper lawn dart. The sweet spot is a firm, smooth throw just above level.
The hoop glider is the surprise champion of curiosity. People often doubt it because it does not look like a normal paper airplane. Then it flies, and suddenly everyone wants to try one. The biggest trick is alignment. The small hoop and large hoop must point in the same direction. If one hoop is twisted, the glider spins. If both hoops are lined up, it can travel smoothly and steadily. It is a great reminder that aerodynamics is not always about looking sleek. Sometimes the weird little paper-and-straw invention gets the applause.
Testing paper gliders also teaches the value of changing one thing at a time. When I changed the wing angle, paper weight, and throwing force all together, I had no idea what helped or hurt. When I tested only one adjustment per round, the results made sense. A tiny upward wing bend improved stability. A small paper clip helped one glider fly straighter but made another dive. Heavier paper worked better for distance in some cases, while lighter paper stayed in the air longer indoors.
The best experience came from treating every failed flight as useful information. A crash is not just a crash; it is data with sound effects. If the glider dives, it is telling you something. If it loops, it is telling you something else, possibly with attitude. The more you observe, the better your next fold becomes. That is why making paper gliders is more than a quick craft. It is a small engineering challenge hiding inside a sheet of paper.
Conclusion
Making a paper glider is simple, but making a good paper glider is a fun mix of folding skill, basic aerodynamics, and trial-and-error testing. The classic paper glider is perfect for beginners, the long-distance glider is great for speed and range, and the hoop glider is ideal for experiments that surprise everyone in the room.
Start with clean folds, keep both sides symmetrical, adjust the wings carefully, and test each design more than once. With a little practice, you can turn an ordinary sheet of paper into a smooth-flying glider. And if it crashes? Congratulations. You have just collected your first piece of flight data.
SEO Tags
Note: This article synthesizes practical paper airplane folding methods, STEM classroom testing ideas, and widely accepted beginner aerodynamics principles into original web-ready content.

