Skincare
When Acorn Crafts Go Terribly Wrong
Jun
Acorn crafts look innocent. They sit there in Pinterest photos like tiny woodland treasures, promising cozy fall vibes, rustic charm, and the kind of “I made this myself” confidence that makes you temporarily believe you should open an Etsy shop. Then reality arrives wearing muddy shoes: bugs crawl out, caps fall off, glue strings take over the dining table, and your “adorable acorn wreath” starts shedding like a golden retriever in August.
The good news? Most acorn craft disasters are preventable. The bad news? You usually learn this only after collecting two grocery bags of damp nuts, sealing them in a plastic container, and accidentally creating a luxury resort for mold and weevils. This guide breaks down why acorn crafts go wrong, how to rescue them, and how to make fall decor that looks charming instead of vaguely haunted.
Why Acorn Crafts Are Trickier Than They Look
Acorns are not craft-store beads. They are real tree seeds, which means they arrive with dirt, moisture, tannins, tiny cracks, loose caps, and occasionally living tenants. That rustic texture everyone loves is also the reason acorns can rot, split, stain surfaces, attract pests, and crumble after you glue them to a project.
The most common acorn craft ideas include wreaths, garlands, painted acorns, napkin rings, vase fillers, ornaments, fairy garden accessories, candle accents, and Thanksgiving table decorations. They can be beautiful, inexpensive, and wonderfully seasonal. But if you skip preparation, your project can go from “autumn cottagecore” to “science fair experiment” faster than you can say, “Why is that acorn moving?”
The Classic Acorn Craft Disasters
1. The Bug Surprise
One of the most famous acorn craft failures is discovering small larvae, beetles, or weevils after the acorns are already inside your home. Acorn weevils and similar insects can develop inside nuts. Sometimes you do not notice them until a tiny hole appears or a larva exits the shell like it just checked out of a very crunchy hotel.
Small holes are a warning sign. So are soft spots, cracked shells, dark stains, and acorns that feel oddly light. Even if you plan to paint or glue them, inspect every acorn first. Toss damaged ones. The best craft acorns are firm, dry, and intact.
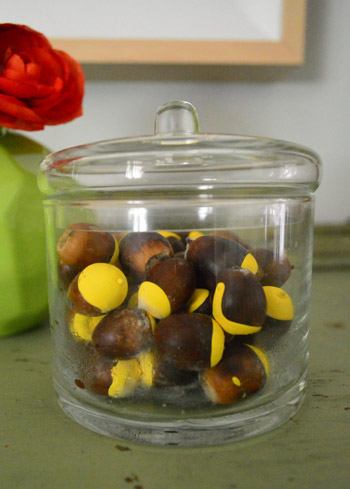
2. The Moldy Jar of Regret
Putting fresh acorns directly into a sealed jar is one of the fastest ways to ruin them. Acorns collected from the ground often contain moisture. When trapped in a closed container, that moisture can encourage mold growth. The result is not a cozy fall centerpiece. It is a biology lesson with a lid.
To prevent mold, wash acorns, let them dry thoroughly, and avoid storing them while damp. If an acorn smells musty or shows fuzzy growth, do not try to “craft through it.” Throw it away. No wreath is worth turning your living room into a mushroom subplot.
3. The Hot Glue Avalanche
Acorns are round, smooth, and extremely committed to rolling away at the exact moment you apply glue. Hot glue can work well, but it also creates burns, strings, blobs, and dramatic finger choreography. Low-temperature glue guns are safer for many craft projects, especially when kids are nearby, but adult supervision is still essential.
For wreaths and garlands, glue is not always enough. Acorn caps may separate from the nut, and the nut itself may pop loose if the surface is dusty or oily. For longer-lasting projects, clean and dry the acorns first, reattach loose caps, and glue onto a stable base such as a grapevine wreath, foam form, cardboard backing, or wooden frame.
4. Paint That Peels, Smears, or Looks Like Sad Pudding
Painted acorns can be gorgeous, especially in metallic, white, copper, gold, navy, or soft pastel colors. But paint does not love dirty, damp, or waxy surfaces. If the acorn is not clean and dry, the finish may streak or peel. If you use too much paint, the natural texture disappears and the acorn starts looking like a suspicious candy.
The fix is simple: use thin coats. Let each layer dry fully. Acrylic craft paint works for most decorative acorn projects, while a clear sealer can help protect the finish. If you want the caps to stay natural, paint the nut only and hold it by the cap. If the cap falls off, glue it back after painting and drying.
5. The Toddler and Pet Problem
Acorns are small, round, and tempting. That makes them risky around toddlers, curious pets, and any dog that believes “floor snack” is a complete food group. Small natural objects can pose choking or swallowing hazards. Acorns can also irritate pets’ digestive systems if eaten, and decorations with glue, paint, glitter, wire, or sealant should be kept away from animals.
If you have young children or pets, use acorn crafts as high-up decor rather than table scatter. Avoid placing them in bowls on low coffee tables. Secure pieces firmly, skip sharp wires, and store leftovers in labeled containers out of reach.
How to Prepare Acorns Before Crafting
Proper preparation is the difference between a charming fall craft and an indoor pest parade. The process is not hard, but it does require patience. Think of it as spa day for tiny tree nuts, minus the cucumber water.
Step 1: Collect Carefully
Choose acorns that are firm, fresh-looking, and mostly intact. Avoid ones that are mushy, cracked, blackened, or full of holes. Collect after a dry day if possible. Acorns picked from wet grass or muddy areas need more drying time.
Step 2: Sort Like a Ruthless Judge
Spread your acorns on newspaper, cardboard, or a tray. Remove any with obvious insect holes, rot, deep cracks, or missing chunks. Loose caps are not a dealbreaker; you can glue them back on later. Rotten acorns, however, should be exiled immediately.
Step 3: Wash and Rinse
Wash acorns in warm water with a small amount of mild dish soap. Swish them around to remove dirt and debris. Rinse thoroughly. Some crafters use a vinegar-water rinse, but plain soap and water are usually enough for decorative use.
Step 4: Dry Thoroughly
Lay the acorns in a single layer on towels and let them air-dry. This step matters. If you bake them while dripping wet, they can steam, crack, or take longer to dry. If you store them damp, mold may move in and start paying rent.
Step 5: Bake Low and Slow
Many experienced crafters dry acorns in a low oven to reduce moisture and discourage hidden insects. A common approach is to place acorns on a rimmed baking sheet lined with foil or parchment, bake at a low temperature, and check them regularly. Keep them in a single layer and do not walk away for hours. Acorns can darken, crack, or scorch if the oven is too hot.
Let the acorns cool completely before painting, sealing, gluing, or storing. If caps loosen during drying, save them and reattach them later with craft glue or a careful dot of hot glue.
When Your Acorn Project Has Already Gone Wrong
If You Found Bugs
Do not panic. Remove the acorns from the project area, seal them temporarily in a bag, and decide whether they are worth saving. If they are already glued to a wreath or centerpiece, inspect the whole item. For small projects, it may be easier to discard the acorns and start over with properly dried ones. For larger projects, place the item somewhere isolated and dry, then evaluate whether baking is safe for the materials used. Never put painted, glued, plastic, or synthetic pieces in the oven unless you know the materials are heat-safe.
If You Found Mold
Throw away moldy acorns. Do not paint over mold. Do not seal it under varnish. Do not pretend it is “snowy farmhouse texture.” Clean the container or surface where the moldy acorns sat, dry the area, and start again with fully dried acorns.
If the Caps Fell Off
This is normal. Acorn caps often loosen during washing, drying, or baking. Match caps to nuts when possible, or mix and match for a whimsical look. Use a tiny amount of glue inside the cap, press it onto the nut, and let it dry cap-side down.
If the Paint Looks Bad
Let the paint dry fully, then decide whether to sand lightly, repaint, or embrace the chaos. Metallic paint often hides flaws better than flat paint. White paint can look chalky if applied too thickly, while dark paint may hide the acorn’s natural charm. For a more polished finish, apply two or three thin coats instead of one heavy coat.
Best Acorn Craft Ideas That Are Less Likely to Betray You
Painted Acorn Bowl Filler
This is one of the easiest acorn crafts for beginners. Paint dried acorns in fall colors, metallics, or neutrals, then display them in a glass bowl, wooden tray, or ceramic dish. Keep the display out of reach of pets and small children.
Acorn Cap Mushrooms
Acorn caps make adorable mushroom tops when glued onto small twigs, cork pieces, or wooden beads. Paint the caps red, white, brown, or gold. Add tiny dots for a fairy-garden look. This project uses fewer full acorns, so there is less chance of hidden moisture problems.
Rustic Acorn Garland
A garland can be beautiful, but it works best when acorns are fully dried and firmly attached. Instead of piercing the nut, many crafters attach string or twine around the cap or glue acorns onto ribbon. Keep the garland lightweight so it does not sag or shed.
Acorn Wreath
An acorn wreath is stunning but time-consuming. Use a sturdy form, clean acorns, strong adhesive, and patience. Arrange acorns in sections rather than gluing randomly. Fill gaps with caps, leaves, pinecones, or ribbon. Seal the finished wreath if it will be stored and reused.
Thanksgiving Place Cards
Glue one or two acorns to a small cardstock tag, write each guest’s name, and tie with twine. It is simple, inexpensive, and less likely to turn into a structural engineering crisis.
Acorn Craft Safety Tips
Use acorns only for decoration, not for children’s pretend food. Keep them away from toddlers, pets, and open flames. Avoid using them directly around candles unless the acorns are clearly separated from heat and flame. If you use spray sealers, work in a well-ventilated area and follow the product label. Store finished acorn crafts in dry containers, not airtight boxes if there is any chance moisture remains.
For school or group crafts, consider paper acorns, felt acorns, wooden beads, or foam shapes instead of real acorns for younger children. Real acorns are wonderful for older kids and adults, but they require sorting, cleaning, drying, and supervision.
Why Acorn Crafts Are Still Worth Trying
Despite their tiny betrayals, acorns are fantastic craft materials. They are free, biodegradable, naturally beautiful, and deeply tied to the feeling of fall. A handful of well-prepared acorns can make a table setting feel warmer, a wreath look richer, or a mantel feel like it belongs in a cozy cabin where everyone owns matching socks.
The secret is respecting the material. Acorns are not plastic decorations from a craft aisle. They are natural objects with quirks. Once you clean, dry, inspect, and seal them properly, they become far more reliable. The goal is not perfection. The goal is controlled rustic charm, which is very different from “mysterious crumbs under the centerpiece.”
Real-Life Experiences: When Acorn Crafts Go Terribly Wrong
My first serious acorn craft lesson came from a centerpiece that looked perfect for exactly forty-eight hours. I had gathered acorns during a walk, tossed them into a glass hurricane vase, added a candle in the middle, and admired my own seasonal genius. It looked like something from a magazine. Unfortunately, it also behaved like something from a swamp. By the third day, the inside of the vase had fogged slightly. A few acorns had darkened. One had a suspicious white fuzz that I tried to ignore for about six seconds before admitting the centerpiece had become a tiny woodland crime scene.
The mistake was obvious: I had skipped drying. I had confused “looks dry” with “is dry,” which is the kind of confidence that gets people humbled by nature. After that, I learned to wash acorns, spread them out, dry them fully, and never trap fresh natural materials in a sealed container without preparation.
Another memorable failure involved painted acorns for a Thanksgiving table. The idea was elegant: gold acorns scattered along a runner with candles, linen napkins, and small name cards. The execution was less elegant. I painted the acorns too quickly, used too much paint, and set them on paper towels to dry. The paper towel texture stuck to the paint, leaving tiny fuzzy patches on half the batch. Some caps fell off. A few rolled under the refrigerator, where I assume they started a new life.
The lesson? Use thin coats, dry acorns on parchment or wax paper, and accept that round objects will roll unless contained. A rimmed baking sheet is not just helpful for drying; it is also a tiny fence against acorn rebellion.
The third disaster was a wreath. I imagined a lush, expensive-looking acorn wreath with a velvet ribbon. What I made was a lopsided brown tire with glue strings. I used acorns of wildly different sizes, started gluing without a pattern, and ran out of patience halfway through. The wreath became heavy on one side and bald on the other. When I hung it on the door, three acorns fell off immediately, as if the wreath itself rejected the project.
That failure taught me to plan the layout first. For an acorn wreath, sort acorns by size, attach the largest ones first, then fill gaps with smaller nuts and caps. A little variation looks natural. Total randomness looks like a squirrel sneezed on a wreath form.
Finally, there was the pet incident. A friend made a lovely bowl of acorn decor for her entry table, only to discover her dog had been quietly stealing pieces and carrying them to his bed. Thankfully, he did not eat them, but it was a sharp reminder that natural decor is not automatically safe decor. Anything small, chewable, or interestingly crunchy should be treated as a potential temptation. Since then, acorn crafts in pet-friendly homes go high, secured, or behind glass.
These experiences do not mean acorn crafts are doomed. They mean acorns require the same respect as any natural craft material. Prepare them well, keep them dry, choose the right project, and do not underestimate the ability of a small nut to create a large mess. When handled properly, acorns can become charming fall decor. When handled poorly, they become a cautionary tale with caps.
Conclusion
Acorn crafts go terribly wrong when we treat acorns like ready-made decorations instead of living natural materials that need cleaning, drying, sorting, and safe handling. Bugs, mold, loose caps, peeling paint, glue burns, pet hazards, and toddler risks are all manageable when you prepare properly. The best acorn projects start before the glue gun turns on: collect good acorns, toss damaged ones, dry them thoroughly, and choose a project that matches your patience level.
With a little care, acorns can become beautiful fall wreaths, garlands, ornaments, table accents, and rustic home decor. Without that care, they can become an indoor nature documentary. Choose wisely, craft bravely, and never trust an acorn that looks damp and smug.
Note: This article is based on real craft preparation practices, home safety guidance, mold prevention principles, pet safety recommendations, and practical fall decorating experience synthesized for web publication.
