
Beauty Unlocked
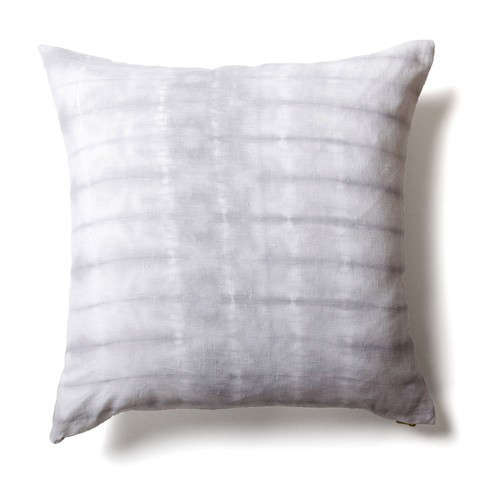
Striped Shibori Pillow
Aug
A striped shibori pillow brings together three excellent things: crisp geomeyour hands may be blue for the rest of the afternoon. Unlike factory-printed stripes, shibori stripes are never perfectly identical. Dye slips into folds, pressure changes along the bundle, and tiny variations create soft edges, broken lines, and pale flashes of the original fabric. That unpredictability is not a flaw. It is the entire point.
This project uses a simple accordion-fold resist to create repeated stripes on cotton fabric, then turns the dyed panel into a removable throw pillow cover. The method is beginner-friendly, but the finished pillow looks polished enough for a modern living room, relaxed bedroom, reading nook, or covered porch. You can work with a traditional indigo vat or use a fiber-reactive blue dye formulated for plant-based fibers. Either route produces a one-of-a-kind textile that looks far more expensive than the humble supplies suggest.
What Is a Striped Shibori Pillow?
Shibori is a Japanese resist-dyeing tradition in which fabric is folded, bound, stitched, twisted, wrapped, or clamped before it enters a dye bath. The compressed areas resist some or all of the color, while exposed areas absorb more dye. When the bundle is opened, the contrast between dyed and undyed cloth reveals the pattern. Indigo is strongly associated with shibori, although modern makers also use fiber-reactive and all-purpose dyes in many colors. a striped design, the fabric is folded back and forth like a paper fan. Binding the folded strip at regular intervals limits dye penetration and creates a rhythm of blue and white lines. Narrow folds make slim, frequent stripes; wide folds produce broader bands. Tight compression creates clearer pale sections, while looser binding gives the dye more room to travel and creates softer, more painterly marks.
Materials and Tools
- One 18-inch square pillow form, or another size of your choice
- Approximately 1 yard of white or natural 100% cotton fabric
- Indigo dye kit or fiber-reactive fabric dye
- Dye fixative or soda ash if required by the selected dye
- Plastic bucket or nonfood dye container
- Rubber gloves and an apron
- Rubber bands, cotton cord, or strong synthetic twine
- Two flat wood blocks, acrylic squares, or sturdy clamps
- Measuring tape, washable fabric marker, and scissors
- Sewing machine, coordinating thread, pins, and iron
- Plastic drop cloth, old towels, and a drying rack
Choose the Right Fabric and Dye
Medium-weight 100% cotton is the easiest choice. Cotton canvas and duck create structured covers with bold resist marks, while quilting cotton folds more easily and produces softer transitions. Avoid polyester upholstery fabric for a first attempt because synthetic fibers require different dyes and may not accept ordinary indigo or fiber-reactive color evenly.
A pre-reduced indigo kit creates the classic blue. The fabric may emerge yellow-green before turning blue in the air, and repeated dip-and-oxidize cycles deepen the shade. Fiber-reactive dye is another good option for cotton, but it needs the correct alkaline conditions, often supplied by soda ash. Follow the product instructions for water temperature, proportions, and processing time rather than improvising the chemistry. to Make a Striped Shibori Pillow
Step 1: Prewash and Cut
Wash the cotton with detergent and no fabric softener, then dry and press it. For an 18-inch pillow form, cut the front about 19 inches square. Cut two back pieces about 19 by 13 inches for an envelope closure. Dyeing the flat pieces before sewing makes folding, rinsing, pressing, and pattern placement easier.
Step 2: Mark and Accordion-Fold
Choose horizontal, vertical, or diagonal stripes. Mark the edges every 1 to 1 1/2 inches for narrow stripes or every 2 to 3 inches for wide bands. Fold the panel back and forth like a paper fan, keeping the edges reasonably aligned and pressing each crease with your fingers.
Step 3: Bind the Bundle
Wrap the folded strip tightly with cord or rubber bands, or clamp it between two flat blocks. Closely spaced ties create frequent pale lines; wider spacing leaves larger blue areas. Stronger compression produces clearer undyed sections, while looser binding creates softer, more painterly stripes.
Step 4: Prepare the Dye
Protect the work area, wear gloves, and mix the dye exactly as directed. For indigo, let the vat settle and avoid vigorous stirring, which introduces oxygen. Wet the fabric bundle thoroughly and squeeze out excess water before dipping. For fiber-reactive dye, use the specified activator and processing conditions. p 5: Dye and Develop the Color
Lower the bundle slowly into the bath and keep it below the surface while gently working exposed areas. With indigo, remove it, squeeze over the vat, and let it oxidize until the blue develops; repeat for a darker shade. With fiber-reactive dye, keep the bundle damp for the recommended batch time before rinsing. p 6: Rinse, Wash, and Press
Rinse according to the dye instructions, carefully cut away the ties, and unfold the fabric. Wash it separately until excess color is removed, then dry and press from the back. Prewashing and proper aftercare help limit later shrinkage and color transfer. p 7: Sew the Envelope Cover
Double-fold and stitch one long edge on each back piece. Place the dyed front right side up, then lay the back pieces right sides down with their hemmed edges overlapping at the center. Sew around all four sides with a 1/2-inch seam allowance, finish the raw edges, clip the corners, turn, press, and insert the pillow form. An envelope back needs no zipper and makes the cover easy to remove for washing. iped Shibori Design Variations
Change the fold width and binding method to alter the look. Narrow accordion folds and closely spaced cord create frequent, broken lines. Three-inch folds clamped between boards produce broad coastal bands. Folding the long accordion strip into a compact square before clamping can create a loose grid. For a contemporary version, use fiber-reactive navy and teal, charcoal and rust, or plum and coral, testing overlapping colors on scraps first.
Troubleshooting Common Problems
Blurry Stripes
The bundle may be too loose or too wet. Increase pressure, add tighter bindings, or use slightly thicker cotton. Soft edges can still look intentional, especially after the panel is sewn.
A Nearly White Center
The folds were compressed so firmly that dye could not reach the middle. Loosen the binding, make fewer layers, and wet the bundle thoroughly before dyeing.
Pale Color
For indigo, add more dip-and-oxidize cycles. For fiber-reactive dye, verify the activator, water temperature, processing time, and fiber content. Polyester blends and old dye solution can weaken the result.
An Undersized Cover
Prewash before measuring and include seam allowances. For an 18-inch form, a front panel cut about 19 inches square provides room for two 1/2-inch seams. A slightly smaller finished cover creates a plump look, but it should be planned rather than discovered after laundry day.
How to Style and Care for the Finished Pillow
Use the shibori pillow as the patterned focal point among mostly solid cushions. Indigo works especially well with cream, camel, mustard, terracotta, olive, faded denim, warm wood, and black accents. Blue-and-white shibori has enough energy to refresh seating without overpowering a room, which is why it appears so often in bedroom and cushion makeovers. the cover inside out and wash it separately or with similar dark colors in cool water. Use gentle detergent, avoid chlorine bleach, and air-dry or tumble dry low when the fabric and dye directions permit. Before placing a newly dyed cover on a white sofa, test for color transfer with a damp white cloth.
What the Striped Shibori Pillow Experience Is Really Like
The first surprise is how quickly a neat square of cotton turns into a bulky, stubborn accordion. On paper, the instruction “fold the fabric evenly” sounds peaceful. In practice, the far edge wanders, the center puffs up, and one crease appears determined to pursue an independent career. The useful lesson is that perfect folds are not necessary. Straight guide marks, patient pressing, and reasonably aligned edges are enough to create a strong stripe.
The binding stage usually feels more important than expected. Loose rubber bands are easy to apply, but they allow dye to migrate through the bundle and produce soft, cloudy lines. Tight cord takes longer and can be awkward to knot while wearing gloves, yet it often creates brighter white resist marks. Clamps and boards offer the most dramatic compression, although the bundle may resemble a small sandwich assembled by a hardware store. Trying two small test pieces with different pressure is often more informative than reading ten descriptions of “tight.”
Indigo adds its own theater. The vat does not look like the final color, the cloth may emerge greenish, and then the blue develops in the air. Watching that change makes the process feel less like ordinary decorating and more like a small chemistry performance. The temptation is to unfold the fabric after the first dip, but patience produces better depth. Several short dips with oxidation between them generally give more control than one prolonged soak.
The reveal is rarely what the maker pictured exactly. One side may be darker because it sat closer to the surface. A fold may create a pale interruption through an otherwise clean stripe. Dye may reach one corner and ignore another. At first, these details can look like mistakes. Once the panel is dry and pressed, however, the marks usually read as texture and movement. Sewing the fabric into a pillow further changes the impression. A pattern that looked uneven on a flat table often becomes balanced when wrapped around a soft form and viewed from across the room.
Another practical discovery is that less dye chaos comes from preparing the sewing pieces before the bath. Cutting the front panel first reduces waste and keeps the stripe scale appropriate for the pillow. Dyeing yardage offers more freedom for pattern placement, but it also requires a larger container, more rinsing, and a heroic amount of ironing. For a first project, one front panel and two optional back panels are plenty.
The sewing portion feels reassuringly predictable after the dyeing adventure. Straight seams, two hems, four corners, done. The envelope closure is especially forgiving because no zipper needs to be installed and the back overlap can absorb a small measuring error. The most common mistake is making the overlap too shallow, which lets the pillow form peek out. A generous overlap of several inches keeps the back neat and reduces strain.
Once the pillow is on a chair or sofa, the appeal becomes obvious. It has the clean visual structure of a stripe but none of the stiffness of a machine-perfect print. The pattern carries evidence of folding, pressure, timing, and chance. It also tends to trigger the dangerous thought, “I still have dye left.” That is how one striped shibori pillow becomes napkins, tea towels, a tote bag, and a household in which every available cotton object begins to look suspiciously dyeable.
Conclusion
A striped shibori pillow is a practical introduction to resist dyeing and an easy way to create custom home decor. Start with natural-fiber fabric, prewash it, fold it consistently, bind it firmly, and follow the selected dye’s instructions rather than improvising the chemistry. After rinsing and washing, an envelope-style back turns the dyed panel into a removable cover that is useful as well as beautiful.
The best result may not have ruler-straight stripes, and it should not need them. Subtle bleeds, broken bands, and uneven blue tones give the pillow its handmade identity. That balance of order and surprise is why shibori remains so satisfying: you control the folds, the dye contributes an opinion, and together you make something no store can reproduce exactly.

