
Beauty Tools & Accessories
Simple Ways to Make a Framed Bathroom Mirror
Aug
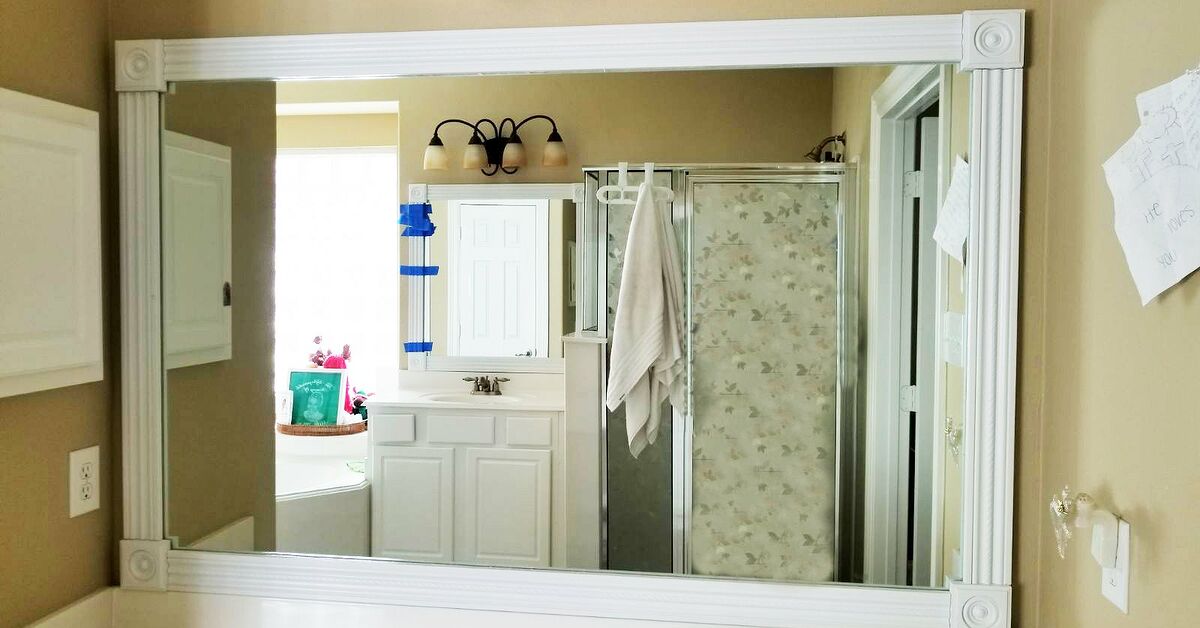
A plain bathroom mirror is useful, but it rarely has much personality. It reflects your face, catches to ignored rectangle in the room. Fortunately, adding a frame can turn a builder-grade mirror into a custom-looking focal point without replacing the glass or starting a full bathroom renovation.
The easiest DIY bathroom mirror frame can be made with basic wood trim, adhesive, paint, and careful measuring. You can also use corner blocks, peel-and-stick molding, rope, tile, or a ready-made frame kit. The right method depends on your tools, budget, mirror clips, and willingness to negotiate with 45-degree corners.
Why Frame an Existing Bathroom Mirror?
Framing an existing mirror is usually less disruptive than removing a large sheet of glass from the wall. A frame hides worn edges, coordinates the mirror with the vanity, and gives the bathroom a more finished appearance. It may also cover mild edge desilvering, although cracks, loose glass, or serious black spots should be evaluated before they are hidden. Bathroom moisture can damage a mirror’s reflective backing over time, so a frame is a cosmetic upgrade rather than a repair. A custom frame can repeat finishes already in the room. Black trim may echo the faucet, warm oak can connect with a wood vanity, and painted white molding can blend with traditional cabinetry. Coordinating the mirror frame with fixtures and nearby materials helps the bathroom look intentional. ection>
Five Simple Ways to Frame a Bathroom Mirror
1. Make a Mitered Wood Frame
Cut four pieces of casing, baseboard, or flat lumber at 45-degree angles so the corners meet like a picture frame. This polished style works in modern, farmhouse, coastal, and traditional bathrooms. It does require accurate measurements because even a small error can leave a visible gap.
2. Use Straight Butt Joints
Skip angled cuts and join the boards at 90 degrees. The top and bottom pieces can overlap the sides, or the side pieces can extend past the horizontal boards. Straight cuts are easier for beginners and create a clean, contemporary or rustic look. 3>3. Add Decorative Corner Blocks
Place a rosette or square block at each corner and fit straight molding between them. Corner blocks remove the need for precise miters and conveniently disguise tiny differences in board length. Flexible molding and made-to-size kits offer a fast update with little or no woodworking. Some attach directly to the glass; others hang over the mirror and use removable tape. They can be useful for renters and quick makeovers, but the product must be rated for the mirror surface, frame weight, and bathroom humidity. 3>5. Try a Decorative Border
Rope creates a coastal effect, mosaic tile produces a built-in look, and half-round dowels add modern texture. A painted border is another inexpensive choice when physical trim would interfere with lights or nearby walls. ection> Primed MDF is smooth and affordable, but every cut edge and the hidden back face should be sealed because humidity can cause swelling. Properly finished solid wood is more forgiving, while PVC trim naturally resists water and can be practical in a steamy bathroom. Make sure the glass is secure and free of cracks. Check the distance to the backsplash, faucet, light fixture, outlets, side walls, and cabinet doors. If a light must be removed, turn off power at the breaker and verify the circuit is off before doing electrical work. Many sheet mirrors are supported by plastic or metal clips. Do not remove structural clips simply because the trim covers them. Choose molding with a recessed back, notch the frame, add shallow spacers, or use a frame kit designed to fit over mounting hardware. Measure the width and height in more than one place because the mirror, wall, and countertop may not be perfectly square. Decide how much glass the frame will overlap. For mitered corners, mark the inside opening dimensions. For straight joints, include the actual board width when calculating the overlapping pieces. Write everything down; memory is an unreliable subcontractor. Cut the boards slightly long when possible, then trim gradually. Lay the frame on a flat surface and tape the corners together. Test it against the mirror before painting or gluing. A complete dry fit reveals gaps, clip interference, and clearance problems while they are still easy to correct. 3>Step 5: Sand, Prime, and Finish All Sides
Sand the visible surfaces and cut edges, then remove the dust. Prime or seal the front, back, ends, and fresh cuts. Apply paint or stain in thin coats and protect wood with a clear finish suitable for humid interiors. Finishing the back matters because humid air reaches it even when nobody sees it. HGTV recommends multiple paint coats, while Bob Vila advises a protective varnish where sink splashes may hit the frame. 3>Step 6: Assemble the Frame
Join the frame on a work surface or install one piece at a time. Preassembly usually produces tighter corners, while separate installation is easier for a very large mirror. Use wood glue at wood-to-wood joints and clamp or tape the pieces until set. For piece-by-piece installation, start with the bottom board, level it, and add the sides and top. Read the entire label. A general construction adhesive may bond wood to drywall yet still be unsuitable for a mirror, glass, or nonporous surface. Some formulas can damage mirror backing, while mirror-specific products may exclude acrylic, antique, or painted mirrors. Use only an adhesive approved for the mirror type, trim material, and installation method. Keep adhesive far enough from the inner edge to prevent squeeze-out. When attaching the frame to the surrounding wall rather than the glass, use wall fasteners or adhesive rated for the surface and the frame’s weight. Position the frame, check it immediately with a level, and secure it with painter’s tape or temporary bracing as directed by the adhesive manufacturer. Do not guess at drying time. Some mirror adhesives require mechanical support and up to 48 hours for a full cure. 3>Step 9: Finish the Joints
Fill small seams with paintable caulk or wood filler. Sand filler if necessary and touch up the paint. Use a narrow bead near the glass; the goal is a clean joint, not a mirror decorated like a frosted cake. Match the vanity: Use the same paint color or wood tone for a furniture-style appearance. Repeat a metal finish: Matte black, bronze, brass-tone, or brushed nickel can visually connect the mirror with faucets and cabinet pulls. Add a shallow ledge: A box frame can hold lightweight decor or daily items. Any meaningful shelf load should be supported by wall framing or properly rated anchors, not decorative trim alone. Create two visual frames: On a double vanity, two applied frames can divide one large mirror without removing the glass, provided they do not cover outlets, lights, or essential hardware. Use contrast: Dark trim defines a mirror on a pale wall, while natural wood adds warmth to tile and painted cabinetry. Professional help is sensible when the mirror is cracked, unusually large, loose, installed wall-to-wall, or surrounded by complicated tile and electrical fixtures. Large glass panels are heavy and hazardous to remove. A glass professional can evaluate the mounting system, cut custom glass, or install a replacement safely. ection> The biggest lesson from a framed bathroom mirror project is that cutting the wood is rarely the hardest part. The real challenge is planning around everything already attached to the wall. On one straightforward-looking mirror, the lower clips were almost invisible behind the backsplash. The first trim sample sat beautifully on three sides and rocked forward on the fourth like a restaurant table with one short leg. A small routed recess fixed the problem, but discovering it before painting would have saved an extra round of sanding and muttering. Another useful experience is to test the frame color in the actual bathroom. A warm brown stain that looked rich in the garage turned oddly orange under cool vanity bulbs. A painted sample board placed beside the faucet, countertop, and cabinet gave a much more accurate answer. The eventual choice was a medium walnut tone with a low-sheen protective topcoat. It added warmth without competing with the tile, and the softer sheen hid minor brush marks better than a glossy finish would have. Finishing all sides of the boards also proved worthwhile. It is tempting to paint only what faces the room, especially when the back will be glued against glass. However, the inner edge may appear in the reflection, and unfinished wood can absorb humid air. Priming the backs and sealing the end grain added time, but the frame remained flat through months of steamy showers. The bathroom exhaust fan helped too; decorative carpentry should not be expected to solve a ventilation problem. Dry-fitting with painter’s tape was the most valuable step. The frame was assembled loosely on the mirror, checked from several feet away, and photographed. The photo revealed that the top piece looked heavier than the bottom because the light fixture cast a shadow. Trimming the top molding slightly narrower produced a better visual balance. That adjustment would have been difficult after adhesive was applied. Adhesive cleanup was another education. Applying a thick bead near the inner edge seemed safer, but pressing the trim caused a tiny amount to squeeze into view. Removing uncured residue carefully was possible, yet prevention would have been easier. Later pieces received smaller beads farther from the opening, with the application pattern based on the adhesive instructions. Painter’s tape held everything in place while it cured, and the frame was left alone for the full recommended periodeven though checking it every twenty minutes felt emotionally necessary. The final surprise was how much the frame changed the room. The vanity, wall color, and light fixture were untouched, but the bathroom looked more deliberate and less like it had been assembled from a builder’s default menu. The project did not require rare tools or expert joinery. It required patient measuring, proper surface preparation, compatible materials, and the humility to dry-fit one more time. In DIY work, that final test fit is often the difference between “custom” and “close enough, please don’t stare at the upper-right corner.” A DIY framed bathroom mirror is a manageable project with a surprisingly large visual payoff. Choose a method that suits your skill level, measure carefully, seal every wood surface, work around the mirror’s existing supports, and use only compatible adhesives. A patient dry fit, a level, and enough curing time can make inexpensive molding look convincingly custom.4. Install Peel-and-Stick Trim or a Frame Kit
Tools and Materials for a Basic Wood Frame
How to Make a Framed Bathroom Mirror Step by Step
Step 1: Inspect the Mirror and Clearances
Step 2: Plan Around Mirror Clips
Step 3: Measure Carefully
Step 4: Cut and Dry-Fit Every Piece
Step 7: Choose a Compatible Adhesive
Step 8: Level, Support, and Let It Cure
Design Ideas That Look Custom
Common Mistakes to Avoid
When to Call a Professional
Real-World Experience: Lessons From Framing a Basic Bathroom Mirror
Conclusion
SEO Data

