
Body Care
S4SSE Protected Trim Boards
Aug
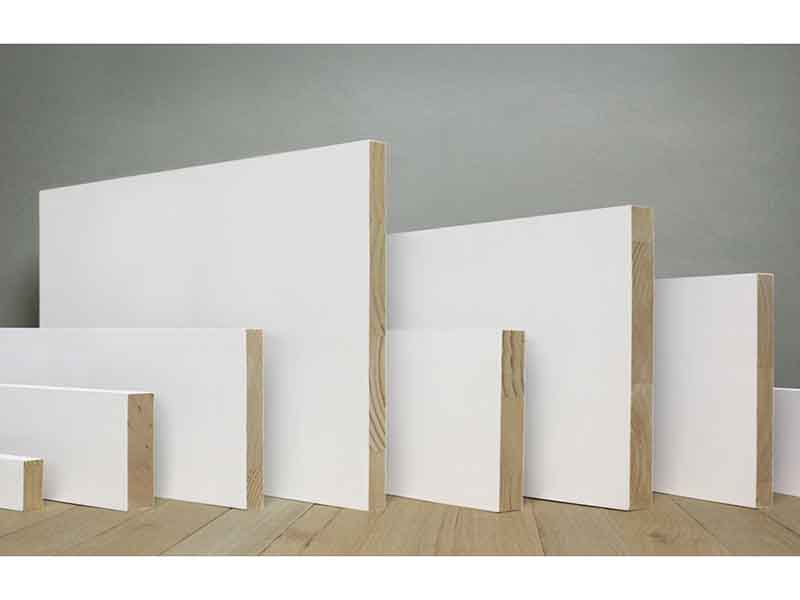
S4SSE Protected Trim Boards can make a house look quietly expensive without shouting about it. Their smooth faces and square edges create disciplined lines around windows, doors, roofs, columns, and corners. Beneath that clean appearance is real wood engineered for consistency, factory primed, and protected against organisms that enjoy turning exterior carpentry into lunch.
The name looks like a lumberyard password, but S4SSE simply means surfaced four sides, square edges: four smooth surfaces with sharp, uneased corners. WindsorONE’s Protected boards are finger-jointed real wood with a three-coat acrylic-latex primer system and a Protected stamp on the back. The manufacturer advertises Tru-Core protection and a 30-year limited warranty against rot, insects, and mold when installation and maintenance requirements are met.
What Makes S4SSE Protected Trim Different?
A Profile Made for Clean Architectural Lines
Square edges produce defined reveals and neat transitions between siding, masonry, windows, doors, and roofing details. Because all four sides are smooth, either face can be used and an exposed edge still looks finished. The profile suits everything from Colonial and Craftsman homes to modern farmhouses and contemporary façades.
Approved applications include window and door trim, fascia, soffit, rake boards, corners, band boards, and column wraps. The boards are not intended for structural support, decking, siding, fences, planters, pergolas, handrails, or exterior stairs. This is trim, not a superhero beam wearing white primer.
Real Wood With More Consistency Than Ordinary Boards
Protected S4SSE trim uses finger-jointed wood: selected pieces joined into long, consistent boards. Product listings identify primed finger-jointed radiata pine, while WindsorONE emphasizes straightness, tight joints, and a smooth finish. That consistency is valuable on painted fascia and band boards, where a wandering line becomes obvious in raking light. Every bowed board avoided is one less wrestling match on a ladder.
Protection Goes Deeper Than the Primer
Primer improves paint adhesion, but “Protected” refers to treatment intended to resist rot, insects, and mold beyond the visible coating. That matters because trim is cut, routed, and fastened on site. Field cuts still require primer, and the assembly still needs flashing, drainage, clearances, proper fasteners, and paint. Protection helps; it does not repeal the laws of water.
Where S4SSE Protected Trim Boards Work Best
Window and Door Surrounds
The profile works as simple flat casing or as part of built-up surrounds with sills, aprons, backbands, and pediments. Whatever the style, trim must cooperate with the wall’s drainage system. Proper flashing directs water outward; caulk is not a substitute for flashing.
Fascia, Rake Boards, and Soffit Details
Fascia and rake trim face sun, runoff, and wind-driven rain. Use correctly placed drip-edge flashing and maintain the required two-inch separation from roofing and similar horizontal surfaces. The gap reduces capillary uptake and lets the board dry instead of marinating against shingles.
Corner Boards and Band Boards
Corner boards cover siding ends; band boards divide stories or cladding materials. Support joints with solid framing, fasten them correctly, and detail transitions so water drains overnot behindthe assembly. Horizontal changes require flashing, while exposed horizontal profiles must slope to shed water.
Column Wraps and Porch Details
For column wraps, separate the trim from framing materials and provide an air cavity with drainage and ventilation at the top and bottom. Sealing boards tightly around a damp core creates a decorative wooden thermos that stores moisture forever.
How to Choose the Right Boards
Confirm the Exact Product and Stamp
Check the label, dimensions, warranty literature, and ink stamp on the back. Protected and traditional primed boards may look nearly identical from the front, but their warranties differ. Buying by appearance is how “close enough” becomes expensive later.
Select Width and Thickness by Proportion, Not Habit
Choose width and thickness by façade proportion. Narrow casing can look underfed on a large wall, while oversized trim crowds small openings. Sketch the elevation and verify actual finished dimensions rather than relying only on nominal lumber names.
Inspect for Handling Damage
Inspect for crushed corners, deep scratches, staining, swelling, damaged joints, and bow. Store boards flat, off the ground, and protected from sun, dirt, and saturation. Outdoor covers should shed water without sealing off ventilation; tightly wrapping damp boards creates a portable humidity experiment.
Installation Practices That Protect the Investment
Measure Moisture Before Installation
Wood changes dimension as it gains and loses moisture. The U.S. Forest Service explains that exterior wood moisture depends largely on relative humidity and exposure to rain and sunlight, and that installing wood near its expected in-service moisture level reduces later movement. WindsorONE requires exterior boards to be at or below 18% moisture content and recommends checking with a moisture meter. Material stored near soil, concrete, or in humid conditions can gain moisture even when it arrived dry.
Prime Every Field Cut
Cut ends expose end grain, which absorbs water far faster than a factory-coated face. Reprime every saw cut, miter, notch, routed edge, and drilled area required by the manufacturer. WindsorONE specifies repriming all field cuts and notes that a high-quality 100% acrylic-latex primer may be used under suitable curing conditions, while colder conditions may require an alkyd wood primer. Fine Homebuilding likewise recommends priming exterior end grain because untreated cuts can rapidly absorb moisture and begin to deteriorate.
Use Corrosion-Resistant Fasteners
Exterior trim fasteners must resist both weather and chemical exposure. Manufacturer guidance recommends stainless-steel or galvanized nails, with Type 304 stainless steel for general applications and Type 316 for coastal exposure. Nails must penetrate at least 1-1/4 inches into solid wood framing. Near edges and ends, predrilling helps prevent splitting, and overdriven fasteners should be repaired rather than disguised with wishful thinking.
Respect Spacing, Support, and Joint Design
Fastener spacing depends on the trim application and board width. WindsorONE calls for double fastening and tighter schedules at joints, fascia, and wider boards. Butt joints should land over framing or solid backing, and long horizontal runs should be planned so movement is controlled rather than trapped. Follow the current installation guide for the exact board, because a fastening schedule is engineering guidancenot a decorative suggestion.
Maintain Clearance From Wet Surfaces
The memorable rule for this product is “6, 2, 1/4”: keep trim at least six inches above grade, two inches above roofs, decks, and similar horizontal surfaces, and one-quarter inch above flashing to create a capillary break. Landscaping, mulch, masonry, and concrete should not be allowed to hold moisture against the board. These gaps may look small on a drawing, but they make a large difference in drying potential.
Flash First, Caulk Second
Water should be managed in layers. Head flashing above windows and doors, drip caps, roof-edge flashing, and flashing at horizontal material changes should direct water to the exterior. Do not seal drainage openings or caulk the joint between flashing and trim where the assembly is designed to drain. Building-science guidance similarly emphasizes that flashing should direct water out of the wall cavity and remain connected to the drainage plane.
Painting and Long-Term Maintenance
Finish the Factory Primer With Exterior Topcoats
Factory-primed trim is not usually intended to remain exposed indefinitely. WindsorONE calls for two coats of high-quality 100% acrylic-latex exterior paint, preferably within 90 days and no later than one year after installation. The surface should be clean, dry, and free from mildew, dust, and contaminants. Sherwin-Williams and Benjamin Moore also emphasize thorough preparation and exterior-grade coatings for durable wood finishes.
Brush application is useful at edges, joints, end grain, and detailed profiles because it works coating into small irregularities. Spraying can be efficient on large projects, but back-brushing helps produce uniform coverage. Follow the paint maker’s spread rate and weather limits. A heroic third coat cannot rescue paint applied over wet wood.
Inspect Annually
Once a year, walk the exterior and look for open joints, cracked caulk, peeling paint, rust stains, gutter overflow, sprinkler exposure, and trim touching soil or mulch. Pay special attention to lower corners, window sills, roof intersections, deck connections, and column bases. Clean dirt with mild detergent and water, allow the surface to dry, and repair coating failures promptly. Small maintenance is inexpensive; deferred maintenance has excellent taste in ladders, scaffolding, and replacement lumber.
S4SSE Protected Wood Trim Compared With Alternatives
Versus ordinary primed wood: Protected trim adds preservative resistance and a product-specific warranty while retaining the cutting, fastening, and finishing behavior contractors expect from wood. Ordinary primed boards may cost less, but their protection level varies widely.
Versus PVC trim: PVC does not require paint for protection and is not subject to wood rot, but it expands and contracts with temperature and follows different fastening, adhesive, and paint rules. Protected wood offers a familiar wood feel, crisp milling, and compatibility with traditional carpentry details. AZEK’s own guidance notes that PVC trim can be worked with common woodworking tools but must be installed according to material-specific movement and fastening requirements.
Versus engineered wood trim: Engineered products can offer excellent consistency and durable factory finishes, but cut-edge sealing, clearances, flashing, and product-specific gaps remain essential. LP’s installation resources repeatedly stress keeping products dry and sealing exposed cuts. The common lesson across materials is wonderfully unglamorous: the wall must drain.
Common Mistakes to Avoid
- Using trim boards as structural members, decking, siding, or railings.
- Installing wet material without checking moisture content.
- Leaving field cuts and end grain unprimed.
- Letting trim touch soil, roofing, concrete, mulch, or standing water.
- Using interior fasteners or non-corrosion-resistant nails outdoors.
- Overdriving nails and leaving the depressions unsealed.
- Substituting caulk for head flashing or drip-edge flashing.
- Painting dirty, damp, or mildew-contaminated surfaces.
- Ignoring the current manufacturer guide because “wood is wood.”
Experience-Based Lessons From S4SSE Protected Trim Projects
On real jobs, the first pleasant surprise is usually the straightness. When a crew is trimming several windows on the same elevation, consistent boards make it much easier to keep head casings aligned and reveals uniform. The time saved does not arrive with a trumpet fanfare; it shows up as fewer trips to the saw, fewer rejected pieces, and less persuasion with clamps. On a long band board, that consistency can be the difference between a clean horizontal line and a subtle wave that becomes impossible to unsee after sunset lighting hits the wall.
The second lesson is that factory primer creates confidence, but sometimes too much confidence. Installers who treat a preprimed board as fully finished are more likely to skip the cut-end station. Experienced crews solve this with a simple routine: a small container of compatible primer sits beside the saw, and every cut is coated before the board travels to the wall. This adds seconds per piece and prevents the classic problem of beautiful faces surrounding thirsty end grain.
Coastal projects make fastener selection memorable. A standard galvanized nail may look acceptable on installation day, yet harsh salt exposure can reveal weak choices through dark streaks and corrosion. Using the specified stainless steel from the beginning costs more than bargain fasteners, but it costs far less than repainting a façade dotted with rust marks. The same principle applies to nail depth. A nail gun set too aggressively can punch small craters through the primer. Those craters become water pockets unless they are filled, reprimed, and painted.
Another recurring experience involves landscaping. Trim may be installed with perfect clearance, only for mulch beds to rise a few inches during later yard work. Suddenly, the lower corner boards are buried in damp organic material. Smart maintenance includes photographing or documenting required clearances for the homeowner, landscaper, or property manager. The house should not lose its capillary break because someone became enthusiastic with a wheelbarrow.
Window trim demonstrates why water management matters more than caulk artistry. A thick bead of sealant can look reassuring, but if head flashing is missing or reverse-lapped, water may still enter behind the assembly. Worse, excessive caulk can block the drainage path that was supposed to let water escape. Successful projects treat flashing as the primary defense and caulk as a supporting player. Caulk is useful; it simply should not be promoted to chief building scientist.
Dark paint colors also deserve planning. On wood trim, the central issues are coating quality, surface preparation, solar exposure, and moisture control. A sample board painted in the chosen color and left in the sun for several days can reveal whether joints, filler, or surface texture become more visible than expected. Dark colors show crisp S4SSE geometry beautifully, but they are less forgiving of dents, uneven sanding, and rushed repairs.
Finally, the best long-term results usually come from treating trim as part of a system rather than as decoration added at the end. The board, fastener, primer, topcoat, flashing, weather-resistive barrier, air gap, gutter, roof edge, and landscaping clearance all contribute to performance. S4SSE Protected Trim Boards provide a strong starting material, but craftsmanship completes the promise. The glamorous secret is annoyingly practical: keep the wood dry, give water a way out, and maintain the paint before it begins sending distress signals.
Conclusion
S4SSE Protected Trim Boards combine the appearance and workability of real wood with smooth four-sided milling, square architectural edges, factory primer, and preservative protection. They are especially effective for window and door casings, fascia, rake boards, corner boards, band boards, soffits, and properly ventilated column wraps. Their value is greatest when the installation follows the complete system: dry storage, moisture testing, sealed cuts, corrosion-resistant fasteners, solid backing, correct clearances, dependable flashing, compatible exterior paint, and routine inspection.
Choose them when you want crisp painted woodwork and the flexibility of traditional carpentry without relying on ordinary untreated trim. Just remember that “Protected” does not mean “indestructible.” Water remains undefeated in every weight class, so the winning strategy is to keep it moving away from the building.
Note: Product specifications, approved uses, warranty terms, paint requirements, and fastening schedules can change. Always follow the current manufacturer instructions, paint-system requirements, local building code, and project-specific guidance from a qualified designer or contractor.

