
Skincare
Our $200 Marble Fireplace Makeover
Jul
Our fireplace was not disastrous enough to become a funny family legend, but it was not attractive enough to deserve the center of the living room. It had beige builder-grade tile, stained grout, and a white mantel that had slowly faded into a color best described as “old refrigerator.”
Replacing the entire surround professionally was outside our budget, so we set a challenge: create a real marble fireplace makeover for approximately $200 without changing the firebox, rebuilding the mantel, or using materials that merely looked convincing from across the room.
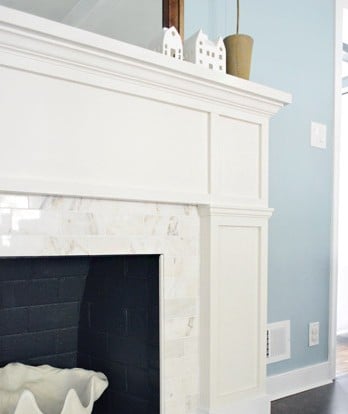
The finished fireplace is brighter, cleaner, and considerably more expensive-looking than the receipt suggests. Here is how we planned the project, stretched the budget, installed the marble tile, and survived the small mistakes that every honest DIY makeover includes.
Why We Chose Marble for a Budget Fireplace Makeover
Marble sounds like something selected while casually discussing yacht storage. Fortunately, a fireplace surround covers a relatively small area. That makes natural stone far more affordable than it would be for a floor, shower, or full-height wall.
We found discounted Carrara marble subway tile with soft gray veining. The pale stone connected the warm white walls, dark flooring, and black firebox without introducing another competing color. Its classic pattern also felt less likely to age badly than a dramatic trend.
Natural marble does require extra care. Tiles vary in shade, some pieces contain heavier veining, and the surface can absorb stains or become etched by acidic cleaners. It also chips more easily than porcelain. We accepted those quirks because the natural variation was exactly what gave the finished fireplace its character.
Homeowners who want the same general appearance with easier maintenance can choose heat-appropriate marble-look porcelain. For this project, however, using real stone was part of the funand part of the slightly unreasonable challenge.
Our Exact $200 Fireplace Makeover Budget
The budget worked because we reused the mantel and hearth, borrowed a wet saw, and purchased clearance tile. Prices vary by retailer and location, so this breakdown is best used as a planning example rather than a binding agreement with the renovation gods.
| Material | Cost | How We Saved |
|---|---|---|
| Carrara marble subway tile | $72 | Clearance boxes, including extra tile for cuts and breakage |
| White natural-stone mortar | $24 | One bag covered the entire surround |
| Marble-compatible grout | $18 | A small package was enough for narrow joints |
| Surface patch and bonding primer | $16 | Used only on damaged or difficult areas |
| Metal tile edge trim | $22 | Less expensive than specialty marble trim |
| Penetrating stone sealer | $17 | Purchased a small project-size container |
| Spacers, sealant, blades, and miscellaneous supplies | $31 | We reused buckets, trowels, a level, and safety equipment |
| Total | $200 | Decorative pillow emergencies not included |
Tools and Materials We Used
- Natural marble tile with approximately 15 percent extra for waste
- White mortar approved for natural stone
- Marble-compatible grout and flexible perimeter sealant
- Penetrating stone sealer
- Notched trowel, margin trowel, spacers, and mixing bucket
- Wet saw with a blade suitable for natural stone
- Tape measure, level, straightedge, pencil, and painter’s tape
- Sponges, microfiber cloths, clean water, and drop cloths
- Gloves, eye protection, and a dust mask
Borrowing the wet saw was our biggest money-saving move. A rental is another practical option, especially when every cut is measured and marked before the rental clock starts ticking.
Safety Checks Before Starting
A cosmetic fireplace makeover should never interfere with the firebox, chimney, gas system, wiring, vents, access panels, or required clearances. Before removing anything, we confirmed that the existing surround was stable and that the chosen materials were suitable for the fireplace location.
Manufacturer instructions and local requirements take priority over a general DIY tutorial. If a fireplace has cracked firebrick, loose masonry, smoke problems, damaged controls, water intrusion, or questionable gas or electrical components, the correct tool is a qualified professionalnot a larger hammer.
Combustible wood trim must remain outside the clearances required for the specific fireplace. Vents, louvers, controls, warning labels, and service openings should never be covered with tile or decorative materials.
How We Completed the Marble Fireplace Makeover
1. Measuring and Planning the Layout
We measured each section around the firebox separately and calculated the total square footage. We then added approximately 15 percent for cuts, color selection, and accidental damage.
After opening every box, we spread the tiles across the floor and blended the colors. This prevented one side of the surround from appearing nearly white while the other side looked like a thunderstorm. We also removed a few pieces with distracting veins or chipped corners.
The pattern was centered on the firebox opening because that is the feature the eye notices first. Several dry layouts helped us avoid narrow tile slivers along the outer edges.
2. Removing the Old Tile
Some of the old tiles released easily. Others behaved as though they had signed a permanent lease. We worked slowly with controlled pressure rather than attacking the surface and creating unnecessary repairs.
Once the old material was removed, we scraped away loose adhesive, vacuumed the dust, and cleaned soot and grime. Any weak material left beneath the new tile could eventually cause cracks or bond failure.
3. Repairing and Flattening the Surface
Low spots and damaged areas were patched and allowed to cure. We checked the surface with a long straightedge because marble tile does not politely hide an uneven wall. High and low spots can create lippage, crooked joints, and rows that drift away from level.
Where a bonding primer was appropriate for the substrate, we used it according to the manufacturer’s directions. The existing surface must be clean, sound, and compatible with the chosen setting material before installation begins.
4. Dry-Fitting the Marble
We dry-fit the lower row, vertical legs, and section above the firebox. This was not the most exciting stage, but it prevented nearly every expensive layout mistake.
We selected a simple running-bond pattern. Herringbone would have looked beautiful, but it also would have required more cuts, more waste, and considerably more discussion beside the wet saw. The simpler layout allowed the natural veining to remain the main feature.
5. Installing the Edge Trim
Instead of purchasing specialty marble pencil trim, we used slim metal profiles along the exposed outer edges. The profiles protected the tile and created a crisp transition between the marble and painted wall.
We selected trim that matched the thickness of the tile and embedded it in mortar as the perimeter rows were installed.
6. Mixing and Applying the Mortar
We used white mortar formulated for natural stone. Dark setting materials can sometimes affect the appearance of pale or slightly translucent marble, so following the tile and mortar manufacturers’ recommendations is important.
Mortar was mixed in small batches and spread with the recommended notched trowel. We combed the ridges in one direction, skim-coated tile backs when needed, and pressed each piece into position with a short sliding motion.
Every few rows, we lifted a tile to inspect the contact between the stone and mortar. Proper coverage helps prevent unsupported corners and weak spots. Excess mortar was cleaned from the joints before it hardened into something requiring archaeological tools.
7. Keeping the Rows Level
The first visible row controlled the alignment of everything above it. We used a straight ledger where necessary and checked level frequently.
Fireplaces, floors, and mantels are often less square than they look. Instead of forcing the entire correction into one noticeably crooked joint, we made tiny adjustments across several rows.
Cut edges were positioned where adjacent tile or metal trim would conceal them. The mortar was then allowed to cure for the full period specified by the manufacturer.
8. Sealing and Grouting
We tested the penetrating sealer on a spare piece before applying it to the installed marble. Once we confirmed that it did not darken or alter the finish, we sealed the tile according to the product instructions.
A warm-gray grout was chosen to echo the stone’s veining without outlining every tile. Because the joints were narrow and the marble surface could scratch, we used a grout specifically compatible with polished natural stone.
We worked in small areas, cleaned with a barely damp sponge, and changed the water frequently. Perimeter joints and changes of plane were finished with flexible sealant rather than rigid grout.
9. Refreshing the Existing Mantel
The mantel was structurally sound, so replacing it would have been budget sabotage. We cleaned it, filled small dents, sanded lightly, and applied fresh trim paint.
The clean white finish created a stronger contrast with the gray-veined marble. It looked like an entirely new mantel, although its glamorous paint station consisted of two storage bins and a piece of leftover cardboard.
How We Made an Inexpensive Makeover Look Custom
We Used a Limited Color Palette
White, gray, black, and a narrow line of metal trim created a calm composition. The room already contained wood, fabric, books, plants, and plenty of personality. The fireplace did not need six additional colors competing for attention.
We Prioritized Alignment Over Trends
Balanced cuts, level rows, and consistent joints made the inexpensive tile look refined. Premium stone installed carelessly still looks careless. Discounted stone installed thoughtfully can look surprisingly luxurious.
We Kept the Mantel Styling Simple
After the makeover, we added one framed artwork, two candleholders, and a trailing plant. Empty space allowed the veining to remain visible and prevented the finished surround from immediately disappearing behind seasonal decorations.
Common Marble Fireplace Makeover Mistakes
- Ignoring fireplace damage: Decorative tile cannot repair firebrick, chimney, gas, electrical, or structural problems.
- Using an unsuitable adhesive: Mortar, primer, grout, and sealant must be compatible with the stone, substrate, and location.
- Tiling over a weak surface: Loose paint, mortar, tile, or masonry should be removed or repaired first.
- Skipping the dry layout: Planning prevents tiny edge cuts, abrupt pattern changes, and uneven color distribution.
- Failing to blend the boxes: Natural marble should be mixed before installation so its color variation appears balanced.
- Rushing the curing time: Mortar, grout, sealer, and sealant need the curing periods listed by their manufacturers.
- Using harsh cleaners: Vinegar and acidic household cleaners can etch marble. A neutral stone cleaner is a safer choice.
Our Real Experience: What the Project Actually Felt Like
The completed fireplace looks calm and orderly, but the installation was not a continuous montage of smiling people wearing spotless overalls. The first surprise appeared during demolition. We expected the beige tiles to come off in neat sections. Some did. Others clung to the wall as if protecting a family secret.
Working slowly turned out to be faster overall. Whenever we became impatient and applied too much force, we created another patch that had to be repaired later. Controlled removal was less exciting, but it protected the underlying surface and kept the budget from wandering into “unexpected materials” territory.
The second major lesson involved blending the marble. On the floor, nearly every individual tile looked attractive. On the wall, certain combinations appeared too busy, too blank, or strangely striped. We spent almost an hour moving pieces before installing the first row.
At the time, that felt excessive. Once the mortar was mixed, every minute of planning felt like a bargain. We photographed the dry layout and numbered several groups so the arrangement could be recreated during installation. Next time, we would label every row instead of relying on memory.
Cutting the marble also required patience. Slow passes with a suitable wet-saw blade produced much cleaner edges than rushing. The few tiles we hurried chipped in exactly the places where the damage would have been most visible, because renovation materials apparently enjoy physical comedy.
Keeping extra tile nearby prevented those small accidents from becoming dramatic store visits. The extra pieces also gave us freedom to reject tiles that did not fit the color balance. Buying only the exact measured square footage would have saved a few dollars initially and created significantly more stress later.
Grouting was the most satisfying stage and the easiest point to become overconfident. As soon as the joints filled, the surround looked finished. That made us want to work faster. Instead, we cleaned small areas, used fresh water, and avoided soaking the marble.
The warm-gray grout was one of the best design choices. Bright white would have emphasized every joint, while a darker gray might have made the pattern look too busy. The selected color visually connected the tiles and made their natural veining appear more deliberate.
Staying within the budget required several unglamorous decisions. We did not replace the perfectly usable mantel merely because a new one would photograph well. We did not buy a full-size container when a smaller package covered the project. We also avoided new sconces, decorative molding, and a cart full of “finishing touches.”
A $200 DIY fireplace makeover can easily become a $600 project through a series of innocent $35 purchases. Giving every item a job before buying it kept our total under control.
The room changed more than expected. The old beige surround absorbed light and made the fireplace feel visually heavy. Pale marble reflected daylight, strengthened the contrast around the black firebox, and made the mantel appear sharper and brighter.
Furniture and textiles that had previously looked unrelated suddenly felt coordinated because the marble repeated colors already present in the rug and curtains. We had changed only a few square feet of material, yet the entire living room appeared more intentional.
The best compliment was not, “That marble must have been expensive.” It was, “Was the fireplace always like this?” The new surround looked as though it belonged to the house instead of arriving as a weekend costume.
We would absolutely complete the project again, with two improvements: label every dry-fit row and buy knee pads before sorting stone on the floor for several hours. Otherwise, the makeover delivered exactly what we wantedreal marble, a brighter room, a timeless focal point, and a final receipt of $200.
Final Thoughts
Our $200 marble fireplace makeover worked because we treated preparation and layout as the most important parts of the renovation. We selected a timeless material, kept the pattern simple, repaired the substrate, used products intended for natural stone, and resisted unrelated upgrades.
A similar project can be manageable for an experienced DIYer when the fireplace and surrounding surface are in sound condition. Follow the fireplace manufacturer’s instructions, respect required clearances, and involve a qualified professional whenever work affects the firebox, chimney, gas system, electrical components, or structural masonry.
Saving money on a beautiful fireplace is satisfying. Saving money while keeping the fire exactly where it belongs is considerably better.

