
Hair Care
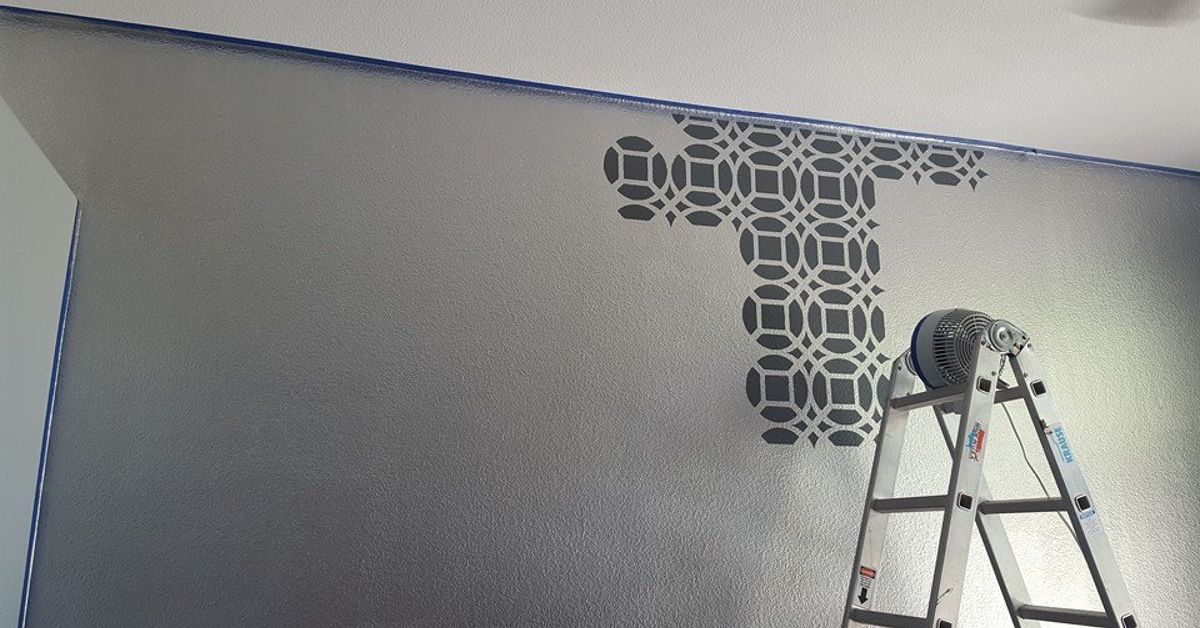
Master Bedroom Stencil Accent Wall
Aug
A master bedroom stencil accent wall is the decorating equivalent of putting on a tailored jacket: suddenly, the whole room looks intentional. You do not need custom millwork, imported wallpaper, or a contractor who arrives with a clipboard and a mysterious hourly rate. With the right stencil, paint, prep work, and a little patience, one plain wall can become the dramatic focal point your bedroom has been politely requesting for years.
The beauty of a stenciled accent wall is that it gives you the look of wallpaper with more control over color, scale, placement, and budget. Want a soft tone-on-tone damask behind the bed? Done. Prefer modern geometric lines in greige and charcoal? Absolutely. Dreaming of a botanical pattern that whispers “boutique hotel” instead of yelling “craft night gone rogue”? Also possible. The key is planning the design like a grown-up and painting it like someone who has learned from other people’s mistakes.
Why Choose a Stencil Accent Wall for the Master Bedroom?
The master bedroom is not just where you sleep. It is where you recharge, hide from laundry, scroll longer than you meant to, and occasionally pretend the rest of the house does not exist. That makes the room’s atmosphere important. A stencil accent wall can add depth, texture, and personality without overwhelming the entire space.
Unlike full-room wallpaper, a wall stencil lets you create a custom pattern using paint colors that already work with your bedding, furniture, flooring, and lighting. It is also easier to update later. If your taste changes from “soft coastal retreat” to “moody modern sanctuary,” you can repaint the wall instead of performing a wallpaper-removal ritual that tests your character.
Another advantage is flexibility. Stencils come in countless styles, including floral, Moroccan, Art Deco, trellis, herringbone, geometric, botanical, medallion, and faux tile patterns. You can stencil the entire wall, create a border, frame the headboard area, or stencil only the upper half above wainscoting. In other words, you get design drama without signing a lifetime contract.
Best Wall to Stencil in a Master Bedroom
The best wall for a master bedroom stencil accent wall is usually the wall behind the bed. This placement naturally creates a focal point because the bed is already the main feature of the room. A patterned wall behind the headboard visually anchors the space and makes even simple bedding look more styled.
If the bed wall has windows, awkward vents, or too many interruptions, look for another large, uninterrupted surface. A wall opposite the bed can work beautifully, especially if you want to enjoy the design while lying down. A stencil wall behind a dresser, reading chair, or fireplace can also look elegant, but avoid choosing a wall at random. An accent wall should have a reason to exist. Otherwise, it may look like one wall got invited to a party and the others stayed home confused.
When Not to Stencil a Wall
A stencil wall may not be ideal if the surface is heavily textured, damaged, glossy, damp, or poorly repaired. Stencils love smooth walls. Bumpy surfaces can cause paint to bleed under the edges and blur the pattern. If your wall has cracks, peeling paint, or mystery lumps from previous DIY adventures, fix those first. A beautiful stencil over a bad wall is like putting eyeliner on a raccoon: dramatic, yes, but not exactly polished.
Choosing the Right Stencil Pattern
The pattern determines the mood of the room, so choose carefully. Large-scale patterns usually feel more modern and luxurious, while tiny repeats can appear busy in a bedroom. For a calming master bedroom, consider designs with breathing room: oversized florals, soft arches, simple geometrics, leafy motifs, or classic damask patterns.
If your furniture is ornate, a cleaner stencil can balance the room. If your furniture is minimal, a more decorative stencil can add personality. A farmhouse bedroom might suit a faded tile or botanical pattern. A glam bedroom may look stunning with metallic paint over a deep base color. A transitional bedroom can handle a tone-on-tone trellis or subtle geometric repeat.
Popular Stencil Styles for Master Bedrooms
Damask stencils create a romantic, elegant look and work well with upholstered headboards, layered bedding, and soft lighting. Use low-contrast colors to keep the design sophisticated rather than overly formal.
Geometric stencils are ideal for modern bedrooms. Hexagons, diamonds, chevrons, and interlocking lines can add structure without needing extra wall decor. For a quieter look, choose colors within the same family.
Botanical stencils bring in a relaxed, nature-inspired feel. Leaves, vines, ferns, and floral patterns pair beautifully with linen bedding, wood furniture, woven baskets, and earthy color palettes.
Moroccan and tile-inspired stencils add global character and can mimic the look of patterned wallpaper or decorative tile. They work especially well when paired with warm neutrals, brass accents, and layered textiles.
Picking the Perfect Paint Colors
Color is where many stencil walls either become gorgeous or start looking like a decision made during a paint-sample sugar rush. For a master bedroom, aim for colors that support rest. Calm does not have to mean boring, but it should not feel like your wall is trying to win a talent show.
For a safe and stylish option, choose a tone-on-tone combination. For example, pair warm white with soft beige, pale gray with charcoal gray, sage green with a lighter green, or navy with a slightly lighter blue. The pattern appears dimensional but not loud.
If you want more contrast, balance it with simpler bedding and furniture. A deep green wall with a soft gold stencil can feel luxurious. A white wall with a charcoal geometric stencil can feel crisp and modern. A dusty rose base with a warm taupe stencil can feel romantic without becoming overly sweet.
Bedroom-Friendly Color Combinations
Soft white and warm beige create a relaxed, hotel-like look. Sage green and creamy white feel fresh and peaceful. Navy and muted blue-gray create a cozy, tailored atmosphere. Greige and ivory work beautifully in transitional spaces. Charcoal and metallic champagne can make the room feel dramatic and upscale, especially with warm bedside lighting.
Before committing, test both colors on the wall. Bedroom lighting changes throughout the day, and a color that looks calm at noon may look gloomy at night. Paint sample boards or small patches near the bed, then view them in morning light, afternoon light, and lamp light. Your future self will appreciate this small act of responsibility.
Tools and Supplies You Will Need
A successful master bedroom stencil accent wall starts with the right supplies. You will need a reusable wall stencil, painter’s tape, a level, measuring tape, a pencil, drop cloths, paint trays, a foam roller or stencil brush, paper towels, a small artist brush for touch-ups, and low-tack spray adhesive if recommended for your stencil. You will also need base paint, stencil paint, spackling compound, sandpaper, and a clean cloth for wall prep.
Do not skip quality tools. A flimsy stencil, overloaded roller, or bargain-bin tape can turn a simple project into an emotional support project. The stencil should be sturdy enough to lie flat against the wall. A dense foam roller works well for large patterns, while stencil brushes are better for detailed designs and corners.
How to Prepare the Wall
Wall preparation is not glamorous, but neither is repainting a smeared stencil at midnight. Start by removing artwork, outlet covers, switch plates, and anything near the work area. Move furniture away from the wall and cover the floor with a drop cloth.
Next, clean the wall with a damp cloth to remove dust, lint, and fingerprints. Fill nail holes and dents with spackling compound, let it dry, and sand the surface smooth. If the wall has a glossy finish, lightly sanding can help the new paint grip better. Wipe away dust before painting.
If you are changing the base color, apply one or two coats of interior wall paint and allow it to dry completely. A flat or matte finish is often easiest for stenciling because it helps reduce slipping and paint seepage. Give the base coat enough time to cure before stenciling. Paint that feels dry to the touch may still be soft underneath, and soft paint can lift when you remove tape.
Step-by-Step: How to Create a Master Bedroom Stencil Accent Wall
Step 1: Find Your Starting Point
Most full-wall stencil projects begin near the top center of the wall. Use a measuring tape to find the wall’s center, then mark a faint vertical line with a pencil. A level helps keep the stencil straight. This first placement matters because every repeat will follow it. Think of it as the first pancake, except you do not get to hide it under the good pancakes.
Step 2: Secure the Stencil
Position the stencil and secure it with painter’s tape. If the stencil is large or detailed, a light coat of low-tack spray adhesive on the back can help hold the edges close to the wall. Let the adhesive become tacky before placing the stencil so it does not leave residue. Always follow the stencil manufacturer’s instructions.
Step 3: Load and Offload the Paint
This step is the secret sauce. Load your roller or brush with paint, then remove most of that paint on a paper towel. Stenciling works best with very little paint. If the tool looks too dry, it is probably just right. Too much paint causes bleeding, smudging, and language you may not want the children to hear.
Step 4: Apply the Paint Lightly
Use light pressure. With a foam roller, roll gently over the stencil in thin layers. With a stencil brush, use a pouncing or circular motion rather than brushing side to side. Brushing can push paint under the stencil edges. It is better to apply two light coats than one heavy coat.
Step 5: Lift and Check
Before moving on, carefully lift one corner of the stencil to check the result. If the pattern looks crisp, continue. If paint is bleeding, offload more paint from your roller or brush and use less pressure. Small imperfections are normal, but large smears mean your tool is too wet or the stencil is not secure enough.
Step 6: Repeat the Pattern
Most wall stencils include registration marks that help you line up the next repeat. Match those marks carefully, tape the stencil in place, and continue across the wall. Work in rows, stepping back often to check alignment. Do not rely only on your close-up view. Up close, you will obsess over one tiny dot. From across the room, the whole wall may look fantastic.
Step 7: Handle Corners and Edges
Edges, ceilings, and baseboards require patience. Bend the stencil gently into corners or trim it if you are comfortable doing so. A smaller stencil brush usually gives better control in tight areas. Do not worry if edge repeats are not perfect. Furniture, bedding, curtains, and normal human eyesight are surprisingly forgiving.
Step 8: Touch Up the Design
After the wall dries, inspect the pattern. Use a small artist brush to clean up any obvious bleeds with the base color. Then use the stencil color to fill any missed spots. This is not cheating; it is finishing. Even professional-looking DIY projects usually have a few tiny corrections behind the scenes.
Design Ideas for a Master Bedroom Stencil Accent Wall
Soft Hotel-Inspired Wall
Paint the wall warm white and stencil a large damask pattern in beige or pale taupe. Add white bedding, two matching lamps, and textured throw pillows. The result feels calm, elegant, and slightly fancy, like you might suddenly start folding towels into swans.
Modern Moody Retreat
Use a charcoal, navy, or deep olive base color with a slightly lighter stencil shade. Keep the furniture simple and add warm metal accents, such as brass or bronze. This works especially well in bedrooms with good natural light or layered lamps.
Boho Botanical Bedroom
Choose a leafy stencil in soft green, clay, or muted terracotta. Pair it with natural wood nightstands, linen bedding, rattan lighting, and a neutral rug. This creates a relaxed, collected look without turning the bedroom into a jungle-themed restaurant.
Subtle Luxury with Metallic Paint
For a glam master bedroom, try metallic champagne, pearl, or soft gold stencil paint over a matte base color. Keep the contrast gentle. Metallic paint catches the light beautifully, but too much shine can make the wall look more nightclub than nest.
Common Mistakes to Avoid
The most common mistake is using too much paint. Stenciling is not regular wall painting. The goal is controlled, thin application. If paint is dripping, your roller is overloaded. If the pattern looks fuzzy, use less paint and press the stencil more firmly against the wall.
Another mistake is skipping wall prep. Dust, holes, and uneven patches become more obvious once a pattern is painted over them. Take the time to clean, patch, sand, and prime if needed.
Many DIYers also forget to check alignment. Even a small tilt can become noticeable after several repeats. Use a level frequently, especially on large geometric patterns. Organic patterns are more forgiving, while straight lines will expose every shortcut like a tiny interior design detective.
Finally, avoid choosing a pattern that is too small or too busy for the wall. In a master bedroom, the accent wall should support relaxation. If the pattern makes your eyes do aerobics, scale it up or lower the contrast.
How to Style the Room Around the Stencil Wall
Once your stencil wall is finished, let it lead the design. You do not need a huge gallery wall over a patterned background. In many cases, the stencil itself is the artwork. A simple headboard, clean bedding, and balanced nightstands may be enough.
Repeat the stencil colors in small accents around the room. If the stencil is sage green, add a green throw pillow or ceramic lamp. If it includes warm beige, echo that tone in curtains or a rug. This makes the room feel coordinated instead of accidentally decorative.
Lighting also matters. Wall sconces, bedside lamps, or picture lights can highlight the pattern and add softness at night. Warm bulbs often make bedroom colors feel more inviting than cool bulbs. The right lighting can turn a stencil wall from “nice project” into “wait, did you hire someone?”
Maintenance and Long-Term Care
A painted stencil wall is fairly easy to maintain. Dust it gently with a microfiber cloth or vacuum brush attachment. For small marks, use a lightly damp cloth and mild soap, testing first in a hidden area. Keep leftover paint labeled for touch-ups. Write the brand, color name, finish, and room on the lid because future you will not remember. Future you is busy.
If you eventually want a new look, simply sand any raised edges lightly, prime if needed, and repaint. That is one of the biggest benefits of a stencil accent wall: it gives you pattern without permanent commitment.
Real-Life Experience: What Actually Happens When You Stencil a Bedroom Wall
The first thing people learn when making a master bedroom stencil accent wall is that the project looks easier online than it feels halfway through. In photos, the stencil is always perfectly flat, the paint tray is spotless, and the person painting appears to have the peaceful expression of someone who has never dropped painter’s tape behind a headboard. In real life, stenciling is still very doable, but it rewards patience more than enthusiasm.
One practical experience is that the first few repeats often feel slow. You may spend ten minutes lining up the stencil, taping it, checking the level, loading the roller, offloading the roller, and questioning all your life choices. Then, after a few sections, the rhythm improves. You begin to understand how much paint is enough, how firmly to press, and how carefully to lift the stencil. The project becomes less scary and more satisfying.
Another lesson is that perfection is not the goal. A tiny bleed in one corner will feel enormous when your face is six inches from the wall. But once the bed is back in place and the lamps are glowing, those small flaws usually disappear into the overall pattern. The human eye reads the wall as a complete design, not as a courtroom investigation of every brush mark.
It also helps to take breaks. Stenciling while tired is when mistakes happen. Alignment gets sloppy, paint gets heavier, and suddenly the wall has one repeat that looks like it had a long lunch. Step away, drink water, stretch your shoulders, and come back with fresh eyes. A master bedroom is supposed to be relaxing, not the site of a personal endurance challenge.
Many homeowners discover that choosing a subtle color combination makes the final result feel more expensive. High-contrast stencil walls can be beautiful, but they demand accuracy and confidence. Tone-on-tone designs are more forgiving and easier to live with. For example, a soft greige pattern over a warm white wall can add texture without dominating the room. It is the quiet luxury of DIY: elegant, calm, and unlikely to startle you before coffee.
Furniture placement also changes the final impression. A stencil wall can look intense when the room is empty, then suddenly perfect once the bed, pillows, art, and lamps return. Do not judge the wall too early. Interior design is a team sport, and the wall is only one player.
The most rewarding moment usually comes at the end, when the tape is removed, the touch-ups are dry, and the room feels completely different. A plain bedroom wall becomes a custom backdrop. The bed looks more important. The room feels more finished. And yes, you may casually mention to guests that you did it yourself. Try to sound humble. You have earned at least a little dramatic pause.
Conclusion
A master bedroom stencil accent wall is one of the smartest ways to add pattern, style, and personality to a bedroom without committing to expensive wallpaper or major renovation. The project works best when you choose the right wall, select a bedroom-friendly pattern, test your colors, prepare the surface properly, and apply paint in thin, careful layers. With patience and a sense of humor, even a beginner can create a wall that feels custom, polished, and deeply personal.
The best stencil accent walls do not scream for attention. They create atmosphere. They frame the bed, soften the room, and make the space feel intentionally designed. Whether your style is modern, romantic, boho, farmhouse, classic, or quietly luxurious, a stencil wall can help your master bedroom feel less like a place where laundry waits and more like a retreat you actually want to spend time in.
Note: This article is an original, publication-ready synthesis based on current, real-world home improvement, paint, stencil, and interior design guidance from reputable U.S. sources. It contains no copied source text and no unnecessary citation placeholders.

