
Beauty Unlocked
How to Space Curtains Evenly Using Toilet Paper Rolls
Jul
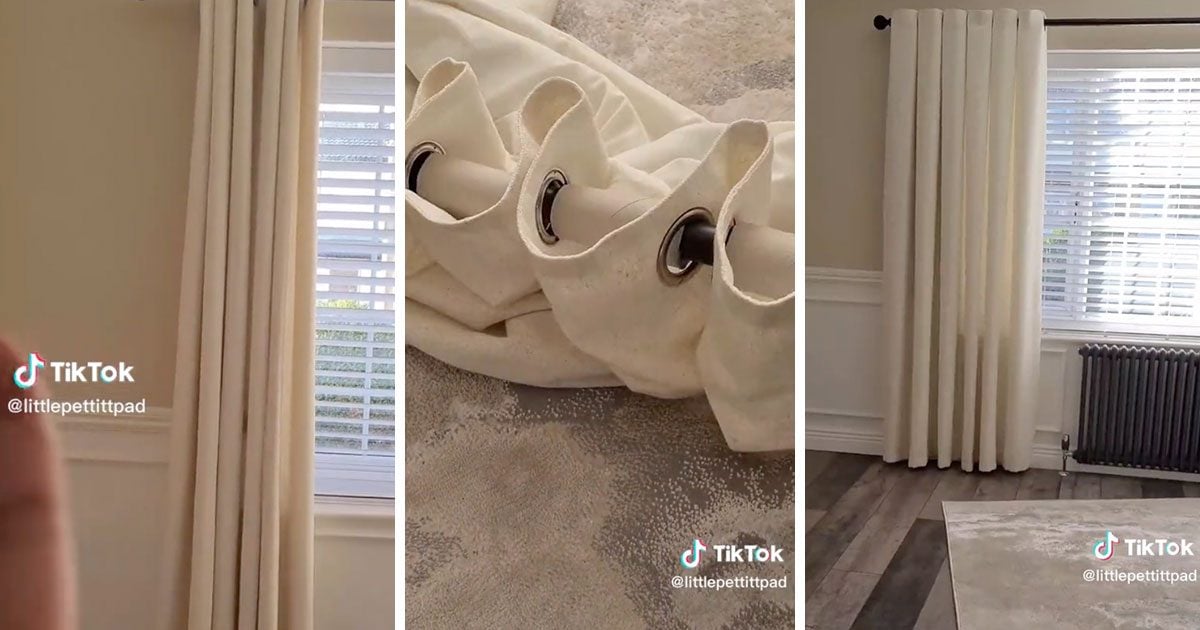
Curtains have a remarkable talent for exposing tiny decorating mistakes. One uneven fold can make a freshly styled window look as though the fabric lost an argument with the curtain rod. Fortunately, you do not need custom drapery, professional installers, or a suspiciously expensive bag of plastic accessories to fix the problem. A few empty toilet paper rolls can act as hidden curtain spacers, creating consistent folds and helping ordinary panels look fuller and more polished.
The toilet paper roll curtain hack works by placing short cardboard tubes on the rod between selected grommets. Each tube maintains a fixed amount of space behind the curtain, preventing the folds from collapsing into random bunches. The cardboard stays hidden while the fabric faces forward, so guests see orderly pleats rather than evidence that your bathroom recycling has joined the interior design industry.
Why Do Grommet Curtains Become Uneven?
Grommet curtains slide directly over a rod through large metal or plastic eyelets. Their simple construction makes them easy to install, but it also gives each section of fabric considerable freedom to move. When you open the curtains, some grommets may crowd together while others remain several inches apart. The result is a row of narrow folds, wide folds, flat patches, and one rebellious section doing whatever it wants.
Fabric weight also affects the finished appearance. Lightweight curtains can collapse into thin folds, while lined or blackout panels may form deeper, heavier waves. An adjustable curtain rod can contribute to the problem because grommets may catch where one section of the rod overlaps another.
Fullness Still Matters
Cardboard spacers improve the arrangement of the fabric you already have, but they cannot manufacture extra fabric. For a gathered appearance, curtain panels generally need a combined width greater than the area they cover. Home decorating guides commonly recommend approximately 1.5 to 3 times the window or rod width, depending on the fabric and desired fullness. A pair of panels totaling exactly the width of the window may still look flat, even when every fold is spaced with mathematical precision.
What You Need for the Toilet Paper Roll Curtain Hack
- Clean, empty toilet paper rolls
- Grommet-top or large-loop curtain panels
- A curtain rod narrow enough to fit through the tubes
- A ruler or measuring tape
- Scissors or a utility knife
- A pencil for marking equal lengths
- Optional decorative paper, paint, or tape
Most standard cardboard tubes can be used without modification if you want deep, widely spaced folds. For a softer effect, cut each roll into shorter sections. Paper towel tubes also work and are convenient when you want several spacers of exactly the same length.
Before collecting a small cardboard tower in the linen closet, count the spaces you intend to fill. You will usually install one spacer behind every other fold rather than between every single grommet. The correct pattern depends on how the panel is threaded and how prominently the cardboard would otherwise show.
How to Space Curtains Evenly Using Toilet Paper Rolls
Step 1: Confirm That the Hack Suits Your Curtains
This technique works best with grommet curtains because the rod passes directly through the curtain header. It may also work with large fabric loops or certain tab-top panels. It is not designed for rod-pocket curtains, pinch-pleat drapes, traverse systems, ceiling tracks, or curtains suspended from small clip rings.
Check that the cardboard tube slides comfortably over the rod. It should move without being forced, but it should not be so oversized that it tilts visibly behind the fabric. Curtain style and rod diameter need to be considered together because different headers require different hardware dimensions.
Step 2: Remove the Rod and Curtain Panels
Take the rod down carefully and place it on a clean floor, bed, or large table. Remove the panels if they are already installed. This is also a good opportunity to tighten loose brackets and confirm that the rod is level. A beautiful row of equal folds cannot fully distract from a rod descending toward the floor like a slow-motion ski slope.
Step 3: Decide How Wide the Folds Should Be
Test one full toilet paper roll behind the curtain. If the fold looks too deep, cut the roll into sections measuring roughly 2 to 3 inches. The exact length is not sacred. Short spacers create tighter folds and allow the curtains to stack more compactly. Longer spacers create broader waves and make stationary panels appear more substantial.
Cut every spacer to the same length. Even a difference of half an inch can become noticeable when repeated across the rod. Mark one tube, cut it, and use that piece as a template for the remaining spacers.
Step 4: Begin Threading the First Panel
Slide the first grommet onto the rod so the outer edge of the curtain faces the correct direction. Thread the second grommet and shape the fabric into an alternating wave. The fabric between the first two grommets should project forward while the next section folds toward the wall.
The exact starting direction matters. When the first fold faces the wrong way, the edge of the panel may expose the back of the fabric or reveal the cardboard spacer.
Step 5: Add a Cardboard Spacer Behind the Fabric
After threading the appropriate grommet, slide one cardboard tube onto the rod. Position it behind the curtain where the fabric folds toward the wall. Continue by adding the next grommet or pair of grommets, followed by another tube.
A common pattern is two grommets, one spacer, two grommets, and another spacer. Other versions place a tube between each backward-facing fold. The essential rule is that the curtain should wrap around the front of every tube, keeping the cardboard hidden from normal viewing angles.
Step 6: Repeat the Pattern Consistently
Continue across the panel using the same sequence. Pause occasionally to stand the rod upright or lift it toward the window. This lets you check whether the folds appear uniform before finishing the entire panel.
Do not force in more tubes simply because you saved them. Too many spacers can consume valuable rod space and prevent the curtain from opening fully. The goal is orderly fullness, not a cardboard traffic jam.
Step 7: Install the Second Panel as a Mirror Image
Repeat the process with the second curtain, reversing the fold direction so the inner edges meet neatly at the center. Use the same spacer length and pattern on both sides. Matching panels create balance even when the window itself is slightly off-center.
Step 8: Rehang the Rod and Shape the Folds
Return the rod to its brackets, secure the finials, and spread the curtains into position. Gently pull each forward fold toward the room and press each backward fold toward the wall. The tubes establish the spacing, but a few seconds of hand shaping produces the cleanest result.
Open and close the curtains slowly to test their movement. Professional hanging guides recommend checking the operation after installation rather than judging the curtains only while they are stationary.
How to Make the Finished Curtains Look More Expensive
Steam or Iron the Panels
Uniform spacing cannot hide deep package creases. Follow the care label and steam or iron the curtains before arranging the final folds. Wrinkle-free fabric reflects light more evenly and allows the vertical lines to continue from the grommets to the hem.
Hang the Rod Higher and Wider
A rod mounted several inches above the window can make the wall and ceiling appear taller. Extending the rod beyond the sides of the frame also gives the open curtains somewhere to stack without covering as much glass. Recommendations vary with ceiling height and room proportions, but many decorating guides suggest placing the rod roughly 4 to 6 inches above the frame or higher when the architecture allows it.
Use Enough Panels
For a narrow window, two standard panels may provide sufficient fullness. A large window, sliding door, or extra-long rod may require four panels. The toilet paper roll method distributes fabric; it does not replace missing width. If closed curtains stretch flat across the glass, adding panels will make a greater difference than adding more cardboard.
Match the Spacer Length to the Fabric
Sheer curtains often look better with shorter spacers and more frequent folds. Medium-weight cotton or polyester panels can usually support broader waves. Thick blackout curtains may need fewer spacers because the fabric naturally occupies more rod space.
Hide Light-Colored Cardboard Behind Sheers
Cardboard can sometimes be visible through very transparent curtains, especially when sunlight shines directly through them. Cover the rolls with white paper for pale sheers or dark paper for charcoal and navy panels. Another solution is to use shorter tubes positioned farther behind the header.
Common Mistakes to Avoid
Using Wet, Crushed, or Dirty Tubes
Only use clean and completely dry cardboard. Damp tubes can soften, lose their shape, or transfer marks to light fabric. Crushed rolls also create inconsistent spacing.
Making Every Spacer a Different Size
Eyeballing several cuts usually produces several different lengths. Use a ruler and a template. This project is wonderfully cheap, but it still benefits from introducing the scissors to basic quality control.
Putting the Tubes on the Front Side
The tubes belong inside the folds that face the wall. If cardboard is visible from the room, reverse that section of the threading pattern.
Expecting the Curtains to Glide Normally
Cardboard spacers may increase friction and make panels harder to draw across the rod. The hack is ideal for decorative panels, curtains that remain mostly open, or windows where the fabric is adjusted only occasionally. For curtains opened every morning and closed every night, commercial spacers, a smooth one-piece rod, or a track system may be more convenient.
Ignoring Child-Safety Concerns
The cardboard tubes themselves are not cords, but the entire window treatment should still be checked for accessible pull cords or loops. The U.S. Consumer Product Safety Commission recommends cordless window coverings in rooms where young children may be present and warns that accessible window-covering cords can create strangulation hazards.
Alternatives to Toilet Paper Roll Curtain Spacers
If cardboard is not suitable for your room, several alternatives can create a similar effect:
- Paper towel tubes: Cut them into identical sections for customized spacing.
- Foam pipe insulation: Lightweight and easy to cut, although the inner diameter must fit the rod.
- Plastic tubing: More durable and better suited to curtains that are adjusted regularly.
- Commercial grommet spacers: Designed specifically for curtain rods and available in reusable materials.
- Fold training: Arrange the curtains into alternating pleats, loosely tie them in place, and leave them for several days.
- Drapery tape or connecting ribbon: Fixed behind the header to control the distance between folds.
Commercial products are generally neater and longer-lasting, but the cardboard method is useful for testing the look before buying permanent accessories.
A Practical Experience With the Toilet Paper Roll Curtain Hack
The following is a composite DIY experience based on common installation results rather than a claim of personal household testing.
The test window had two inexpensive grommet panels on an adjustable metal rod. The curtains were technically wide enough to close, but they looked disappointing when open. One side formed five respectable folds. The other side formed three large folds, two tiny folds, and a flat section that appeared to have clocked out early.
The first attempt used full-length toilet paper rolls. Installation took only a few minutes: two grommets went onto the rod, followed by a cardboard tube, and then the pattern was repeated. The improvement was immediate. The curtains stood away from the wall, and the folds looked deeper and more deliberate. Unfortunately, the full tubes also occupied too much horizontal space. The panels could no longer stack neatly at the ends of the rod, and the window lost several inches of uncovered glass.
For the second attempt, each roll was cut into two equal sections. Measuring mattered more than expected. The first few pieces had been cut casually, producing spacers that ranged from roughly 2 inches to almost 3 inches. Once installed, the differences were visible. The longer pieces created broad valleys in the fabric, while the shorter pieces produced tighter folds. It was not a design catastrophe, but it looked as though the curtains had been spaced by a committee that refused to communicate.
A ruler solved the problem. One 2.5-inch section became the template, and every remaining spacer was marked before cutting. With equal pieces installed behind the backward-facing folds, the panels finally looked balanced. From the front, the cardboard disappeared completely. From the side, it could be seen only when standing close to the wall and actively searching for ita viewing position rarely chosen by normal guests.
The biggest surprise was that the trick improved the curtains most when they were open. The panels looked fuller at the sides of the window, and the folds remained consistent instead of collapsing into a narrow bundle. The rod also appeared more intentional because the spacing created a steady visual rhythm across both panels.
There were limitations. Drawing the curtains closed required more effort because the cardboard did not glide as smoothly as metal grommets. The spacers also reduced how tightly each panel could stack. For a bedroom where curtains are opened and closed daily, that extra resistance could become irritating. For a living room with decorative curtains that remain open most of the time, it was far less important.
A sheer-panel test revealed another issue: brown cardboard was faintly visible in strong afternoon light. Wrapping the tubes in white paper solved most of the problem, although shorter spacers would have been an equally practical fix. With medium-weight opaque curtains, no covering was necessary.
The experience also confirmed that spacing is only one part of a successful window treatment. The panels initially remained several inches above the floor, which made the entire installation look less polished despite the improved folds. Repositioning the rod and choosing the correct curtain length made a larger overall difference than the cardboard alone. The rolls were the finishing tool, not a magical cure for incorrect measurements.
After the final adjustments, the project delivered what a good household hack should deliver: a visible improvement, almost no cost, and only a modest amount of effort. It did not turn budget curtains into custom pinch-pleat drapery, but it made them look tidier, fuller, and far more intentional. It also provided an unexpectedly dignified second career for cardboard that had previously been destined for the recycling bin.
Final Thoughts
Using toilet paper rolls to space curtains evenly is a simple solution to a surprisingly noticeable decorating problem. Cut the tubes to matching lengths, position them behind the curtain, and repeat the same grommet pattern across both panels. The hidden spacers keep folds from collapsing and can give lightweight curtains a fuller, more organized appearance.
The method works especially well for grommet curtains that remain mostly open. It is less suitable for frequently operated panels, extremely sheer fabric, or rods that barely fit through the cardboard. Start with a few short spacers, test the movement of the curtains, and adjust the length before completing the entire window.
Note: Remove the cardboard spacers before washing, steaming, or ironing the curtains. Keep them dry, inspect them occasionally, and replace any tube that becomes crushed or discolored.

