
Body Care
How To Patch Damaged Wood Floors: A Comprehensive Guide
Jul
Wood floors are like the jeans of a home: durable, classic, and somehow better with a little character. But there is a fine line between “warm rustic charm” and “did a raccoon host a dance party in here?” Scratches, gouges, dents, water stains, gaps, pet damage, and broken boards can all make a beautiful hardwood floor look tired before its time.
The good news is that many types of wood floor damage can be patched without replacing the entire floor. The even better news is that you do not need to be a master carpenter with a tool belt named “Thunder.” With the right products, a patient approach, and a realistic understanding of what can and cannot be hidden, you can repair damaged wood floors and make them look dramatically better.
This comprehensive guide explains how to patch damaged wood floors, from light surface scratches to deeper gouges and board replacement. You will learn how to inspect the damage, choose between wood putty, wood filler, wax repair sticks, stain pens, epoxy, sanding, refinishing, and full board patches, and avoid the mistakes that turn a small scratch into a weekend-long emotional support project.
Understanding the Type of Wood Floor Damage
Before grabbing filler and smearing it around like frosting on a panic cake, identify the kind of damage you are dealing with. The repair method depends on depth, location, finish type, and whether the actual wood is damaged or only the protective coating.
Surface Scratches
Surface scratches usually affect only the finish, not the wood underneath. These are the faint lines caused by pet claws, chair legs, sandy shoes, vacuum wheels, or one dramatic furniture move that everyone in the house agreed was “probably fine.” They often look white, dull, or slightly lighter than the surrounding floor.
These scratches can often be improved with a hardwood floor cleaner, microfiber cloth, touch-up marker, floor polish, or a maintenance coat. Since they do not cut deeply into the wood, they are usually the easiest to repair.
Deep Scratches and Gouges
Deep scratches and gouges go through the finish and into the wood. You can usually feel them with your fingernail. These need more than a quick polish. Depending on severity, you may need colored wax sticks, stainable wood filler, epoxy filler, sanding, staining, and a protective topcoat.
Dents and Crushed Wood Fibers
Dents happen when something heavy compresses the wood fibers without necessarily removing material. Think dropped skillet, furniture foot, high heel, or that one toolbox you swore you had a good grip on. Some shallow dents can be improved with moisture and gentle heat, but dents that break the finish or crush the wood deeply usually require filling and refinishing.
Water Damage
Water damage may appear as dark stains, white cloudy marks, cupping, swelling, soft spots, or warped boards. Minor surface stains may be cleaned or lightly sanded, but swollen, moldy, or structurally weak boards often need replacement. Water is wood flooring’s least charming roommate.
Cracks, Gaps, and Splits
Small seasonal gaps are common because wood expands and contracts with humidity. Large gaps, persistent cracks, or splits in the face of the board may require wood filler, flexible gap filler, slivers of matching wood, or professional repair. If gaps appear and disappear with the seasons, do not rush to fill every single one. The floor may simply be breathing, which is annoying but normal.
Tools and Materials You May Need
The exact supplies depend on the repair, but these tools cover most wood floor patching projects:
- Microfiber cloths
- Vacuum or soft-bristle broom
- Hardwood floor cleaner
- Painter’s tape
- Plastic putty knife
- Wood putty or wax repair sticks
- Stainable wood filler
- Two-part epoxy wood filler for high-traffic or deeper repairs
- Fine-grit sandpaper, usually 120 to 220 grit
- Stain marker, stain pen, or matching wood stain
- Small artist’s brush
- Polyurethane, varnish, wax, or finish that matches your floor
- Utility knife or oscillating tool for board replacement
- Replacement board or salvaged matching flooring
- Wood glue and finish nails, if replacing a board
Always test color products in an inconspicuous spot first, such as inside a closet or under furniture. Wood floors love surprises, and not all of them are good.
Step 1: Clean and Inspect the Damaged Area
Start by cleaning the damaged section thoroughly. Dirt, grit, pet hair, old wax, and mystery crumbs can interfere with adhesion and make scratches look worse than they really are. Use a vacuum designed for hard floors or a soft broom, then wipe with a cleaner made for hardwood floors.
Avoid soaking the floor. Wood does not want a bath. Use a lightly damp cloth if needed, then let the area dry completely before applying filler, stain, or finish.
Once clean, inspect the area under good lighting. Run your fingernail gently across the scratch or gouge. If your nail does not catch, it is probably a surface scratch. If it catches slightly, you may need a touch-up marker or wax. If it catches deeply or exposes raw wood, you are looking at filler, sanding, staining, and sealing.
Step 2: Repair Light Surface Scratches
For shallow scratches, start with the least aggressive method. This is the golden rule of wood floor repair: do not bring out the sander when a cloth will do. Over-repairing can make a tiny flaw more noticeable than the original scratch.
Use Hardwood Cleaner and a Microfiber Pad
Sometimes what looks like a scratch is actually a scuff. Clean the area and buff gently with a microfiber pad. If the mark fades, congratulations: you have successfully performed floor magic without needing a hardware-store pilgrimage.
Apply a Stain Marker or Touch-Up Pen
If a scratch looks pale because it has cut through the finish color, use a stain marker that closely matches your floor. Follow the direction of the wood grain, apply lightly, and wipe away excess before it dries. It is better to build color slowly than to create one dark racing stripe across your oak floor.
Use Floor Polish Carefully
A hardwood floor polish can reduce the appearance of micro-scratches and refresh dull areas. However, polish is usually best applied across a broader section or entire room so the sheen looks even. Spot-polishing one small area may leave a shiny patch that announces itself like a tiny billboard.
Step 3: Patch Small Gouges With Wood Putty or Wax
For small holes, nail dents, and minor gouges in finished floors, wood putty or wax repair sticks can work well. These products are often color-matched and designed to hide imperfections without major sanding.
When to Use Wood Putty
Wood putty is often used on finished interior wood for small nail holes, scratches, and minor imperfections. Many putties remain slightly flexible and may not harden enough to sand. That can be helpful for tiny cosmetic repairs but less ideal for deep gouges in heavy-traffic areas.
How to Apply Wood Putty
- Clean and dry the area.
- Choose a putty color that matches the finished floor.
- Press putty into the gouge with a plastic putty knife.
- Wipe excess from the surrounding boards immediately.
- Buff lightly after the product settles.
Use a plastic putty knife rather than a metal one to avoid creating new scratches while repairing old scratches. That is the flooring version of fixing a leaky faucet by flooding the kitchen.
When to Use Wax Repair Sticks
Wax repair sticks are useful for small chips, scratches, and gouges, especially when you need to blend multiple tones. Many repair kits include several colors that can be mixed or layered. Wax is easy to apply, but it may not be as durable as a hard filler in busy walkways.
Step 4: Repair Deeper Gouges With Wood Filler
For deeper gouges where wood is missing, stainable wood filler is usually a better choice than soft putty. Wood filler hardens, can often be sanded, and can be stained or sealed to blend with the surrounding floor.
Choose the Right Filler
Use a stainable wood filler for natural hardwood floors. For high-traffic repairs, large voids, or damage that needs extra strength, a two-part epoxy wood filler may perform better. Water-based fillers are easy to clean up and good for many small repairs, while epoxy fillers are more durable but require careful mixing and application.
How to Apply Wood Filler
- Remove loose splinters or debris from the gouge.
- Lightly sand rough edges around the damaged spot.
- Vacuum dust and wipe clean.
- Apply filler with a plastic putty knife, pressing it firmly into the gouge.
- Overfill slightly because some fillers shrink as they dry.
- Allow the filler to dry completely according to the label.
- Sand smooth with fine-grit sandpaper, following the grain.
- Apply matching stain if needed.
- Seal with polyurethane, varnish, wax, or the finish that matches your floor.
The hardest part is color matching. Filler absorbs stain differently than real wood, so it may never disappear completely. Aim for “not noticeable unless you are crawling around with a flashlight,” not “museum-grade invisibility.”
Step 5: Fix Dents in Wood Floors
Some dents can be raised slightly because the wood fibers are compressed rather than removed. A common method uses a damp cloth and a warm iron to create steam, encouraging the fibers to swell back into shape. This works best on unfinished or lightly finished wood and should be used cautiously on finished floors.
Place a barely damp cloth over the dent, apply a warm iron briefly, and check progress often. Do not leave the iron in place. Do not flood the floor. Do not attempt this on laminate, vinyl, or unknown flooring materials. If the finish is cracked or the dent is deep, patching with filler may be safer.
Step 6: Replace a Badly Damaged Board
If a board is cracked, warped, rotted, deeply stained, or chewed beyond cosmetic repair, replacing the board may be the cleanest solution. This is more advanced than filling a gouge, but it can make a dramatic difference.
When Board Replacement Makes Sense
Replace a board when the damage affects the structure, when water has caused swelling or softness, when a stain goes too deep to sand out, or when a large missing chunk would be obvious even after filling. Replacement is also wise when damage sits in a highly visible area, such as the center of a hallway or in front of a kitchen island.
Basic Board Replacement Process
- Mark the damaged board and protect surrounding boards with painter’s tape.
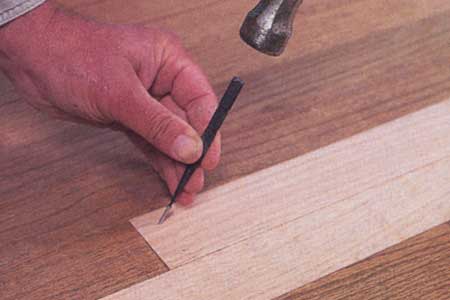
- Cut into the damaged board carefully with an oscillating tool or circular saw set to the correct depth.
- Remove the center section first, then work out the remaining edges.
- Prepare a replacement board of the same species, width, thickness, and profile.
- Trim the lower groove lip if necessary so the board can drop into place.
- Apply wood glue or fasteners as appropriate.
- Set the board flush with the surrounding floor.
- Sand, stain, and finish to blend the repair.
If your floor is prefinished, matching the factory coating can be tricky. Prefinished boards often have aluminum oxide or other durable finishes that are difficult to duplicate by hand. In that case, replacing the entire board with a matching prefinished piece may look better than trying to fill and refinish one spot.
Step 7: Blend the Patch With Stain and Finish
The patch is only half the job. The finish is what makes the repair blend instead of shouting, “Hello, I am a patch!”
First, match the color. Stain pens are helpful for narrow scratches, while liquid stain works better for larger filled areas. Apply in thin layers with a small brush and wipe excess quickly. Let each layer dry before adding more.
Next, match the sheen. Floors may be matte, satin, semi-gloss, or glossy. A perfect color match can still look wrong if the sheen is different. Use the same type of finish already on the floor whenever possible. Common finishes include water-based polyurethane, oil-based polyurethane, wax, varnish, and factory-applied coatings.
For small repairs, apply finish only to the patched area and feather the edges. For larger repairs or multiple scratches, recoating the entire boardor even the entire roommay create a more even appearance.
Common Mistakes to Avoid
Using the Wrong Product
Wood putty, wood filler, wax sticks, and epoxy are not the same. Putty is usually best for minor cosmetic repairs. Filler is better when sanding and staining are needed. Epoxy is useful for stronger repairs. Using soft putty in a deep, high-traffic gouge may lead to a repair that fails quickly.
Sanding Too Aggressively
Heavy sanding can create a low spot or remove surrounding finish. This is especially risky with engineered wood floors, which have a thinner hardwood veneer than solid hardwood. Sand lightly and only as much as needed.
Ignoring Moisture Problems
If boards are cupping, swelling, or turning dark from moisture, do not simply fill the damage and call it a day. Find and fix the source of water first. Otherwise, the repair may fail, and the floor may continue to move, stain, or rot.
Expecting a Perfect Invisible Patch
Wood has grain, color variation, age, finish wear, and personality. Filler does not. A good patch should look neat, smooth, and natural from standing height. It may not vanish completely under close inspection, and that is okay. Your floor is not being judged on a cooking show.
How to Prevent Future Wood Floor Damage
After patching damaged wood floors, protect your hard work. Add felt pads under chair and table legs. Use rugs or runners in high-traffic areas. Keep pet nails trimmed. Remove shoes indoors if possible, especially shoes that bring in gravel, grit, or tiny driveway souvenirs. Clean regularly with a soft broom, microfiber mop, or hard-floor vacuum.
Control indoor humidity as well. Wood floors perform best when the home is kept in a stable temperature and humidity range. Too much moisture can cause swelling and cupping; too little can cause gaps and cracks. A humidifier in dry seasons and good ventilation in damp areas can help reduce seasonal movement.
Finally, wipe spills quickly. Water left on wood floors can seep between boards and damage raw edges. The mop should be damp, not dripping. Steam cleaners, harsh chemicals, bleach, ammonia, and abrasive scrub brushes are generally bad news for hardwood finishes.
When to Call a Professional
DIY repairs are great for scratches, small gouges, minor dents, and cosmetic touch-ups. Call a flooring professional if you have widespread water damage, mold, rot, loose boards, severe cupping, large areas of missing finish, deep pet urine staining, or engineered flooring with a very thin wear layer.
A professional can sand and refinish individual boards, apply a maintenance coat, replace boards cleanly, or refinish the entire room. In some cases, a pro repair costs less than a DIY mistake that has to be undone later. That is not defeat; that is wisdom wearing kneepads.
Real-World Experience: What Patching Wood Floors Actually Teaches You
After working through wood floor repairs, one lesson becomes obvious: the floor always tells a story, but it does not always tell it clearly. A white scratch near the sofa may look terrible under afternoon light, yet disappear after cleaning and buffing. A small dark spot near a doorway may seem harmless, then reveal itself as old water damage that needs more attention. The first experience-related tip is simple: slow down and diagnose before repairing.
In many homes, the most common damaged areas are predictable. Entryways collect grit from shoes. Dining areas suffer from chair legs. Kitchens get water drips near sinks, dishwashers, and pet bowls. Living rooms often show scratches where furniture has been dragged. If you are patching one area, inspect nearby boards too. Damage often travels in little neighborhoods.
Color matching is usually the most humbling part. A filler that looks perfect in the container may dry lighter, darker, flatter, or strangely pink against the floor. The best approach is to test on scrap wood or a hidden area first. If you have leftover flooring from installation, guard it like treasure. Matching species, grain, age, and finish is much easier when you have the original material.
Another practical discovery: small tools give better control. A tiny artist’s brush, cotton swab, plastic scraper, and folded piece of sandpaper can outperform bigger tools when repairing narrow scratches. Large tools make large mistakes. For small patches, precision matters more than muscle.
It also helps to repair in layers. One thick blob of filler is rarely better than a careful application that is allowed to dry, sanded smooth, recolored, and sealed. The same goes for stain. A light coat can be deepened; a dark blotch is harder to reverse. Patience is not glamorous, but neither is explaining why the repaired board now looks like a chocolate bar.
Experience also teaches that sheen matters as much as color. Many DIYers focus entirely on stain, then wonder why the patch still stands out. If the surrounding floor has a satin finish and the patch is glossy, the repair will catch the light. Matching matte, satin, semi-gloss, or gloss is essential for a natural look.
Finally, prevention is easier than repair. Felt pads, rugs, trimmed pet nails, quick spill cleanup, and gentle cleaning habits can prevent most future damage. A repaired floor can look beautiful, but a protected floor gives you fewer reasons to kneel on the ground muttering at a gouge. Patch the damage, learn from the cause, and your wood floors can keep their warmth, durability, and charm for decades.
Conclusion
Patching damaged wood floors is part repair project, part detective work, and part art class. The right method depends on whether the damage is a surface scratch, deep gouge, dent, stain, crack, gap, or broken board. Light scratches may need only cleaning, buffing, or a touch-up marker. Deeper gouges often require wood filler, sanding, stain, and finish. Severely damaged boards may need replacement.
The secret is to start gently, match products carefully, and protect the floor after the repair. A well-patched wood floor may not look brand-new, but it can look clean, cared for, and beautifully lived-in. And honestly, that is the sweet spot: floors with character, not floors that look like they survived a pirate battle.

