Skincare
How to Make a Sticky Note Shuriken: 9 Steps
Jun
Note: This guide is for making a harmless paper craft for decoration, desk fidgeting, classroom art, or origami practice. Do not throw paper shuriken at people, animals, screens, or anything fragile. A sticky note ninja star looks cooler on your desk than in someone’s eye.
Introduction: A Tiny Origami Star With Big Desk Energy
Sticky notes are usually the office supply version of background actors. They remind you to buy milk, submit homework, call someone back, or stop forgetting your own passwords. But with a little folding magic, those square pieces of paper can become something much more entertaining: a sticky note shuriken.
A sticky note shuriken, often called a paper ninja star, is an origami-style craft made by folding small square notes into interlocking units. The final design can look like an eight-pointed star, a transforming paper ring, or a colorful desk toy depending on how you fold and arrange the pieces. It is simple enough for beginners, but it still gives you that satisfying “I have created something with my bare hands” feeling. Very dramatic. Very craft-table warrior.
This tutorial explains how to make a sticky note shuriken in 9 steps using basic materials, clear folds, and beginner-friendly tips. You do not need glue, scissors, tape, staples, or secret ninja training in a mountain temple. All you need is a small stack of sticky notes, a flat surface, and a willingness to crease paper more carefully than you crease your favorite hoodie.
The version below uses eight sticky notes because that creates a sturdy, balanced, transforming star. You can use one color for a clean look, two colors for a pattern, or eight different colors if your desk currently looks like a rainbow sneezed. The craft is great for kids, students, teachers, office workers, origami fans, and anyone who needs a five-minute break from staring into the glowing rectangle of responsibility.
What Is a Sticky Note Shuriken?
A sticky note shuriken is a decorative paper star inspired by the shape of a traditional ninja star. In this craft version, the “shuriken” is not a weapon. It is a folded paper model made from sticky notes. The design works because each note becomes a small folded module, and the modules lock together to form a circular star shape.
Unlike some paper crafts that require precise measuring, cutting, or special origami paper, sticky note origami is accessible because most sticky notes are already square. Square paper is ideal for many origami projects because the corners, edges, and center creases line up naturally. That means fewer calculations and fewer moments of staring at a rectangle like it personally betrayed you.
The sticky strip can actually help the model stay neat, but it can also make folds a little lumpy if you are not careful. The trick is to fold firmly, align the corners before pressing down, and avoid rushing the interlocking stage. The final piece should feel flexible but secure, like a tiny paper machine.
Materials You Need
Basic Supplies
- 8 square sticky notes, preferably the same size
- A clean, flat surface such as a desk or table
- Your hands
- Optional: a ruler or the edge of a book for sharper creases
That is the whole supply list. No glue. No scissors. No tape. No “some assembly required” nightmare involving missing screws and emotional damage.
Best Sticky Notes to Use
Standard square sticky notes work best. A 3 x 3-inch note is a popular size, but smaller or larger square notes can also work as long as all eight pieces match. Avoid notes that are curled, wrinkled, very thin, or overly sticky. If the adhesive strip is too strong, it may resist folding smoothly. If it is too weak, the pieces may slide around during assembly.
For beginners, two colors are ideal. Use four notes of one color and four notes of another. Alternating colors makes it easier to see how the modules connect, and it makes the finished star look more polished. Also, it helps you notice mistakes before the whole thing becomes a confusing paper octopus.
Before You Start: Folding Tips for Better Results
Origami rewards patience. The good news is that “patience” here means about ten minutes, not a lifetime of meditation under a waterfall. Before folding your sticky note shuriken, keep these tips in mind:
- Line up corners first. Do not press a crease until the edges match.
- Crease firmly. Sharp creases help the modules lock together.
- Fold every unit the same way. Consistency is what makes the final star symmetrical.
- Keep the sticky side controlled. The adhesive should not bulge or trap folds in the wrong place.
- Do not force the final transformation. If it jams, adjust the tucked flaps instead of crushing the model.
Think of each sticky note as one member of a tiny paper team. If one unit goes rogue, the entire star starts looking like it lost a debate with a stapler.
How to Make a Sticky Note Shuriken: 9 Steps
Step 1: Place the Sticky Note With the Adhesive at the Top
Start with one square sticky note. Place it on the table with the sticky strip facing up and positioned along the top edge. This helps the adhesive fold inward later, where it is less visible and less likely to catch on other pieces.
Smooth the note flat with your fingers. If the paper has curled edges, gently flatten it before folding. A flat starting point makes cleaner creases and a neater final star.
Step 2: Fold the Note in Half From Top to Bottom
Bring the top edge down to meet the bottom edge, folding the sticky note in half horizontally. The sticky strip should now be inside the fold. Press along the folded edge to create a strong crease, then unfold the paper.
This center crease acts as your guide. Many beginners skip strong creasing because they are excited to get to the “cool star” part. Do not skip it. Origami is basically architecture, except the building is tiny and made of paper that once reminded you to buy bananas.
Step 3: Fold the Top Corners Toward the Center Crease
Take the top-left corner and fold it down toward the center crease. Then fold the top-right corner down toward the center crease. The top of your sticky note should now look like a pointed roof or a simple paper airplane nose.
Make sure both diagonal folds are even. If one side is wider than the other, unfold and adjust before pressing the creases again. Symmetry matters because these folds will become part of the interlocking shape.
Step 4: Fold the Sticky Note in Half Again
Refold the sticky note along the horizontal center crease you made earlier. The corner folds should now be tucked inside. Press the long folded edge firmly.
At this point, your piece should look like a narrow folded shape with angled ends. If it looks strange, do not panic. During origami, many models pass through an “ugly duckling” phase. The paper is not broken; it is just developing character.
Step 5: Create the Angled Module Shape
Now fold one end of the strip diagonally upward and the other end diagonally downward, using the existing creases as guides. You are aiming to create a small parallelogram-like module with two triangular flaps.
This is usually the trickiest step for beginners. The goal is not to make a random zigzag. The folds should create a clean unit that has one open pocket area and small flap ends that can later tuck into the next piece.
If your module refuses to cooperate, unfold it gently and try again. Sticky notes are forgiving, but they are not immortal. Too many angry folds can make the paper soft and wrinkly, like it has seen things.
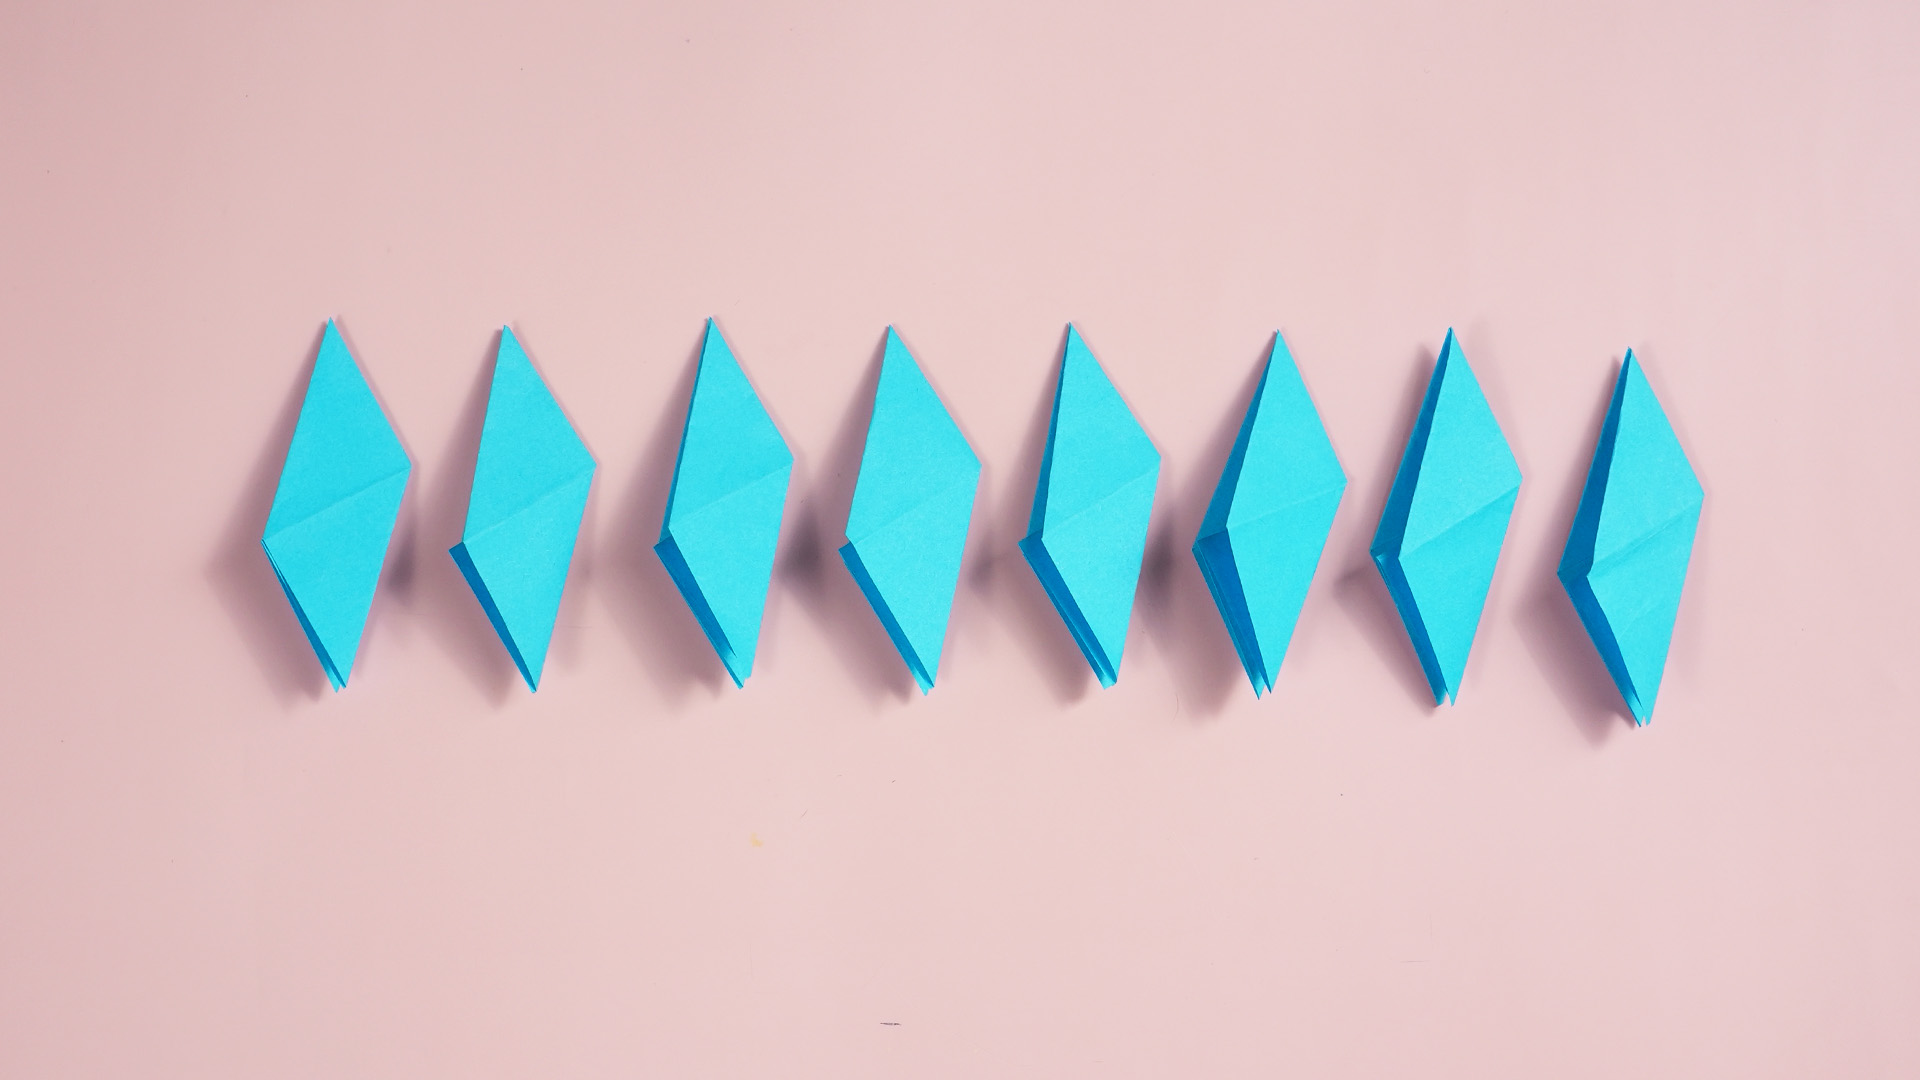
Step 6: Repeat the Same Fold With the Other Seven Sticky Notes
Use the first folded piece as your model and create seven more identical modules. Try to fold every piece in the same direction and with the same orientation. This is the secret to making the final sticky note shuriken fit together smoothly.
If you are using two colors, make four modules of each color. Lay them out on the table in an alternating pattern. This helps you visualize the final design before connecting the pieces.
Step 7: Insert One Module Into Another
Pick up your first module and hold it so the open pocket faces the next piece. Slide the second module into the opening of the first. Push it in gently until the edges meet neatly.
Once the second piece is inserted, fold the small loose flaps of the first piece over and tuck them into the second piece. This locks the two modules together. The connection should feel snug but not crushed.
If the pieces keep slipping apart, check whether the flap is tucked deeply enough. If the connection looks bulky, the flap may be folded at the wrong angle. Small adjustments make a big difference here.
Step 8: Continue Connecting the Modules in a Circle
Add the third module into the second, then tuck the flaps. Continue around the circle, alternating colors if you are using a pattern. Each new piece should slide into the previous piece and lock with the same flap-tucking method.
As the chain grows, it may begin to curve naturally. That is a good sign. Do not flatten it completely or twist it too aggressively. Let the paper form a loose ring as you work.
By the seventh or eighth piece, things may feel a little crowded. This is normal. The last connection is always the one that acts like it has a personal grudge against you.
Step 9: Lock the Final Piece and Shape the Star
Insert the final module into the previous one, then connect it back into the first module to close the circle. Tuck all remaining flaps neatly. You should now have a ring or octagon-like shape.
To transform it into a star, hold opposite sides of the ring and gently push inward. The points should slide outward and form a shuriken-like star shape. Work slowly around the model, adjusting each point until the star looks even.
Congratulations. You have made a sticky note shuriken. Your desk is now approximately 37% more interesting, according to absolutely no official study but very strong vibes.
Troubleshooting: Why Your Sticky Note Shuriken Looks Weird
The Star Will Not Close
If the final module will not connect, one or more pieces may be facing the wrong direction. Compare each module to the others. All units should follow the same fold pattern. If one is reversed, remake that piece instead of forcing it.
The Points Are Uneven
Uneven points usually mean uneven creases. Check the diagonal folds and make sure the flaps are tucked evenly. A ruler, book edge, or fingernail can help sharpen soft creases.
The Pieces Keep Falling Apart
This happens when the flaps are not tucked deeply enough. Open the loose connection, slide the module farther in, and tuck the flap again. Avoid adding tape unless you want a permanent model, because tape can stop the transforming motion.
The Sticky Part Is Getting in the Way
If the adhesive strip sticks where it should not, lightly touch it once or twice with clean fingers to reduce the tackiness. Do not cover it with dust, crumbs, or mysterious desk particles. That is not crafting. That is archaeology.
Creative Variations to Try
Two-Color Classic Star
Use four sticky notes in one color and four in another. Alternate the colors as you assemble the ring. This creates a clean, balanced pattern and makes the star easier to understand visually.
Rainbow Sticky Note Shuriken
Use eight different colors for a bright, playful look. This version is perfect for classroom displays, bulletin boards, or cheering up a desk that currently says, “I file taxes for fun.”
Mini Sticky Note Shuriken
Use smaller square notes to create a tiny star. Mini versions are cute but harder to fold because the pieces are smaller. Beginners should practice with standard sticky notes first.
Large Practice Version
If you are struggling with the folds, cut or use larger square paper for practice. Once you understand the structure, return to sticky notes. Larger paper makes the pocket-and-flap system easier to see.
Why This Craft Is Surprisingly Useful
Making a sticky note shuriken is more than a boredom cure. It helps develop hand coordination, spatial reasoning, sequencing, focus, and patience. You have to understand how a flat square becomes a folded unit, how that unit connects to others, and how the final ring transforms into a star. That is geometry wearing a party hat.
For students, this craft can support learning about shapes, symmetry, angles, fractions, patterns, and step-by-step problem solving. For adults, it is a simple hands-on reset between tasks. Folding paper can feel calming because it gives your brain a clear goal and your hands something precise to do.
It is also a low-cost project. Sticky notes are common in homes, classrooms, libraries, and offices. Because the craft does not require cutting or glue, cleanup is easy. The only mess is emotional, and that only happens if the eighth piece refuses to lock on the first try.
Safety and Common-Sense Rules
Even though this is a paper craft, it still needs basic rules. Use your sticky note shuriken as a decoration, fidget toy, or origami model. Do not throw it at people, animals, screens, windows, drinks, or ceiling fans. Ceiling fans always win.
If younger children are making this craft, an adult or older helper can guide the folding and assembly. The project has no cutting, which makes it safer than many crafts, but small hands may still need help with the final tucking step.
Store finished paper stars flat in a folder, pencil case, or desk drawer. If you want to display them, place them on a shelf, attach them to a bulletin board, or use them as colorful desk décor. Treat them as origami art, not as something to launch across the room.
My Experience Making Sticky Note Shuriken
The first time I tried to make a sticky note shuriken, I was overly confident. This is a dangerous emotional state in crafting. I looked at a square sticky note and thought, “How hard can this be?” Five minutes later, I had one decent folded piece, three suspicious paper lumps, and the facial expression of someone trying to solve a math problem written in ancient raccoon.
The biggest lesson I learned was that the first module matters. Once I made one clean folded unit, the rest became easier because I could compare every new piece to the first one. That little “master piece” became my quality-control manager. If a new module looked different, I knew something had gone wrong before I wasted time assembling the entire star.
Another useful experience: two colors are much better for beginners than one. When all eight pieces are the same color, it can be hard to see which flap belongs to which module. With alternating colors, the structure makes more sense. You can see the pattern forming, and mistakes stand out quickly. It is like turning on subtitles for your own craft project.
I also found that sharp creases make the final transformation much smoother. At first, I folded casually, pressing the paper with one finger and hoping for the best. The finished star looked loose and uneven. Later, I used the edge of a hardcover notebook to press each fold. The difference was huge. The modules locked better, the points looked cleaner, and the star transformed without feeling like it might collapse into a tiny office-supply tragedy.
The final connection is the part that tests your patience. The first seven modules usually go together nicely, then the eighth piece arrives like a puzzle villain. The trick is to keep the ring slightly flexible. Do not squeeze the earlier connections too tightly before the last piece is locked. Leave just enough movement so the final module can slide into place. Once it is connected, you can go back around the ring and tighten each tuck.
One surprisingly fun use for sticky note shuriken is color planning. You can make a star using colors that match a holiday, team, classroom theme, or mood. Yellow and blue looks bright and cheerful. Red and green works for Christmas. Orange and black works for Halloween. Pastel colors make the star look soft and decorative, while neon colors make it look like it escaped from a 1990s arcade.
I have also noticed that this craft works well as a short break activity. It is long enough to feel satisfying but not so long that it eats an entire afternoon. After making one, you may want to make another just to improve the symmetry. Then another with better colors. Then another smaller one. Suddenly, you are not “wasting time”; you are building a collection. That is what we call branding.
The best part is that the finished sticky note shuriken feels more impressive than the materials suggest. You start with plain office notes and end with a flexible origami star. It is a reminder that creativity does not always require expensive supplies. Sometimes it only needs eight sticky notes, a flat table, and the stubborn belief that this time, yes, the final flap will tuck correctly.
Conclusion
Learning how to make a sticky note shuriken is a fun, affordable, and beginner-friendly way to explore origami. With eight square sticky notes and nine simple steps, you can create a colorful paper star that transforms from a ring into a sharp-looking decorative shape. The key is to fold each module consistently, crease firmly, connect the pieces carefully, and shape the final star gently.
This project is perfect for classrooms, study breaks, office desks, rainy afternoons, craft sessions, and anyone who enjoys turning ordinary supplies into something unexpectedly cool. Just remember: it is a paper craft, not a throwing toy. Make it, display it, fidget with it, admire it, and maybe make a few more because your first one deserves friends.
