
Hair Care
How to Make a Star with String: 7 Steps
Jul
Learning how to make a star with string is one of those delightfully simple skills that feels almost magical the first time it works. One minute you are holding a plain loop of string. A few finger moves later, you have a tiny five-point star floating between your hands like you just passed a secret test from the International Society of Extremely Patient Fingers.
The best part? You do not need fancy supplies, batteries, glitter explosions, or a craft drawer that looks like a raccoon packed it during a thunderstorm. A single loop of string is enough. This guide walks you through the classic hand-string method in seven clear steps, plus helpful troubleshooting tips, creative variations, and real-life experience notes to make the process easier, especially if your first attempt looks more like a confused spider than a star.
Whether you are making a string figure for fun, teaching kids a screen-free activity, preparing a classroom craft, or just trying to impress someone with a charmingly old-school trick, this tutorial will help you make a clean, recognizable star with string.
What Is a String Star?
A string star is a simple string figure made by looping string around your fingers and pulling different sections into a five-point shape. It belongs to the same family of string games as cat’s cradle, Jacob’s ladder, cup and saucer, and other hand-string figures played around the world for generations.
String figures are not just random loops. They combine pattern, tension, memory, and hand coordination. That is why they are so satisfying. You are basically doing tiny finger choreography, except nobody expects you to wear tap shoes.
Materials You Need
Before you begin, gather one simple item: a loop of string. That is it. Your supply list has officially reached peak minimalism.
Best Type of String
For beginners, choose a smooth cotton string, yarn, embroidery floss, shoelace, or thin cord. The ideal string should slide easily over your fingers without being too slippery. If it is too fuzzy, it can catch. If it is too stiff, it can fight back like it has personal issues.
A loop between 36 and 48 inches long works well for most hands. Kids may prefer a shorter loop, while adults with larger hands may need a little more length. Tie the ends together with a small knot and trim any long tails so they do not get tangled in the figure.
Quick Safety Note
Use the string only around your hands and fingers. Do not wrap it around the neck, face, or tightly around wrists. For younger children, adult supervision is a smart idea. Crafting is fun; emergency untangling is less fun.
How to Make a Star with String: 7 Steps
These steps use both hands. Your thumbs, index fingers, and pinkies will do most of the work. Move slowly the first time. Once your fingers understand the pattern, the whole thing becomes much easier.
Step 1: Start with a String Loop Across Both Hands
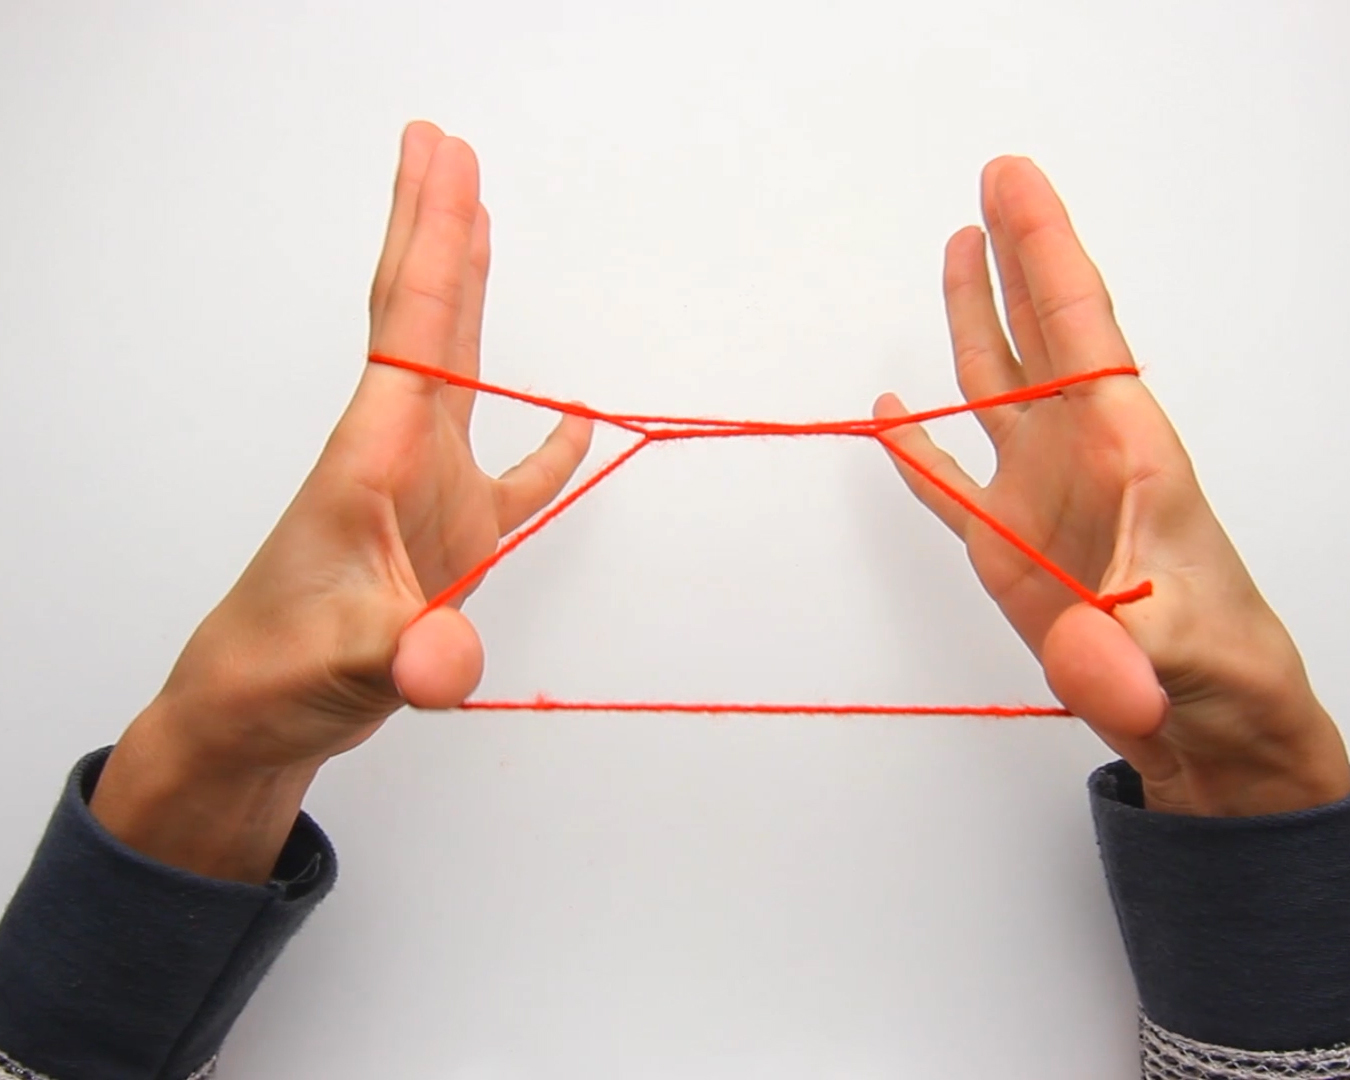
Place the loop of string over both thumbs and both pinkies. Keep your palms facing each other, about shoulder-width apart. The string should run across the front of your hands and behind your fingers, forming a simple rectangular loop.
Do not pull too tightly. A star needs gentle tension, not a wrestling match. If the string digs into your fingers, relax your hands slightly. If the loop droops like tired spaghetti, spread your hands a little farther apart.
Step 2: Pick Up the Opposite Palm String
Use your right index finger to reach across and pick up the string running across the palm of your left hand. Pull it back toward your right hand. Now use your left index finger to reach through and pick up the string running across the palm of your right hand. Pull it back toward your left hand.
You should now have loops around your thumbs, index fingers, and pinkies. This is the foundation position. It may look like a small web. That is good. Stars, like great snacks, often begin as chaos.
Step 3: Drop the Thumb Loops Carefully
Gently release the loops from both thumbs while keeping the loops on your index fingers and pinkies. Let the thumb loops fall forward into the center of the figure.
This step creates space for the star shape to form. The most common mistake is dropping more than the thumb loops. If everything collapses, do not panic. Reset to Step 1 and try again. Every string figure artist has stared at a knot and whispered, “Well, that was educational.”
Step 4: Move Your Thumbs Under the Nearest Strings
Bring both thumbs back into the figure. Slide each thumb under the nearest lower string, the one closest to your body. Hook that string with your thumbs and gently pull it upward.
You should begin to see a more angular shape forming in the middle. Keep your hands level and avoid twisting your wrists. Twisted wrists create twisted string, and twisted string creates the kind of star that looks like it missed its morning coffee.
Step 5: Transfer the Index Finger Loops
Now comes the move that makes the star more defined. Carefully lift the top loop from each index finger and move it over the finger, letting it drop into the center. Keep the lower loop on each index finger in place.
This transfer changes the tension across the center of the figure. If the middle shape tightens into a small diamond, you are on the right track. If it collapses completely, your string may be too loose, or you may have dropped both index loops instead of only the top ones.
Step 6: Open Your Hands Slowly
Spread your hands apart gradually. Do not yank. A smooth, slow pull helps the string settle into a cleaner shape. As you open the figure, the center should stretch into a star-like pattern with points formed by the loops around your thumbs, index fingers, and pinkies.
This is the “aha!” moment. It may not be perfect yet, but the star should be visible. Think of it as a celebrity before makeup: recognizable, but still adjusting to the lighting.
Step 7: Adjust the Points of the Star
Use tiny movements to sharpen the shape. Spread your thumbs slightly outward, lift your index fingers a little, and keep your pinkies steady. The star will look best when the tension is even on both sides.
If one point is too long, relax that finger. If the center is too tight, bring your hands slightly closer. If the whole thing looks like abstract art, congratulations: you have created either a star or a conversation piece.
Troubleshooting Common Problems
The Star Keeps Falling Apart
This usually happens when one loop is dropped too early. Move slowly during Steps 3 and 5. Try saying the actions out loud: “Drop thumbs only,” then “move top index loops only.” It sounds silly, but it helps your fingers stay organized.
The String Is Too Tight
If the string feels tight, your loop may be too short. Try a longer piece, especially if you have larger hands. A loop around 42 inches is a comfortable starting point for many beginners.
The Star Looks Uneven
Uneven tension is the usual culprit. Keep your hands at the same height, spread your fingers evenly, and avoid pulling harder with your dominant hand. Right-handed beginners often tug too strongly on the right side, giving the star a dramatic lean, as if it is trying to leave the room.
The String Slips Off Your Fingers
If the string keeps sliding away, use a slightly thicker cotton cord or yarn. Very smooth nylon string can be frustrating for beginners because it slips before the shape is finished.
Helpful Tips for a Cleaner String Star
Practice with a bright-colored string so you can see the different loops clearly. Dark string on a dark shirt is basically crafting in stealth mode, and nobody needs that level of difficulty on a casual afternoon.
Sit at a table for your first few attempts. Resting your elbows lightly can make your hands steadier. Once you learn the sequence, you can make the star standing up, sitting down, or dramatically presenting it like a magician who charges exactly zero dollars per show.
Keep the knot near one side instead of in the center of the figure. A bulky knot can interrupt the star shape. If your knot lands in the middle, rotate the loop before starting again.
Creative Variations to Try
Use Colorful Yarn
Bright yarn makes the star easier to see and more fun to display. Red, gold, silver, blue, or rainbow yarn can turn a simple string figure into a seasonal craft. Gold yarn is especially nice for holiday stars, while white cotton string gives a classic cat’s cradle look.
Make a Hanging String Star Ornament
If you want a permanent star rather than a hand-held figure, use pins, a corkboard, glue, and string. Place a paper star template on the board, cover it with plastic wrap, pin the five points, dip the string in diluted craft glue, and wrap it around the pins to form the outline. Let it dry completely before removing it.
This method creates a firm star ornament for a tree, wall, window, classroom board, or gift topper. It is messier than the hand-string version, but it also lasts longer. In other words, one is a magic trick, and the other is home decor with commitment issues.
Turn It Into a Learning Activity
Making a star with string can help children practice following directions, using both hands together, and controlling finger movement. It can also introduce basic ideas about symmetry, shapes, tension, and patterns. A string star is a small craft, but it quietly teaches patience. Very quietly. Unlike children, who often announce every mistake at full volume.
Why String Crafts Are Still Worth Teaching
In a world full of screens, apps, and toys that beep with the confidence of a microwave, string crafts feel refreshingly simple. They are portable, inexpensive, and surprisingly engaging. A loop of string can become a star, ladder, cup, bridge, or web. That kind of flexibility is rare for something that fits in your pocket.
String figures also encourage experimentation. Once you learn one pattern, you naturally start wondering what else the string can do. What happens if you pull this loop? What happens if you drop that finger? Sometimes the answer is “a new shape.” Sometimes the answer is “a knot with ambition.” Both are useful discoveries.
Experience Notes: What Making a String Star Teaches You
The first experience most people have with making a star with string is not instant success. That is completely normal. The beginning often feels awkward because your fingers are learning a sequence they have probably never done before. You may understand the instructions in your head while your hands behave like unpaid interns. Give them a minute.
One helpful lesson is that string figures reward calm movement. When you rush, the loops slip, twist, or tighten in the wrong place. When you slow down, the pattern becomes easier to control. This makes the activity surprisingly relaxing. It is a tiny reminder that not every project needs speed. Some crafts work best when you breathe, look carefully, and let your fingers find the rhythm.
Another useful experience is learning how much tension matters. Beginners often pull the string as tight as possible because they think tight means neat. With string figures, that is not always true. Too much tension can shrink the center and make the star disappear. Too little tension makes the figure sag. The best result comes from balance: firm enough to hold shape, loose enough to adjust. That same idea applies to plenty of real-life situations, but luckily this article is about string, not your group project from last semester.
Teaching someone else to make the star is also a great test of whether you truly know the pattern. When you explain the steps, you notice which parts are confusing. You may need to say “top loop” instead of “that loop,” or “the string closest to your palm” instead of “the inside one.” Clear language matters. A good string tutorial is not just about the final star; it is about helping someone avoid the mysterious knot dimension.
Kids often enjoy the star because the result appears quickly. Unlike crafts that require drying, cutting, painting, or cleaning glitter from the dog, the hand-string star gives an immediate reward. That makes it useful for classrooms, rainy days, family gatherings, camp activities, and quiet breaks. It is also a good confidence-building activity because the supplies are low-pressure. If the figure fails, you simply reset the loop and try again. No wasted materials, no ruined project, no dramatic soundtrack required.
Adults may appreciate the nostalgic side. Many people remember cat’s cradle or string tricks from childhood, even if they cannot remember the exact steps. Relearning a string star can feel like opening a tiny door to an older kind of play. It is simple, social, and a little mesmerizing. You can make it alone, teach it to a friend, or challenge someone to copy it without instructions. That last option is slightly evil, but in a harmless party-game way.
One practical tip from repeated attempts is to keep a “practice string” ready. A soft shoelace or cotton cord tied into a loop is perfect. Store it in a desk drawer, backpack pocket, or craft box. When you have a few spare minutes, practice the steps. After several tries, muscle memory takes over. The star becomes less of a puzzle and more of a quick hand motion.
Finally, making a star with string teaches that small crafts can still feel impressive. You do not need expensive tools to create something charming. You need attention, patience, and a loop of string. That is the beauty of it. The finished star is temporary, but the skill stays with you. And once you can make one cleanly, you will probably show someone else. Then they will ask how you did it, and suddenly you are the local wizard of yarn. Accept the title with humility.
Conclusion
Making a star with string is easy to learn, fun to practice, and satisfying to share. With one loop of string and seven simple steps, you can create a classic hand-string figure that works for kids, adults, classrooms, parties, and quiet creative breaks. The key is to use the right length of string, move slowly, keep even tension, and practice the finger transfers until they feel natural.
If your first star looks a little crooked, do not worry. Every great string figure begins with a few tangled attempts. Reset the loop, try again, and enjoy the process. The charm of this craft is not perfection. It is the moment when a plain piece of string suddenly becomes a star.
Note: This article is written for web publication and focuses on the classic hand-string star method, with added practical craft experience, troubleshooting advice, and beginner-friendly explanations.

