Hair Care
How to Deep Clean and Whiten Your RV Shower (No, You Can’t Use Drano)
Jun
Note: This article is for general RV care and cleaning education. Always check your RV owner’s manual and the label on any cleaning product before using it inside your camper, travel trailer, fifth wheel, or motorhome.
An RV shower has a special talent: it can go from “cute little spa corner” to “mystery science experiment” faster than you can say, “Who forgot to squeegee?” Between hard water, soap scum, shampoo film, body oils, campground minerals, humidity, and the occasional muddy post-hike rinse-off, your shower pan and walls can turn yellow, gray, chalky, or just plain suspicious.
The good news? You can deep clean and whiten your RV shower without destroying the finish, irritating your nose, or turning your gray tank into a chemistry lab. The very important news? No, you should not casually pour Drano down your RV shower drain. Household chemical drain cleaners may be marketed for home showers, but RV plumbing is not always built like residential plumbing. RV drains, seals, P-traps or waterless traps, gray tanks, and holding-tank valves deserve gentler treatment.
This guide walks you through how to clean an RV shower safely, brighten yellowed fiberglass or plastic, remove soap scum, handle mold and mildew, freshen the drain, and prevent that “campground locker room” vibe from returning next weekend.
Why RV Showers Get Yellow, Dingy, and Weirdly Sticky
Most RV showers are made from lightweight materials such as fiberglass, ABS plastic, acrylic, or molded composite panels. These materials are practical for RV life because they keep weight down, but they can scratch, dull, stain, or discolor if treated like a ceramic hotel bathtub.
The yellowing you see is usually not one single villain. It is often a layered mess of soap scum, hard water minerals, body oils, sunscreen residue, shampoo, conditioner, iron in water, mildew stains, and oxidized plastic. In other words, your shower is not “dirty” in one way. It is dirty in a tiny committee meeting of ways.
Hard water leaves cloudy white or yellowish mineral spots. Soap and body oils create a sticky film that grabs dust and dirt. Mildew shows up in corners, seams, caulk lines, and textured shower floors where moisture lingers. Rust-like stains may appear near drains or metal fixtures if the water supply has iron. Before you scrub, identify the stain type so you do not use the wrong cleaner and make the problem worse.
Why You Should Not Use Drano in an RV Shower
Let’s be fair: Drano and similar drain cleaners are designed to dissolve clogs in household drains, especially hair and soap buildup. The issue is not that drain cleaner never works. The issue is that RV plumbing has extra risks.
An RV shower drain may lead through lightweight plastic plumbing, rubber seals, a P-trap or waterless trap, and then into a gray water holding tank. Unlike a house, your RV system stores wastewater until you dump it. A caustic drain cleaner can sit in the plumbing or gray tank longer than expected, especially if the clog is stubborn or the rig is not level. That is not exactly the relaxing “van life” aesthetic anyone ordered.
Strong drain cleaners can also create safety issues if you later use another cleaner, plunge the drain, snake the drain, or call a technician. Chemical residue in standing water can splash. In a tiny RV bathroom, fumes are more concentrated than in a full-size home bathroom. And if someone mixes drain cleaner with bleach, vinegar, ammonia, or another drain product, the result can be dangerous gas or heat.
The safer RV rule is simple: remove hair manually, use gentle cleaning methods first, consider enzyme-based drain maintenance, and save harsh chemicals for situations where your RV manufacturer or a qualified RV technician says they are appropriate.
What You Need to Deep Clean an RV Shower
You do not need a garage full of products. In fact, the fewer chemicals you bring into a small RV bathroom, the better. Gather these supplies before you start:
- Microfiber cloths
- Soft sponge or non-scratch scrub pad
- Soft-bristle brush or old toothbrush
- Plastic scraper or old gift card
- Spray bottle
- Mild dish soap
- Baking soda
- 3% hydrogen peroxide
- White vinegar
- Rubber gloves
- Drain hair removal tool or small plastic drain snake
- Squeegee
- Optional: enzyme-based drain treatment labeled safe for RV or septic systems
Do not use steel wool, harsh abrasive powders, undiluted bleach, acetone, paint thinner, toilet bowl cleaner, oven cleaner, or random “miracle” products from the back of the garage. If the label sounds like it could strip paint off a bridge, your RV shower probably does not want to make friends with it.
Step 1: Ventilate First
Before cleaning, open a window, turn on the bathroom fan, and keep the shower door or curtain open. RV bathrooms are compact, and even mild cleaners can smell stronger in a small space. Ventilation also helps the shower dry faster after cleaning, which is one of the best ways to prevent mildew from coming back.
Put on gloves, remove shampoo bottles, razors, soap dishes, bath mats, and anything suction-cupped to the walls. If your shower has a removable teak mat or plastic floor grid, take it outside and clean it separately.
Step 2: Rinse and Loosen Surface Grime
Start with warm water, not boiling water. Boiling water can soften or stress some RV plumbing components, especially in older rigs or systems with plastic fittings. Warm tap water is enough to loosen surface soil without giving your plumbing an unnecessary sauna.
Spray or rinse the shower walls, pan, corners, and drain area. Let the warm moisture sit for a few minutes. This softens soap film and makes the next step easier. The goal is not to blast the shower like a pressure washer. The goal is to persuade grime to leave voluntarily, or at least with minimal drama.
Step 3: Wash With Mild Dish Soap
Mix a few drops of mild dish soap with warm water in a spray bottle or small bucket. Apply it generously to the shower walls, floor, door track, fixtures, and textured areas. Scrub with a soft sponge or soft-bristle brush, working from top to bottom.
This first wash removes body oils, sunscreen residue, conditioner film, and the general “people happened here” layer. Do not skip it. Whitening treatments work better when they are not fighting through greasy buildup.
Rinse thoroughly and wipe with a microfiber cloth. At this point, your shower may already look 40% better. Congratulations. You are officially more powerful than soap scum.
Step 4: Remove Soap Scum and Hard Water Film
For cloudy shower doors, walls, and fixtures, a vinegar solution can help dissolve mineral deposits and soap residue. Mix one part white vinegar with two parts warm water. Spray the solution onto the stained surfaces and let it sit for 5 to 15 minutes. Scrub gently with a non-scratch pad, then rinse well.
Use vinegar carefully. It is generally useful on fiberglass, acrylic, glass, and many metal fixtures, but it should not be used on natural stone. Some RV showers include decorative stone-look panels, specialty coatings, or aftermarket upgrades, so test a small hidden area first.
If vinegar smell makes your RV feel like a salad bar on wheels, rinse thoroughly and run the fan. The smell fades quickly.
Step 5: Whiten Yellowed Fiberglass or Plastic
For yellowed RV shower pans or fiberglass walls, hydrogen peroxide and baking soda are often a safer whitening approach than harsh bleach. Make a paste using two parts baking soda and one part 3% hydrogen peroxide. The texture should be spreadable, like thick frosting, except please do not frost a cupcake with it.
Spread the paste over yellowed or stained areas with a sponge. Let it sit for 15 to 30 minutes. For stubborn stains, cover the paste with plastic wrap to keep it moist while it works. Gently scrub with a soft brush, paying extra attention to textured flooring and corners. Rinse extremely well, then dry with a microfiber towel.
Repeat the process if needed. Old yellowing may not disappear in one session, especially if the plastic has oxidized from age and UV exposure. The goal is improvement without damage. A slightly older shower that still has its finish intact is better than a “whitened” shower that looks like it was scrubbed with driveway gravel.
Step 6: Treat Mold and Mildew Without Mixing Chemicals
Mildew loves RV showers because they are warm, damp, and often closed up after use. Focus on seams, caulk lines, drain edges, shower door tracks, and the bottom of the curtain or liner.
For light mildew, scrub with dish soap and warm water first. Then use hydrogen peroxide on the stained area, let it sit for several minutes, scrub gently, rinse, and dry. For heavier mildew, use a mold and mildew cleaner only if the label says it is safe for your shower material. Always ventilate and never mix cleaners.
This is the big safety rule: do not mix bleach with vinegar, ammonia, hydrogen peroxide, drain cleaner, toilet bowl cleaner, or any other cleaner. Do not layer products because you feel ambitious. Cleaning is not a cocktail recipe. Use one product, rinse thoroughly, and wait before using something else.
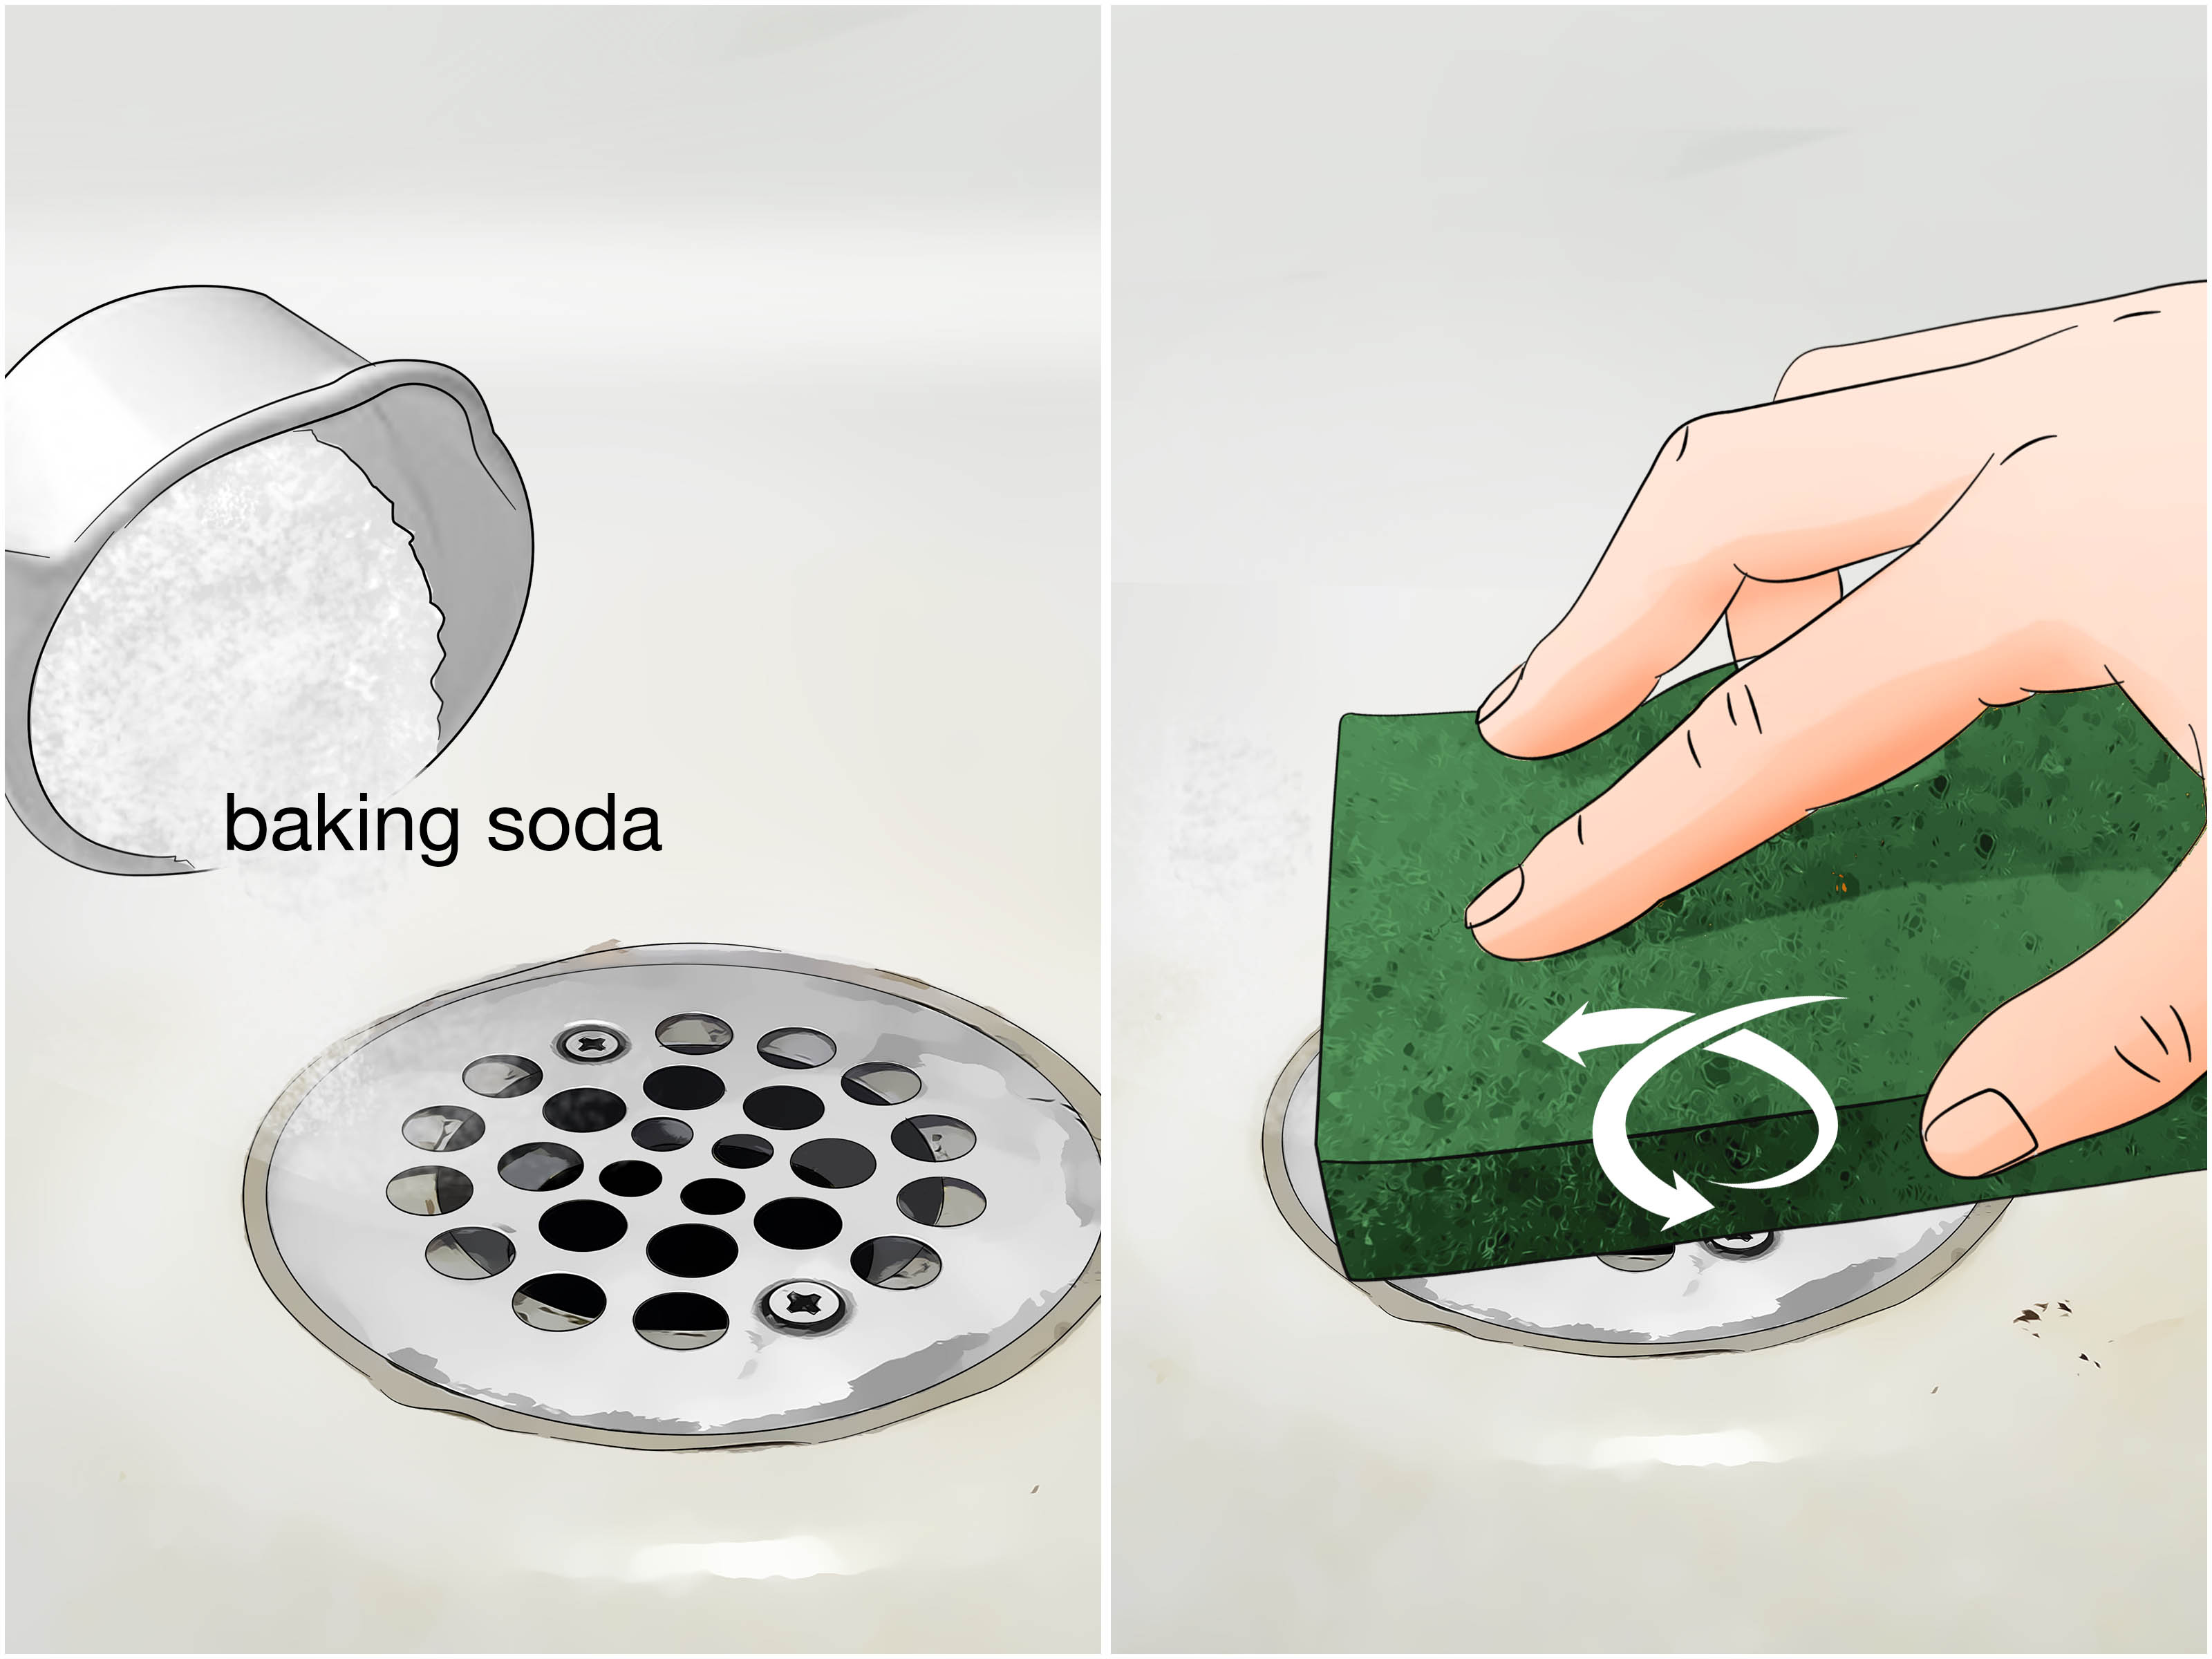
Step 7: Clean the Drain the RV-Safe Way
If your RV shower drains slowly, start with physical removal. Remove the drain cover if possible. Pull out visible hair, soap chunks, and debris using gloves, tweezers, or a small plastic drain snake. This is not glamorous. Nobody puts this part on Instagram. But it works.
After removing debris, flush the drain with warm tap water. If odor remains, sprinkle a small amount of baking soda around the drain opening, follow with a little vinegar, let it fizz briefly, then rinse with warm water. This can freshen the drain cover and upper drain area, but it is not a miracle cure for a serious clog deep in the plumbing.
For routine drain maintenance, consider an enzyme-based cleaner labeled safe for RV or septic systems. Enzymes work more slowly than caustic chemicals, but they are generally gentler and useful for organic buildup like soap film, hair residue, and body oils.
If the shower still drains slowly, check whether the gray tank is full, the vent is blocked, or the rig is sitting off-level. Sometimes the “clog” is not in the shower drain at all. It is your RV politely asking you to dump the gray tank.
Step 8: Freshen the Gray Tank
Your shower drain leads to the gray tank, where soap, shampoo, toothpaste, food particles from the sink, and body oils can collect. If your shower smells clean but the drain still smells funky, the gray tank may be the culprit.
When possible, dump the gray tank when it is fairly full so the rush of water helps carry residue out. After dumping, add several gallons of clean water back into the gray tank to keep the bottom from drying into a sticky sludge layer. Some RV owners use tank treatments designed for gray water systems to reduce odor and buildup.
Keep the gray valve closed when connected to a sewer hookup unless you are actively dumping. Leaving it open all the time can allow residue to dry inside the tank and can also invite odors back toward the RV. Your gray tank is not a decorative pipe. It needs water to move waste properly.
Step 9: Polish Fixtures and Shower Doors
Once the shower walls and pan are clean, finish with fixtures. Spray a microfiber cloth with diluted vinegar and wipe the showerhead, faucet, handles, and door frame. Do not spray cleaner directly into openings or electrical components if your shower area includes lights, fans, or switches nearby.
For a clogged showerhead, remove it if possible and soak the head in white vinegar long enough to dissolve mineral deposits. Rinse and run water through it before reinstalling. Better water flow means better rinsing, and better rinsing means less soap left behind to become tomorrow’s scum.
Step 10: Dry Everything Like You Mean It
The final step is the one most people skip: drying. Use a squeegee on the walls and door. Wipe the shower pan, corners, faucet area, and caulk lines with a microfiber towel. Leave the curtain open and the fan running until the space is dry.
Drying matters because mildew cannot thrive without moisture. A two-minute wipe-down after each shower can save you from a two-hour deep clean later. It is not glamorous, but neither is discovering a black mildew mustache along your caulk line.
How Often Should You Deep Clean an RV Shower?
If you use your RV occasionally, deep clean the shower before storage and after each major trip. If you live in your RV full-time, aim for a light cleaning weekly and a deeper whitening treatment once a month or as needed.
In hard water areas, clean more often. In humid climates, dry more aggressively. If your shower sees sandy feet, muddy dogs, sunscreen, or campground water that smells like pennies, do not wait for the shower to become a modern art installation.
What Not to Use on an RV Shower
Avoid products and tools that can scratch, melt, stain, or weaken the finish. That includes steel wool, stiff wire brushes, abrasive scouring powders, undiluted bleach, acetone, paint thinner, oven cleaner, toilet cleaner, and harsh drain openers.
Also avoid magic combinations from the internet that involve mixing multiple cleaners. Vinegar and baking soda can be used for light fizzing and deodorizing, but they are not a replacement for mechanical clog removal. Bleach should never be mixed with vinegar or drain cleaner. Hydrogen peroxide should not be mixed with vinegar. Different drain cleaners should not be mixed with each other. Your RV shower is small; keep the chemistry boring.
Quick Maintenance Habits That Keep the Shower White
Install a drain hair catcher. Rinse the shower after every use. Squeegee the walls. Dry the corners. Keep the bathroom fan running after showers. Use body washes and shampoos that rinse cleanly. Do not let wet towels sit in the shower. Clean the drain cover weekly. Dump and rinse the gray tank regularly.
For extra protection, some RV owners apply a fiberglass-safe or marine-safe wax to clean, dry fiberglass shower walls. Do not wax the shower floor unless the product specifically says it is safe for walking surfaces. A shiny shower is nice. A surprise indoor slip-and-slide is not.
Real-World RV Shower Cleaning Experience: What Actually Works on the Road
Here is the honest road-tested truth: the best RV shower cleaning routine is the one you will actually do. A perfect 12-step spa-grade cleaning ritual sounds wonderful until you are parked at a windy campsite, your fresh tank is low, and someone used the shower to rinse off hiking shoes. In real RV life, simple systems win.
The most useful habit is keeping a small cleaning kit inside the RV bathroom. A soft sponge, microfiber cloth, mini squeegee, dish soap, baking soda, and a spray bottle of diluted vinegar can handle most messes before they become permanent. When those supplies are nearby, you are more likely to wipe down the shower after use. When they are buried under leveling blocks, extension cords, and that mystery bin labeled “miscellaneous,” the shower loses.
Another practical lesson: clean the shower before travel days, not after. If you scrub the pan and then drive, the movement of the RV can help leftover rinse water move toward the drain and gray tank. This does not replace proper rinsing, but it does help prevent puddles from sitting in textured corners. After arriving, open the shower door or curtain for air circulation.
For yellowed shower floors, patience beats aggression. A hydrogen peroxide and baking soda paste may need two or three rounds. Scrubbing harder is not always better. RV shower pans often have textured surfaces, and if you scratch the peaks of that texture, dirt will cling even more stubbornly. Gentle repeated cleaning gives better long-term results than one furious attack with a rough pad.
If your RV has a shower curtain, wash or replace the liner regularly. A stained liner can make the entire shower look dirty even when the walls are clean. If you have a glass or acrylic shower door, keep a squeegee hanging nearby. The person who showers last gets the glamorous job of wiping the door. Congratulations to that lucky champion.
Odor is another common RV shower complaint. If the shower looks clean but smells like a swamp with commitment issues, check the drain cover, trap, gray tank, and venting. Hair and soap under the drain cover can smell surprisingly dramatic. A dry trap can allow gray tank odors to enter the bathroom. A gray tank that is left open at a full-hookup site can develop residue buildup. Many “dirty shower” problems are actually “unhappy gray tank” problems in disguise.
Finally, never underestimate drying. Full-time RVers often learn this the hard way. In a house, a bathroom has more air volume and usually more ventilation. In an RV, moisture hangs around like an uninvited guest. Wiping the shower dry after use is boring, but it prevents mildew, protects caulk, reduces hard water spots, and keeps plastic from looking cloudy. Two minutes today can prevent a Saturday morning spent muttering at soap scum.
Conclusion
Deep cleaning and whitening your RV shower is not about using the strongest cleaner on the shelf. It is about using the right cleaner for lightweight RV materials, protecting your plumbing, and keeping moisture under control. Start with mild dish soap, use vinegar carefully for mineral buildup, brighten yellowed fiberglass or plastic with hydrogen peroxide and baking soda, remove hair manually, and treat the gray tank as part of the shower system.
And yes, the title means it: do not reach for Drano as your first fix. Your RV shower needs a gentler plan, a little patience, and maybe a tiny pep talk. With regular rinsing, drying, and drain maintenance, you can keep your camper shower bright, fresh, and ready for the next adventurewhether that adventure is a national park, a beach weekend, or simply surviving campground water pressure with dignity.
