
Makeup
How to Convert a Photo to PDF on an iPhone: 3 Free Ways
Jul
Need to turn a photo into a PDF on your iPhone without downloading a suspicious “free” app that somehow wants your email, your shoe size, and a monthly subscription? Good news: your iPhone can already do the job. Whether you are sending a receipt for reimbursement, submitting homework, saving a signed form, organizing ID photos, or turning a picture of a document into something that looks more official than “IMG_4937,” there are several free ways to convert a photo to PDF on an iPhone.
The best part is that you do not need a scanner, a desktop computer, or a paid PDF editor. Apple has quietly built PDF tools into Photos, Files, Notes, Print, Preview, and the Share menu. The only tricky part is knowing where Apple hid the buttons. Spoiler: usually behind the Share icon, the three-dot menu, or a long press. Very Apple. Very “it was there the whole time.”
In this guide, you will learn three free methods: using the Photos app and Print option, using the Files app and Create PDF action, and using Notes or Files to scan a document directly as a PDF. Each method works best for a slightly different situation, so we will also cover when to use each one, how to make the PDF look cleaner, and what to do if the Create PDF option does not appear.
Quick Answer: The 3 Free Ways to Convert a Photo to PDF on iPhone
If you are in a hurry, here is the fast version:
- Use Photos + Print: Best for converting one or more existing photos from your Camera Roll into a PDF.
- Use Files + Create PDF: Best when the image is already saved in the Files app or you want a clean PDF stored in iCloud Drive or On My iPhone.
- Use Notes or Files + Scan Documents: Best for paper documents, receipts, forms, IDs, homework pages, and anything that needs straight edges and a document-style look.
All three methods are free. All three can be done on the iPhone. And all three are much better than taking a blurry photo of a document and emailing it with the subject line “hope this works.”
Method 1: Convert a Photo to PDF Using Photos and Print
The Photos app is the most natural place to start because that is where most iPhone pictures live. This method uses the built-in Print feature to generate a PDF, even if you do not actually print anything. Think of it as fake printing for a very real PDF.
Best for:
This method is ideal for turning a photo from your Camera Roll into a shareable PDF. Use it for screenshots, receipts, whiteboard photos, signed forms, product photos, warranty images, or a single-page document you already photographed.
Steps to convert a photo to PDF from Photos
- Open the Photos app on your iPhone.
- Tap the photo you want to convert.
- Tap the Share icon.
- Scroll down and tap Print.
- On the print preview screen, use two fingers to zoom in on the preview. This opens the photo as a PDF-style preview.
- Tap the Share icon again.
- Choose Save to Files, Mail, Messages, or another sharing option.
- If saving, choose a folder in iCloud Drive or On My iPhone, then tap Save.
That is it. No printer required. No ink. No paper jam. No dramatic beeping from a machine in the corner.
How to convert multiple photos into one PDF
You can also use this method for several images. In Photos, tap Select, choose multiple photos, tap the Share icon, then choose Print. The print preview should arrange your selected images as pages. After opening the preview, use the Share menu to save or send the PDF.
This is handy for creating a multi-page PDF from several receipts, class notes, recipe cards, or project photos. For example, if you photographed three pages of a form, you can select all three images and convert them into one PDF instead of sending three separate image files that arrive like digital confetti.
Pros and cons of the Photos + Print method
Pros: It is fast, free, and does not require moving the photo first. It works well for images already stored in Photos. It is also one of the easiest options when you just need to email a photo as a PDF quickly.
Cons: The Print option can feel hidden. The PDF layout depends on the photo’s size and orientation. If the original image is crooked, dark, or cluttered, the PDF will not magically become beautiful. A messy photo converted to PDF is still a messy photojust wearing a tie.
Method 2: Convert a Photo to PDF Using the Files App
The Files app is one of the cleanest ways to create a PDF on iPhone. It works especially well when your image is already saved outside Photos, such as in Downloads, iCloud Drive, Google Drive, Dropbox, or On My iPhone. It is also a good option if you want to keep the finished PDF organized in a specific folder.
Best for:
Use the Files app when you want a more document-like workflow. It is great for school assignments, business receipts, invoices, IDs, forms, and images you plan to store, rename, upload, or send later.
Step 1: Save the photo to Files
If the image is currently in Photos, move it to Files first:
- Open the Photos app.
- Select the photo you want to convert.
- Tap the Share icon.
- Tap Save to Files.
- Choose a folder, such as On My iPhone or iCloud Drive.
- Tap Save.
Step 2: Create the PDF in Files
- Open the Files app.
- Go to the folder where you saved the image.
- Touch and hold the image file.
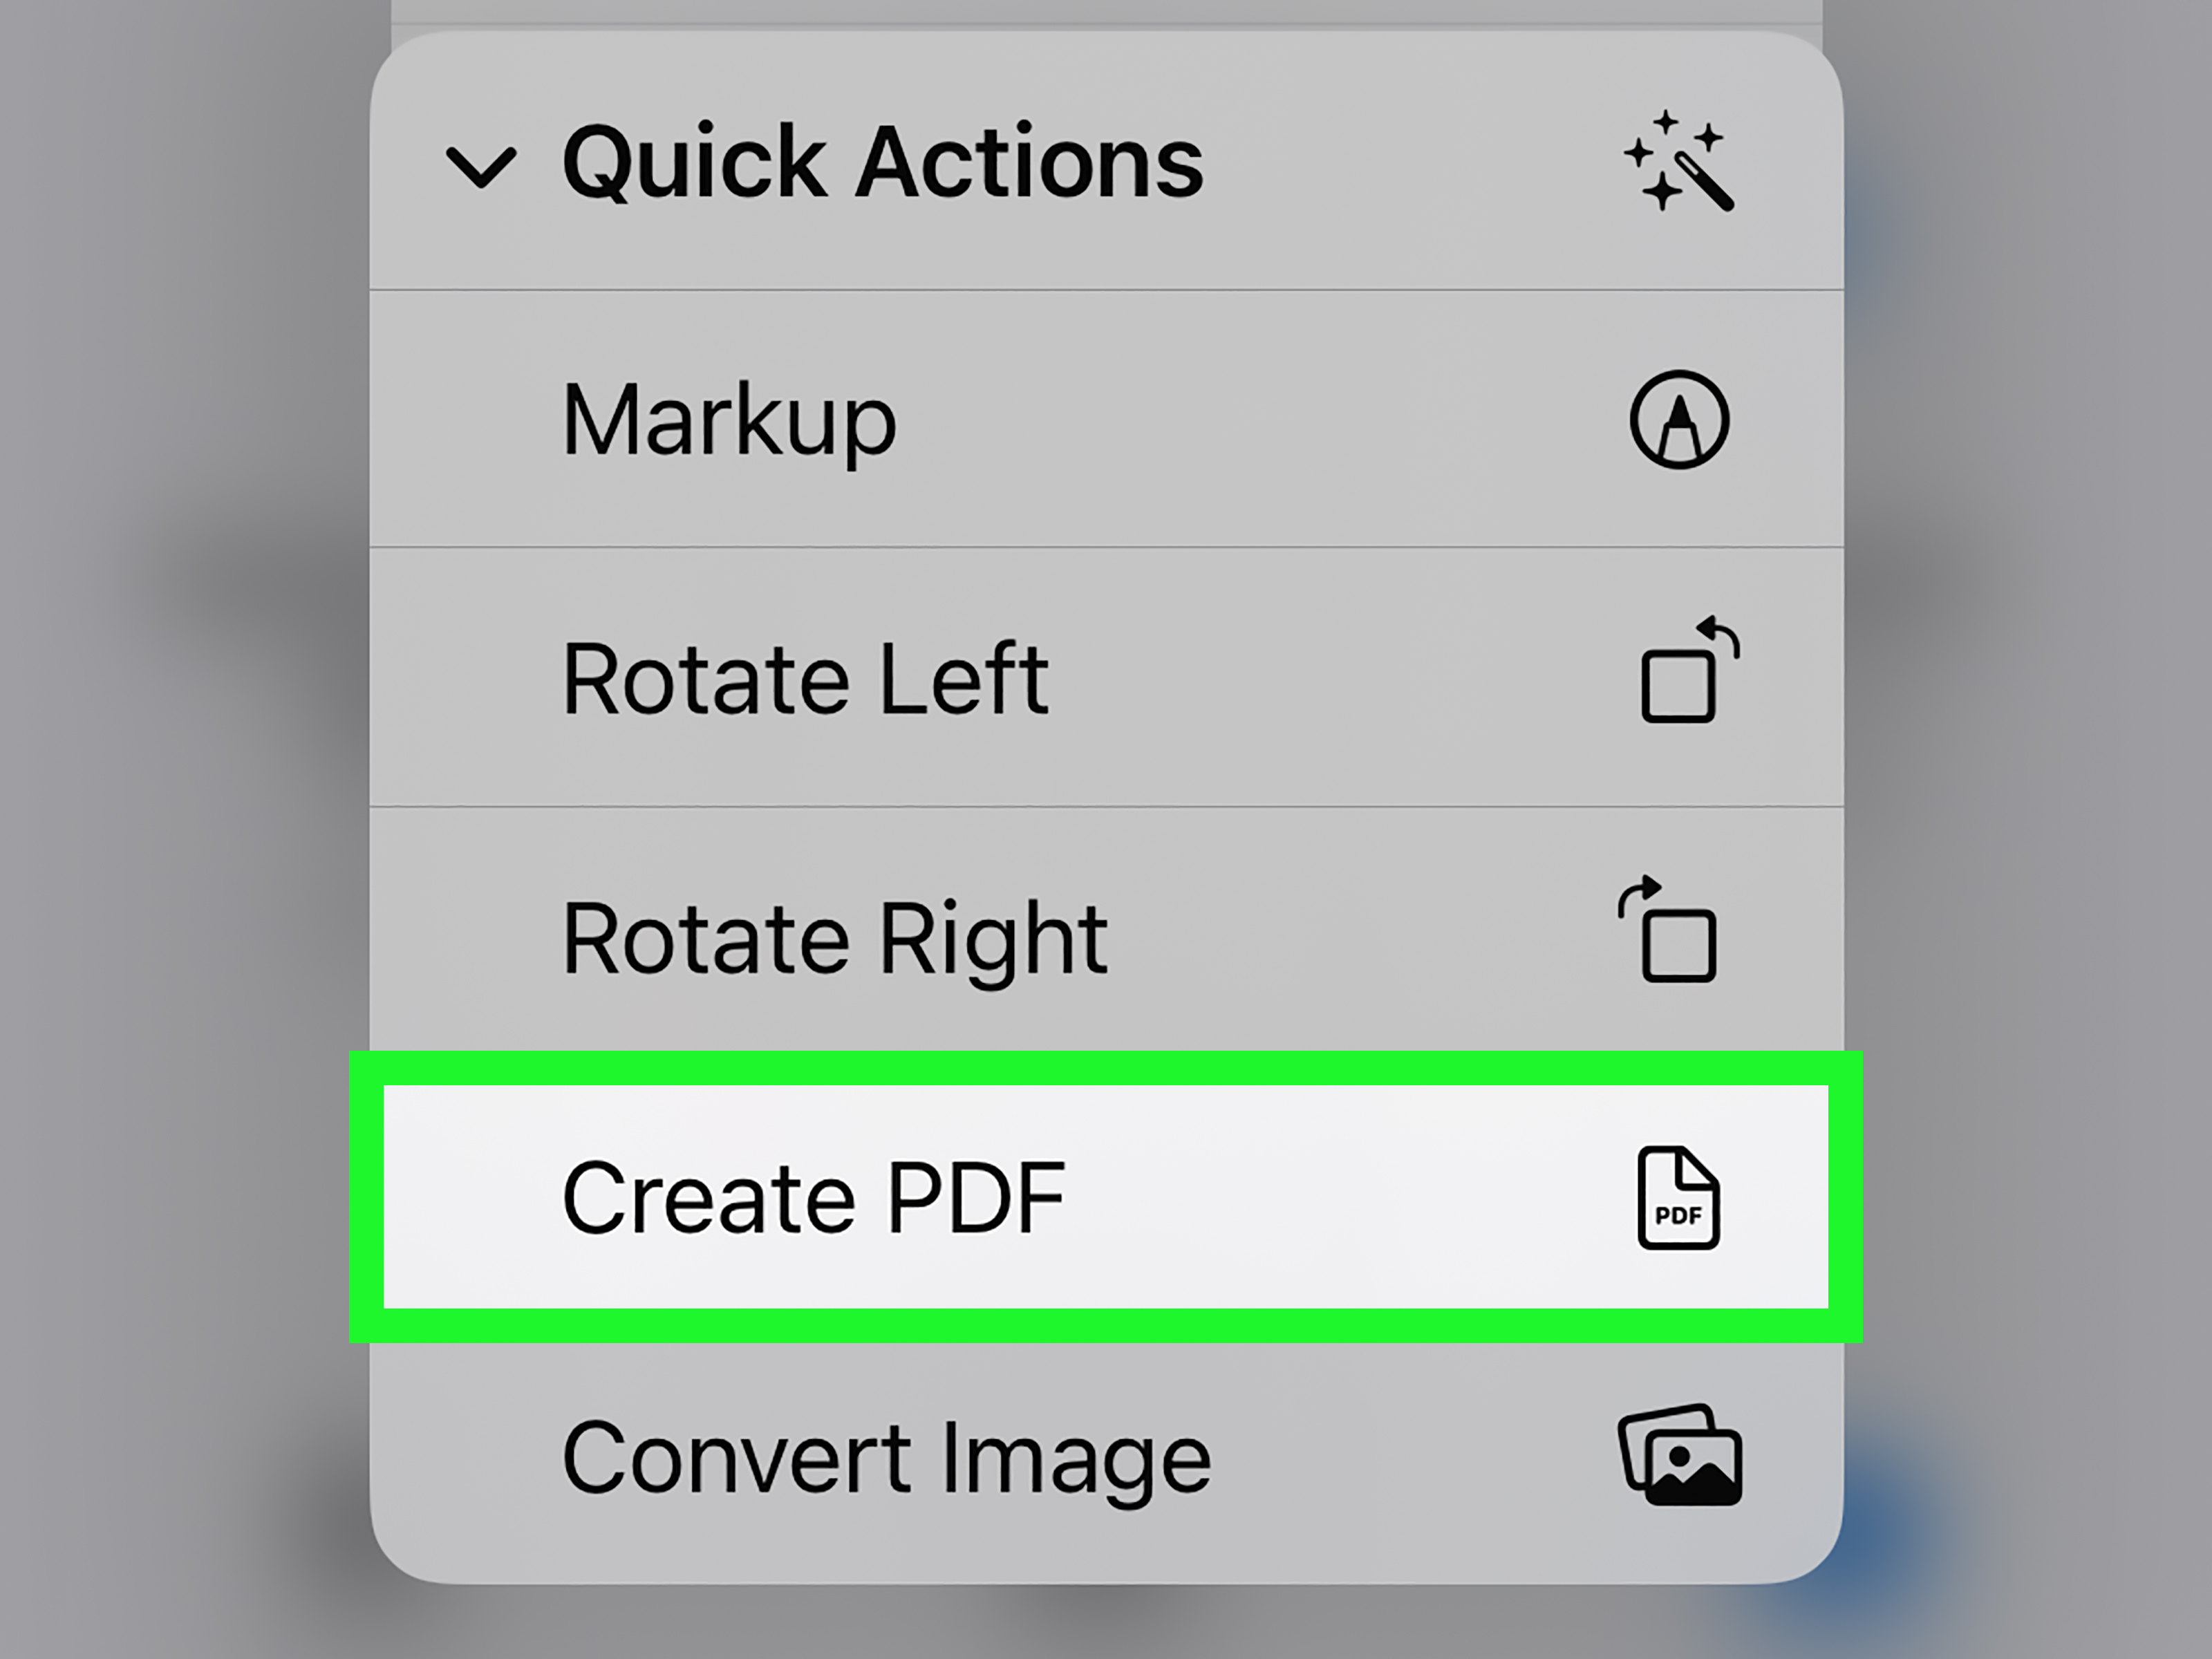
- Tap Quick Actions, if shown.
- Tap Create PDF.
Your iPhone will create a PDF in the same folder. The new file usually appears near the original image and may use a similar file name. From there, you can rename it, move it, compress it, share it, or upload it wherever it needs to go.
How to make a PDF from multiple photos in Files
If you have several images saved in the same Files folder, tap the three-dot menu, choose Select, tap the images you want, then open the additional options menu and choose Create PDF. The iPhone can combine selected images into a single PDF file.
Before doing this, rename the photos or arrange them carefully if order matters. For example, if you are turning five homework pages into one PDF, you do not want page 5 appearing before page 2 like it is trying to win a plot twist contest.
What if “Create PDF” does not appear?
If the Create PDF option is missing, try these fixes:
- Make sure the file is an image format your iPhone can handle easily, such as JPG, PNG, or HEIC.
- Move the image to a local folder under On My iPhone or to iCloud Drive.
- Open the image, tap Share, and try the Print method instead.
- Update iOS if your iPhone is running an older version.
- Try selecting the file first, then using the three-dot menu to look for PDF actions.
The Files method is often the neatest option because it creates a real file in a real folder. If your digital life is already organized into folders, congratulationsyou are among the chosen few. If not, this is still a good time to start.
Method 3: Scan a Document as a PDF Using Notes or Files
Sometimes you do not really want to convert a casual photo. You want to capture a paper document and make it look like a proper PDF. That is where the built-in document scanner comes in. Instead of taking a normal photo, the scanner detects the page, adjusts the edges, improves contrast, and saves the result as a PDF.
Best for:
This method is best for paper documents, receipts, contracts, schoolwork, handwritten notes, forms, certificates, business cards, and printed pages. If the final PDF needs to look clean and official, scanning is usually better than snapping a regular photo.
Option A: Scan a document in Notes
- Open the Notes app.
- Create a new note or open an existing one.
- Tap the Attachment or camera-style button.
- Choose Scan Documents.
- Position the document inside the camera view.
- Let the iPhone capture it automatically, or tap the shutter button manually.
- Adjust the corners if needed.
- Tap Keep Scan.
- Scan more pages if needed, then tap Save.
- Tap the scanned document, use the Share menu, and save or send it as a PDF.
Option B: Scan a document in Files
- Open the Files app.
- Go to the folder where you want the PDF saved.
- Tap the three-dot menu.
- Choose Scan Documents.
- Place the document in view of the camera.
- Capture the page, adjust corners, and tap Keep Scan.
- Tap Save when finished.
The Files scanner is excellent when you already know where the finished PDF should live. Notes is better when you want to keep the scan inside a note, add context, or collect several related items together.
Why scanning is often better than converting a regular photo
A regular photo includes everything the camera sees: the table, shadows, your thumb, the edge of yesterday’s coffee cup, and possibly a dramatic cameo from your cat. A document scan is more focused. It attempts to frame the page, flatten the perspective, and make text easier to read.
If you are sending a document to a school, employer, government office, insurance company, landlord, bank, or client, use the scanner. It usually produces a cleaner PDF and looks more intentional. In professional situations, “clean and boring” is often exactly what you want.
Which Free Method Should You Choose?
Choose based on what you are starting with:
- Already have the image in Photos? Use Photos + Print.
- Already have the image in Files? Use Files + Create PDF.
- Have a paper document in front of you? Use Notes or Files + Scan Documents.
- Need several images in one PDF? Use Files if the order matters, or Photos + Print for a quick version.
- Need the cleanest document look? Use the built-in scanner.
For most people, the Photos method is the fastest. For organized document storage, Files wins. For anything involving actual paper, scanning wins by a mile.
How to Make Your iPhone PDF Look Better
Converting the photo is only half the battle. The other half is making sure the PDF does not look like it was captured during an earthquake. Before you create the PDF, take a moment to improve the original image.
Use good lighting
Place the document near a window or under even lighting. Avoid harsh shadows, glare, and reflections. If you are photographing a glossy receipt or laminated ID, tilt the phone slightly until the glare disappears.
Crop before converting
Open the image in Photos, tap Edit, and crop out extra background. This makes the final PDF cleaner and reduces distractions. Nobody reviewing your PDF needs to admire your kitchen counter.
Keep the phone parallel to the page
Hold your iPhone directly above the document. If you shoot from an angle, the page may look stretched or trapezoid-shaped. That is fine for modern art, less fine for a tax form.
Use Markup when needed
Apple’s Markup tools can help you add text, draw attention to an area, highlight something, or add a signature. This is useful for forms, approvals, quick notes, and documents that need a visible annotation before sharing.
Rename the PDF clearly
After saving the PDF in Files, touch and hold it, then choose Rename. Use a simple file name like Receipt-April-2026.pdf, Homework-Chapter-4.pdf, or Insurance-Claim-Photos.pdf. A clear name makes the file easier to find later and looks more professional when attached to an email.
Can You Convert HEIC Photos to PDF on iPhone?
Yes, in many cases your iPhone can handle HEIC photos because HEIC is Apple’s common photo format. However, some websites, apps, and upload portals behave better with JPG or PDF than with HEIC. That is one reason converting a photo to PDF is useful: it can make the file easier to submit, preview, and share across different systems.
If you run into problems with HEIC images in Files, try the Photos + Print method. You can also duplicate or export the image in a more compatible format before converting. For everyday use, though, most iPhone users can create PDFs from their existing photos without thinking too much about file formats. And honestly, that is how technology should work more often.
Can You Convert a Photo to PDF Without Internet?
Yes. The built-in iPhone methods do not require an internet connection unless you are saving to a cloud folder that needs syncing. If you save the PDF under On My iPhone, you can create and keep the file locally. This is helpful when traveling, working with private documents, or dealing with weak Wi-Fi that has chosen emotional distance as a lifestyle.
Online PDF converters can be convenient, but for personal IDs, medical paperwork, school forms, financial documents, or private photos, built-in offline tools are usually the safer choice. You do not need to upload sensitive images to a website just to make a simple PDF.
Common Problems and Easy Fixes
The PDF file is too large
Large photos can create large PDFs. To reduce file size, crop the photo, avoid unnecessary pages, or use a compression option if available in your iPhone’s PDF or Preview tools. You can also retake the photo at a reasonable distance instead of using an extremely high-resolution close-up.
The image appears sideways
Open the photo in Photos, tap Edit, rotate it correctly, and save the change before converting it again. If the PDF is already created, you may be able to rotate the page in a PDF viewer or editing app.
The PDF pages are out of order
When converting multiple images, order matters. Rename the image files with numbers such as 01, 02, and 03, or select them carefully in the correct sequence before creating the PDF.
The text is hard to read
Use Scan Documents instead of a regular photo. Make sure the page is flat, bright, and in focus. If the document is wrinkled, place it under a book for a few minutes before scanning. Yes, this is low-tech. Yes, it works.
The file will not upload
Check the upload site’s file size limit and accepted file types. Some portals accept PDF but reject images; others may require a smaller file. Rename the PDF with a simple file name using letters, numbers, and hyphens. Avoid emojis in official uploads, even if “passport-final-final-really-final.pdf” feels emotionally accurate.
Real-World Experiences: What Actually Works Best
In everyday use, the best method depends less on technology and more on the tiny chaos surrounding the task. If you are standing at a counter and someone says, “Can you send that as a PDF?” the Photos + Print method is usually the fastest. You can open the image, tap Share, use Print, save the PDF, and send it before anyone has time to suggest downloading a random converter app.
For receipts, the Files app is often the most practical. Imagine you buy office supplies, lunch for a client meeting, or a replacement charger because your old cable decided to retire early. You take a photo of the receipt, save it to a folder called “Receipts,” create a PDF, rename it, and send it for reimbursement. The whole process feels much more organized than scrolling through your Camera Roll later while asking, “Was this receipt before or after the picture of my dog sleeping like a croissant?”
For schoolwork or forms, scanning wins. A normal photo may be acceptable, but a scan looks cleaner and easier to read. The automatic edge detection is especially helpful when the page is on a desk, bed, table, or any surface that is not exactly a professional scanning station. If you have several pages, Notes and Files can keep them together in one PDF, which is much easier for teachers, offices, and clients to review.
One useful habit is to decide where the PDF should live before creating it. If the file is temporary, save it to Downloads or a simple folder under On My iPhone. If it is important, save it to iCloud Drive in a folder with a clear name. This prevents the classic iPhone mystery: you know you saved the file, but it has vanished into a digital forest of folders named “Documents,” “Downloads,” and “Stuff.”
Another lesson from real use: rename files immediately. The default file name might be technically accurate, but names like IMG_8021.pdf are not helpful two weeks later. A file called Car-Repair-Receipt-May-2026.pdf tells you exactly what it is. Good file names are boring in the best possible way.
Privacy also matters. If you are converting a photo of an ID card, medical document, bank statement, legal form, or anything personal, use the built-in iPhone tools instead of uploading the image to an online converter. Offline conversion keeps the workflow simple and reduces unnecessary exposure. Free web tools can be useful for non-sensitive files, but your private documents do not need a world tour.
Finally, do not underestimate the power of retaking the photo. If the first image is blurry, dark, tilted, or half-covered by your thumb, converting it to PDF will not rescue it. PDF is a format, not a miracle worker. Retake the picture with better light, crop it cleanly, and then convert it. The result will look sharper, more professional, and less like it was captured during a mild panic.
Conclusion
Learning how to convert a photo to PDF on an iPhone is one of those small skills that saves time again and again. You can use Photos and Print for quick conversions, Files and Create PDF for organized file management, or Notes and Files scanning when you need a clean document-style PDF. All three methods are free, built into the iPhone, and practical for school, work, travel, personal records, receipts, forms, and everyday paperwork.
The simplest rule is this: if it is already a photo, use Photos or Files. If it is still paper, scan it. Clean up the image, give the file a clear name, save it somewhere you can actually find, and your iPhone becomes a pocket-sized PDF machineminus the office printer drama.
Note: Button names and menu placement may vary slightly depending on your iPhone model and iOS version, but the core workflows remain the same: Share, Print, Save to Files, Create PDF, or Scan Documents.

