
Beauty Tools & Accessories
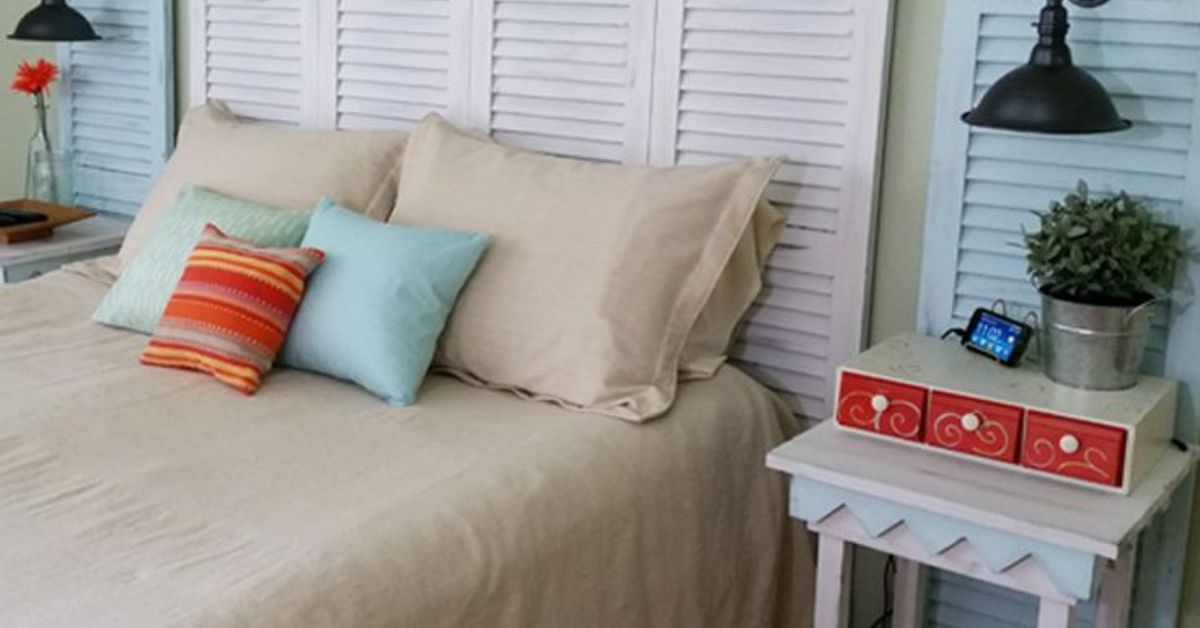
Garage Sale Shutters Turned Headboard!
Aug
Somewhere between the folding table full of mismatched mugs and the box labeled “FREE, probably useful,” there it is: a pair of dusty old shutters leaning against a garage wall like they have been waiting for their second act. Most people walk past. A DIY dreamer stops, squints, and thinks, “That could be a headboard.” And just like that, a bedroom makeover begins for less than the cost of a fancy brunch.
Turning garage sale shutters into a headboard is one of those wonderfully practical home projects that checks every box. It is budget-friendly, beginner-friendly, environmentally friendly, and just quirky enough to make your bedroom feel collected rather than copied from a catalog. Old shutters bring instant texture, vertical lines, vintage charm, and a little architectural drama. They are especially perfect for farmhouse bedrooms, coastal cottages, shabby chic spaces, boho rooms, guest bedrooms, and anyone who enjoys telling visitors, “Oh that? I made it,” while trying not to look too smug.
This guide walks you through how to choose the right shutters, clean and prep them safely, design a balanced layout, mount everything securely, and finish the piece so it looks intentional instead of like you nailed random garage sale loot to the wall at midnight. We will also cover styling ideas, safety tips, cost-saving tricks, and real-world experiences from the kind of project where the measuring tape disappears exactly when you need it most.
Why Old Shutters Make Such a Great DIY Headboard
A headboard does more than fill the wall behind your pillows. It frames the bed, gives the room a focal point, adds comfort, and creates a finished look. Store-bought headboards can be beautiful, but they can also be expensive, bulky, and about as exciting as plain oatmeal. Repurposed shutters, on the other hand, bring character before you even touch a paintbrush.
The louvered design of shutters naturally adds depth and shadow. Even simple painted shutters can make a flat wall feel layered. Their tall, narrow shape works well behind beds because the vertical lines draw the eye upward, making the room feel taller. If the shutters have chipped paint, weathered edges, or old hardware, even better. That patina is not damage; it is personality with hinges.
Another advantage is flexibility. You can use two tall shutters for a twin bed, three or four for a queen, or a wider group for a king. You can mount them directly to the wall, attach them to a backing board, or build a freestanding panel. You can keep the finish rustic, paint everything crisp white, go moody with navy or charcoal, or sand the edges for a soft cottage look.
What to Look for When Buying Garage Sale Shutters
Not every shutter deserves a place of honor behind your bed. Some are charming. Some are wobbly. Some smell like a basement had a basement. Before you hand over your five-dollar bill, inspect the shutters carefully.
Check the size first
Measure your mattress before you shop if possible. A twin mattress is about 38 inches wide, a full is about 54 inches, a queen is about 60 inches, and a king is about 76 inches. Your shutter headboard can be slightly wider than the mattress for a designer look, but it should not be so narrow that it appears accidental. For height, many DIY shutter headboards look best when they rise 24 to 36 inches above the top of the mattress, though taller designs can feel dramatic and cozy.
Look for solid construction
Gently wiggle the frame. If it twists like a pretzel, keep walking. Check for cracked rails, missing louvers, loose staples, splintered corners, and signs of rot. A little surface wear is fine. Structural weakness is not. You want shutters that can be cleaned, painted, and mounted securely without shedding pieces every time you fluff a pillow.
Beware of mystery paint
Old painted shutters can be beautiful, but if they may be from a home built before 1978, treat the paint cautiously because older paint may contain lead. Do not aggressively sand or scrape mystery paint until you have tested it or confirmed it is safe. For a bedroom project, especially in a child’s room, safety beats rustic charm every single time.
Consider pairs, sets, and mismatches
A perfectly matching set is easy to design with, but mismatched shutters can be gorgeous when tied together with one paint color. If you find shutters in different heights, you can trim them, create a stepped design, or use the tallest piece in the center. The secret is making the final layout look deliberate. “Eclectic” is stylish. “I panicked in the driveway” is less stylish.
Tools and Supplies You May Need
The exact supply list depends on your design, but most shutter headboard projects use simple materials. Gather the basics before starting so you are not hunting for screws while holding a shutter against the wall with your knee.
- Garage sale shutters or salvaged shutters
- Tape measure and pencil
- Stud finder
- Level
- Drill and drill bits
- Wood screws
- Wall anchors only where appropriate
- French cleat, heavy-duty picture hangers, or wood backing rails
- Wood glue or construction adhesive, if building a panel
- Sandpaper or sanding sponge
- Lead test kit for older painted pieces
- Primer and paint or stain
- Clear protective topcoat
- Cleaning cloths, mild soap, and water
- Safety glasses, gloves, and dust mask
Step-by-Step: How to Turn Garage Sale Shutters Into a Headboard
Step 1: Clean the shutters thoroughly
Garage sale shutters often arrive with a bonus layer of dust, spiderwebs, pollen, and the vague aroma of someone’s shed. Start with a dry brush or vacuum attachment to remove loose dirt. Then wipe the shutters with a damp cloth and mild soapy water. For greasy or grimy areas, use a gentle cleaner, then rinse with a clean damp cloth. Let the wood dry completely before sanding, priming, or painting.
Do not skip drying time. Paint over damp wood and you may end up with bubbling, peeling, or a finish that looks like it regrets its life choices.
Step 2: Test old paint before sanding
If the shutters are vintage or you do not know their history, use a lead paint test kit before disturbing the finish. If the test is positive, avoid sanding or scraping. You can either consult a professional, seal the surface with an appropriate encapsulating product, or choose a safer set of shutters. The goal is a charming bedroom, not a hazardous dust storm with throw pillows.
Step 3: Repair loose parts
Tighten screws, secure loose louvers, and glue any small splits in the frame. Clamp repaired areas until dry. Fill unwanted holes with wood filler if you plan to paint, but leave some dings and dents if you want a timeworn look. A shutter headboard should feel loved, not surgically perfect.
Step 4: Decide on the layout
Lay the shutters on the floor in front of the bed or use painter’s tape on the wall to outline the finished shape. Try several arrangements before committing. You can place shutters vertically for height, horizontally for a wider modern feel, or in a folding-screen style for extra depth. For a queen bed, three or four vertical shutters often create a pleasing proportion.
Leave a little breathing room on each side of the mattress. If nightstands sit close to the bed, make sure the headboard will not collide with lamps, outlets, or wall sconces. Also consider pillow height. The prettiest detail in the world is wasted if it hides behind six giant pillows named “decorative but useless.”
Step 5: Sand lightly, if safe
If the paint is safe to disturb or the shutters are unfinished wood, sand rough areas lightly. You do not need to remove every trace of the old finish. The purpose is to smooth splinters and give primer something to grip. Wipe away dust with a slightly damp cloth and let everything dry again.
Step 6: Prime and paint
Primer helps paint adhere and creates a more even finish, especially if the shutters are stained, glossy, dark, or uneven. Use a brush to work into corners and louvers, then smooth larger surfaces with a small roller if possible. Two thin coats of paint usually look better than one thick coat. Thick paint loves to collect in shutter slats, where it dries into little blobs of regret.
White, cream, sage, dusty blue, and soft gray are classic choices for a cottage or farmhouse shutter headboard. Black, charcoal, forest green, or deep navy can make the piece feel more modern. For a weathered finish, paint the shutters, let them dry, then gently distress high points with fine sandpaper.
Step 7: Seal the finish
A clear topcoat protects the paint from scratches, pillow friction, and everyday dusting. Choose a finish that matches your style. Matte or satin topcoats work well for vintage looks, while semi-gloss is easier to wipe clean. Let the finish cure according to product directions before installation.
Step 8: Mount the headboard securely
This is the step where pretty meets practical. A shutter headboard must be secure. Whenever possible, mount into wall studs. A French cleat is an excellent option because it distributes weight across a rail and allows the headboard to sit snugly against the wall. Heavy-duty D-rings, metal brackets, or a wood backing rail can also work depending on the weight and design.
If you attach the shutters together as one panel, reinforce the back with horizontal boards. This keeps the shutters aligned and gives you solid places to fasten mounting hardware. Use a level before drilling. Then use it again. Then maybe use it one more time, because crooked headboards have a way of becoming the only thing you can see at 2 a.m.
Design Ideas for Every Bedroom Style
Farmhouse charm
Paint the shutters warm white or soft greige, distress the edges, and pair the headboard with linen bedding, a chunky knit throw, black metal lamps, and a weathered wood bench. Add a small wreath or vintage sign above the bed if you enjoy a layered look.
Coastal cottage
Choose shutters in pale blue, sea glass green, or crisp white. Keep the bedding airy with stripes, cotton quilts, and woven textures. The louvers naturally echo breezy beach cottages, even if the nearest ocean is your neighbor’s inflatable pool.
Boho collected
Use mismatched shutters painted in one earthy color, then style the bed with patterned pillows, a macramé wall hanging, rattan nightstands, and warm wood tones. The shutters add structure while the textiles keep the room relaxed.
Modern vintage
Paint the shutters matte black, deep olive, or charcoal. Keep the bedding simple and the accessories minimal. The result feels architectural and grown-up, but still has the soul of a treasure found beside a lawn mower at a Saturday sale.
Common Mistakes to Avoid
The first mistake is choosing shutters that are too small. A headboard should feel substantial enough to anchor the bed. If your shutters are narrow, add side trim, mount them on a larger painted panel, or combine several pieces.
The second mistake is skipping safety prep. Old paint, splinters, loose louvers, and weak mounting hardware can turn a cute project into a problem. Test questionable paint, smooth sharp edges, and secure everything properly.
The third mistake is overdecorating. Shutters already have strong lines and texture. Let them breathe. A simple lamp, clean bedding, and a few well-chosen accents often look better than piling on every farmhouse accessory in the county.
The fourth mistake is painting too quickly. Cleaning, drying, priming, painting, and sealing all require patience. Rushing the finish can lead to tackiness, brush marks, and paint that scratches when you move the headboard into place.
Budget Breakdown: How Much Does a DIY Shutter Headboard Cost?
The beauty of this project is that the final cost can be surprisingly low. Garage sale shutters may cost anywhere from a few dollars to around $40 depending on size and condition. Paint, primer, screws, sandpaper, and hardware may add another $30 to $80 if you do not already have supplies. Even with a sturdy French cleat and quality paint, many DIYers can complete the project for far less than the price of a new retail headboard.
The biggest savings come from using what you already own. Leftover wall paint, spare screws, old backing boards, or a can of clear coat from another project can all reduce the total. Just make sure you do not cut corners on mounting hardware. Save money on decorative extras, not on the part keeping the headboard attached to the wall.
Real-Life Experience: What It Feels Like to Make One
The best part of turning garage sale shutters into a headboard is not just the finished bedroom photo. It is the story. There is something satisfying about rescuing a dusty object and giving it a starring role. You start with shutters that someone else no longer wanted, and by the end, they look like they were always meant to be there.
In practice, the project usually begins with optimism and one slightly unrealistic timeline. You imagine cleaning, painting, and installing everything in a single afternoon. Then you discover the shutters have twelve tiny grooves per louver, and each groove has collected enough dust to qualify as an archaeological site. This is when patience becomes your best tool. Put on music, work slowly, and accept that prep is half the project.
One useful experience is to test the layout longer than you think necessary. Lean the shutters behind the bed for a day before mounting them. Walk into the room at different times. Look at them in morning light and evening light. Sometimes the arrangement that looked perfect on the garage floor feels too tall, too busy, or too narrow once it is behind the mattress. Painter’s tape is your friend here. It lets you adjust without putting experimental holes in the wall, which is always nice unless your design style is “Swiss cheese drywall.”
Another lesson is that color changes everything. A pair of dark brown shutters may look heavy in a small bedroom, but one coat of soft white primer can suddenly make them feel fresh and airy. On the other hand, painting shutters black or deep green can make a basic room feel custom and dramatic. If you are nervous, paint a scrap board first and hold it near your bedding. Do not choose paint under fluorescent garage lighting unless you enjoy surprises.
Mounting is where many DIYers learn humility. Walls are rarely as cooperative as tutorials suggest. Studs are not always exactly where you want them, baseboards may push the bed forward, and old shutters may not be perfectly square. A backing board can solve many problems because it ties the shutters together and gives you more control over mounting points. It also keeps the shutters from shifting when the bed moves.
The final reveal is worth the fuss. The bed suddenly has presence. The room looks warmer, more personal, and more finished. Guests may assume the headboard came from a boutique furniture shop, which is your cue to casually mention the garage sale price. Try not to grin too hard. Or do. You earned it.
What makes this project special is that it does not demand expert carpentry. It asks for creativity, careful prep, and respect for safety. You do not need a professional workshop. You need a good eye, a level, a drill, and the willingness to see possibility in something leaning beside a box of old extension cords. That is the heart of upcycling: not just saving money, but noticing beauty before everyone else does.
Conclusion
A garage sale shutter headboard is proof that great bedroom design does not have to begin in a furniture showroom. Sometimes it begins in a driveway, next to a coffee can full of rusty nails, with a seller saying, “You can have both shutters for ten bucks.” With the right cleaning, safe prep, thoughtful painting, and secure mounting, old shutters can become a headboard full of texture, history, and handmade charm.
This project works because it blends function with personality. It gives your bed a focal point, keeps usable materials out of the waste stream, and lets you customize the size, color, and style to fit your room. Whether your taste leans farmhouse, coastal, cottage, boho, or modern vintage, shutters offer a flexible starting point. The finished piece feels collected, cozy, and completely yours.
Note: Always inspect old shutters carefully, test questionable painted finishes before sanding, and mount the completed headboard securely to studs or with appropriate heavy-duty hardware.

