
Beauty Tools & Accessories
Easy Recipe for Apple Pastry Rings
Sep
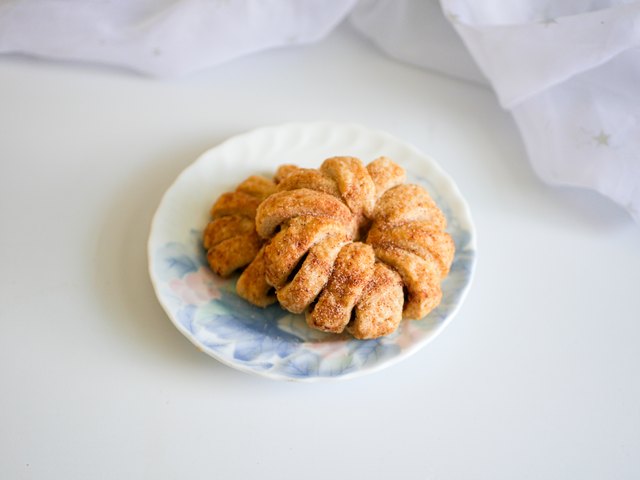
Apple pastry rings are what happen when a cinnamon doughnut and an apple pie decide to share a very flaky winter coat. Each ring starts with a fresh apple slice, gets wrapped in ribbons of puff pastry, and bakes into a golden handheld dessert with a tender, juicy center.
This easy apple pastry rings recipe looks impressively bakery-ready, but it relies on store-bought puff pastry and a short ingredient list. There is no yeast to wake up, no dough to knead, and no pie plate to scrub afterward. From start to finish, you can have warm pastries on the table in roughly 35 minutes.
Serve the rings for brunch, an after-school snack, a fall gathering, or dessert with vanilla ice cream. They are also wonderfully suited to those evenings when you want apple pie but do not want to negotiate with an entire pie crust.
Why You Will Love These Apple Pastry Rings
- Simple ingredients: Apples, frozen puff pastry, cinnamon sugar, and an egg do most of the work.
- Fast preparation: The rings require about 15 minutes of hands-on time.
- Individual portions: No slicing, serving spatula, or argument over who received the largest piece.
- Flexible flavor: Add caramel, nuts, maple glaze, apple pie spice, or even cheddar.
- Beginner-friendly: Slightly uneven pastry strips only make the rings look more charmingly homemade.
Choosing the Best Apples for Pastry Rings
Firm apples are essential because the slices must survive coring, wrapping, and baking without turning into applesauce. Granny Smith is an excellent choice for its tart flavor and sturdy texture. Pink Lady, Braeburn, Cortland, Honeycrisp, and other crisp baking apples also work well.
A sweet-tart variety creates the best balance. The sugar coating and optional glaze add plenty of sweetness, so an apple with a little acidity keeps the finished pastry lively rather than sugary. University extension guidance identifies several firm varieties as suitable for cooking, while also noting differences in sweetness, crispness, and browning behavior.
Avoid unusually soft, mealy, or overripe apples. They may break while you thread the pastry through the center. Choose fruit that feels heavy and firm, with no large bruises or wrinkled areas.
Wash the apples thoroughly under running water before cutting them, even when you intend to remove the peel. The FDA recommends washing produce with water rather than soap or commercial produce detergent.
Ingredients
For the Apple Rings
- 1 sheet frozen puff pastry, thawed according to the package instructions but still cool
- 2 medium firm baking apples
- 1 tablespoon lemon juice
- 3 tablespoons granulated sugar
- 1 teaspoon ground cinnamon
- 1/8 teaspoon ground nutmeg, optional
- Pinch of fine salt
- 1 large egg
- 1 teaspoon water
- All-purpose flour, for dusting the work surface
For the Optional Vanilla Glaze
- 1/2 cup powdered sugar
- 1 to 2 tablespoons milk
- 1/4 teaspoon vanilla extract
This quantity makes approximately eight apple pastry rings, depending on the size of the apples and the thickness of the slices.
Equipment You Will Need
- Large baking sheet
- Parchment paper
- Sharp knife
- Apple corer or small round cutter
- Pastry wheel or pizza cutter
- Pastry brush
- Two small mixing bowls
- Wire cooling rack
A small round cookie cutter makes especially neat centers, but an apple corer works perfectly. In an emergency, carefully trimming the center with a paring knife also works. The apples do not inspect your equipment credentials.
How to Make Apple Pastry Rings
Step 1: Prepare the Oven and Baking Sheet
Preheat the oven to 400°F. Line a large baking sheet with parchment paper.
Puff pastry rises best when it enters a thoroughly preheated oven. The rapid heat turns moisture in the dough into steam, separating the buttery layers and creating the flaky texture everyone is here for. Tested puff pastry recipes commonly use hot ovens and chilled or cool dough to encourage crisp, defined layers.
Step 2: Mix the Cinnamon Sugar
In a small bowl, stir together the granulated sugar, cinnamon, optional nutmeg, and salt. Set the mixture aside.
The tiny pinch of salt may appear unnecessary, but it sharpens the apple flavor and keeps the coating from tasting flat. Nutmeg is optional; use a light hand because it can take over a dessert faster than an enthusiastic karaoke singer.
Step 3: Slice and Core the Apples
Peel the apples for a softer, more pie-like center, or leave the peel on for extra color and a slightly firmer bite. Cut away a thin slice from the top and bottom of each apple. Slice the apples crosswise into rings about 1/4 to 3/8 inch thick.
Use an apple corer or small round cutter to remove the seeds and hard center from every slice. The opening should be about 1 inch wide so the pastry strips can pass through it.
Gently toss or brush the apple rings with lemon juice. Lemon adds brightness and slows browning while you assemble the pastries.
Step 4: Cut the Puff Pastry into Strips
Place the cool puff pastry on a lightly floured work surface. Smooth the fold lines with a rolling pin, but do not roll the sheet paper-thin. Cut it into strips approximately 1/2 inch wide.
Work with cool pastry and a light touch. Overworking or aggressively flattening the dough can compress the layers. If the pastry becomes sticky, soft, or shiny, place it in the refrigerator for 10 minutes before continuing. General frozen puff pastry guidance similarly recommends keeping unused sheets cool and avoiding excessive rolling.
Step 5: Wrap the Apple Rings
Pat the apple slices dry with a paper towel. Lightly coat both sides of each slice with cinnamon sugar.
Thread one end of a pastry strip through the center of an apple ring. Wrap the strip around the apple, slightly overlapping each turn. When the strip ends, gently press a second strip onto it and continue wrapping. Pinch the final end underneath the ring.
Leave a few tiny gaps where the apple can peek through. Complete coverage is unnecessary, and tightly stretching the dough may prevent it from puffing properly. Recipes using pastry ribbons around apple slices demonstrate that this wrapping method creates an attractive, individual dessert without requiring a traditional pie shell.
Transfer the completed ring to the prepared baking sheet. Repeat with the remaining apples and pastry, leaving about 2 inches between the rings.
Step 6: Apply the Egg Wash
Whisk the egg with 1 teaspoon of water. Brush a thin layer over the exposed pastry, avoiding large puddles around the base. Sprinkle the tops with a little more cinnamon sugar.
The egg wash encourages an appetizing golden finish. Too much, however, can drip down the sides and glue delicate pastry layers together, so brush rather than bathe.
Step 7: Bake Until Golden
Bake for 18 to 22 minutes, rotating the pan after about 12 minutes. The rings are ready when the pastry is puffed, deeply golden, and crisp on the bottom. The apples should be tender but still hold their circular shape.
Do not rely only on the timer. Puff pastry that still looks pale generally needs a few more minutes. Proper browning improves both crispness and flavor.
Step 8: Cool and Glaze
Let the apple rings cool on the baking sheet for 5 minutes, then transfer them to a wire rack.
For the glaze, whisk powdered sugar, vanilla, and 1 tablespoon of milk. Add more milk a few drops at a time until the glaze is thick but pourable. Drizzle it over the pastries after they have cooled for about 10 minutes.
Glazing immediately may create a transparent puddle. Waiting briefly produces attractive white ribbons instead of sweet camouflage.
Tips for Flaky, Crisp Apple Pastry Rings
Keep the Puff Pastry Cool
Warm butter can leak from puff pastry before the layers have time to rise. Thaw the sheet only until it bends without cracking. Refrigerate the wrapped rings for 10 minutes before baking if your kitchen is warm.
Dry the Apple Slices
Apples release moisture as they bake. Patting the slices dry after adding lemon juice reduces surface liquid and helps the pastry remain crisp.
Cut Even Rings
Uniform slices bake at the same rate. Thin slices soften quickly but may break during wrapping. Very thick slices can remain too crunchy. A thickness between 1/4 and 3/8 inch offers a good compromise.
Do Not Overload the Sugar
A modest coating is enough. Excess sugar can melt onto the baking sheet and darken before the pastry finishes baking. Save the extra sweetness for a controlled drizzle of glaze or caramel.
Give Each Pastry Some Space
Crowding traps steam and limits browning. Leave approximately 2 inches between the rings so hot air can circulate.
Common Problems and Easy Fixes
The Pastry Did Not Puff
The dough may have become too warm, been rolled too thin, or entered an oven that was not fully preheated. Chill the assembled rings before baking and verify the oven temperature with an oven thermometer when possible.
The Bottoms Became Soggy
The apples were probably very juicy or the pastries needed additional baking time. Dry the fruit well, use parchment instead of a silicone mat, and bake until the bottoms are clearly browned.
The Apple Is Still Too Firm
Cut thinner slices next time. For an especially soft center, microwave the unwrapped apple rings for 45 to 60 seconds, then cool and dry them completely before adding the pastry.
The Pastry Unwrapped in the Oven
Press the end of each strip firmly underneath the ring. A dab of egg wash can act as edible glue, although it should be used sparingly.
The Sugar Burned
Loose sugar on the pan can caramelize quickly. Brush away large piles before baking, and move the pan to a higher oven rack if the bottoms brown much faster than the tops.
Flavor Variations
Caramel Apple Rings
Drizzle the baked rings with warm caramel sauce and add a pinch of flaky salt. Caramel and apple are reliable partners, appearing in many tested crescent, tart, and apple pastry recipes.
Maple-Pecan Rings
Replace the vanilla glaze with a mixture of powdered sugar, maple syrup, and a splash of milk. Sprinkle finely chopped toasted pecans over the wet glaze.
Apple Pie Spice Rings
Replace the cinnamon and nutmeg with 1 1/4 teaspoons of apple pie spice. Depending on the blend, this may add ginger, allspice, cardamom, or cloves.
Apple-Cheddar Pastry Rings
Add a very thin strip of sharp cheddar beside the apple before wrapping. The salty cheese balances the sweet fruit and creates a brunch-friendly version.
Nut Butter Apple Rings
Serve the pastries with warm peanut or almond butter for dipping. Nut butter, apples, and flaky pastry form a proven sweet-and-salty combination.
Crescent Dough Version
Refrigerated crescent dough can replace puff pastry. Cut the dough into strips, wrap the rings, and bake according to the package temperature. The result will be softer and more bread-like, rather than dramatically flaky.
How to Serve Apple Pastry Rings
These pastries are best while slightly warm, when the apple is tender and the outer layers are crisp. Serve them plain or pair them with:
- Vanilla or butter pecan ice cream
- Freshly whipped cream
- Salted caramel sauce
- Maple syrup
- Greek yogurt for a breakfast-style plate
- Hot coffee, apple cider, or chai
For a party, arrange the rings on a platter and offer small bowls of glaze, caramel, and chopped nuts. Guests can customize their pastries, and the host can take credit for creating an interactive dessert station rather than admitting that choosing one topping felt impossible.
Storage and Reheating
Let leftover apple pastry rings cool completely before placing them in an airtight container. Refrigerate them for up to four days, following the USDA’s general guidance for cooked leftovers.
Reheat the rings in a 350°F oven for 5 to 8 minutes or in an air fryer at 325°F for several minutes. These dry-heat methods restore more crispness than a microwave. Microwave reheating is fast, but the pastry will become softer.
You can freeze unglazed baked rings for up to one month. Wrap them individually, place them in a freezer-safe container, and reheat from frozen at 350°F until hot and crisp. Add glaze after reheating.
A Realistic Home-Baking Experience with Apple Pastry Rings
The first surprise for many home bakers is that wrapping an apple ring takes less precision than the finished dessert suggests. Before baking, the strips may resemble a scarf wrapped by someone late for a bus. Once the pastry expands, however, the uneven edges become golden ridges, and the whole thing suddenly looks intentional.
The most noticeable difference between batches usually comes from pastry temperature. Rings assembled with cool dough hold their shape and develop crisp, visible layers. When the pastry sits beside a warm oven for too long, it becomes stretchy and greasy. The wrapping process feels easier for about thirty seconds, but the baked result is flatter. A short refrigerator break solves the problem and also gives the baker time to clean the cinnamon-sugar landslide from the counter.
Apple thickness creates another useful lesson. A 1/2-inch ring looks sturdy and impressive, but it may remain noticeably crunchy after the pastry has browned. A paper-thin ring cooks quickly but can snap while being wrapped. Slices around 1/4 to 3/8 inch thick are easier to handle and retain a pleasant bite. Bakers who prefer completely soft apples can briefly microwave the slices, but they must cool and dry them before touching the pastry.
Different apples also change the personality of the dessert. Granny Smith produces a bright, tangy center that contrasts beautifully with glaze. Honeycrisp gives a sweeter, juicier result and may need less sugar. Pink Lady lands somewhere in the middle, with enough acidity to remain interesting and enough sweetness to please anyone who considers caramel a food group.
The wrapping step becomes faster after the first ring. Short strips are easier to thread through the center, while longer strips reduce the number of seams. There is no single correct approach. The practical method is to cut a mixture of lengths and use whatever piece happens to be within reach.
Another common discovery is that parchment paper is not merely decorative. Cinnamon sugar that falls from the rings melts into sticky caramel spots. On parchment, those spots lift away easily. On an unlined baking sheet, they begin a long-term relationship with the metal.
The finished rings are usually crispest about 10 to 20 minutes after leaving the oven. Straight from the pan, the apple can be extremely hot, even when the pastry feels safe to touch. After a short rest, the layers remain crunchy while the center becomes comfortably warm. This is also the ideal moment for glaze: the pastries are warm enough for the drizzle to settle into the ridges, but not so hot that it disappears.
For gatherings, assembling the rings several hours ahead can make serving easier. Place the unbaked pastries on a parchment-lined tray, cover them loosely, and refrigerate. Apply egg wash just before baking. The cold rest helps maintain the pastry layers, and the kitchen smells like cinnamon and butter just as guests arrive. Convenient? Yes. Suspiciously strategic? Also yes.
Most importantly, this recipe is forgiving. A broken apple can be patched with pastry. A short strip can be joined to another. A ring that leans sideways will still taste excellent. Apple pastry rings offer the polished appearance of a bakery dessert without demanding professional pastry skills, which is precisely the sort of kitchen mathematics worth celebrating.
Conclusion
This easy recipe for apple pastry rings transforms a few familiar ingredients into a crisp, warm, and visually appealing dessert. The keys are simple: choose firm apples, keep the puff pastry cool, cut evenly sized rings, and bake until the dough is genuinely golden.
Once you master the basic version, experiment with caramel, maple glaze, nuts, cheddar, or different baking apples. Whether you serve them at brunch or eat one over the kitchen sink before anyone notices, these flaky apple rings deliver plenty of pie-inspired flavor with considerably less work.

