Skincare
Draw An Art Work In Different Perspectives
Jun
Drawing an artwork in different perspectives sounds fancy, like something whispered dramatically in an art school hallway while someone sharpens a charcoal pencil with suspicious confidence. But at its heart, perspective drawing is simply the art of showing how things look from where you are standing, sitting, crouching, floating, or pretending to be a pigeon on a rooftop.
Perspective helps artists turn a flat page into a believable world. A road can stretch into the distance. A room can feel deep enough to walk into. A character can look powerful from below, vulnerable from above, or hilariously confused when seen through a fisheye angle. Whether you are sketching a city street, a coffee mug, a fantasy castle, a comic panel, or a quiet bedroom corner, learning to draw from different perspectives gives your artwork movement, depth, and personality.
The best part? You do not need to be born with magical “artist eyes.” You can train them. Perspective is a skill built from observation, structure, patience, and a willingness to draw a lot of boxes. Yes, boxes. The humble box is the gym equipment of perspective drawing. It may not look glamorous, but it builds the muscles.
What Does “Different Perspectives” Mean in Art?
In art, perspective can mean two related things. First, it means the visual system artists use to create the illusion of three-dimensional space on a two-dimensional surface. Second, it can mean the emotional or storytelling viewpoint of the artwork. A drawing of a person at eye level feels different from a drawing of that same person viewed from the floor, from above, or from behind a rainy window.
When you draw an artwork in different perspectives, you are changing the viewer’s position. You are asking, “Where is the camera? Where are the eyes? What does this scene feel like from here?” That question changes everything. A simple house can look cozy in one-point perspective, dramatic in two-point perspective, towering in three-point perspective, and dreamlike in atmospheric perspective.
Why Perspective Drawing Matters
Perspective gives artwork structure. Without it, objects may look like they are floating, leaning, shrinking randomly, or secretly melting. That can be charming if you are going for surrealism. But if your goal is a believable scene, perspective is the invisible skeleton holding the drawing together.
It also improves storytelling. A low-angle view can make a superhero look heroic. A high-angle view can make a tiny character seem overwhelmed. A close-up perspective can make an ordinary object feel important. A wide perspective can show environment, distance, and mood. In other words, perspective is not just technical; it is emotional architecture.
The Core Ingredients of Perspective Drawing
Horizon Line
The horizon line represents the viewer’s eye level. If you are standing on a beach, the horizon is easy to see. If you are drawing a kitchen, a classroom, or a spaceship cockpit, the horizon line is still there, even if it is invisible. It tells you how high the viewer’s eyes are.
Vanishing Point
A vanishing point is where parallel lines appear to meet in the distance. Think of train tracks, a hallway, or the edges of a long road. The lines are not really touching, but from your viewpoint, they seem to converge. That visual trick is one of the foundations of linear perspective.
Orthogonal Lines
Orthogonal lines are guide lines that travel toward the vanishing point. They help you place walls, windows, sidewalks, furniture, and other objects so they sit correctly in space. They are like polite traffic lanes for your drawing.
Scale and Overlap
Objects closer to the viewer usually appear larger. Objects farther away appear smaller. Overlap also creates depth: when one object covers part of another, the covered object seems farther back. These simple visual cues can instantly make a drawing feel more dimensional.
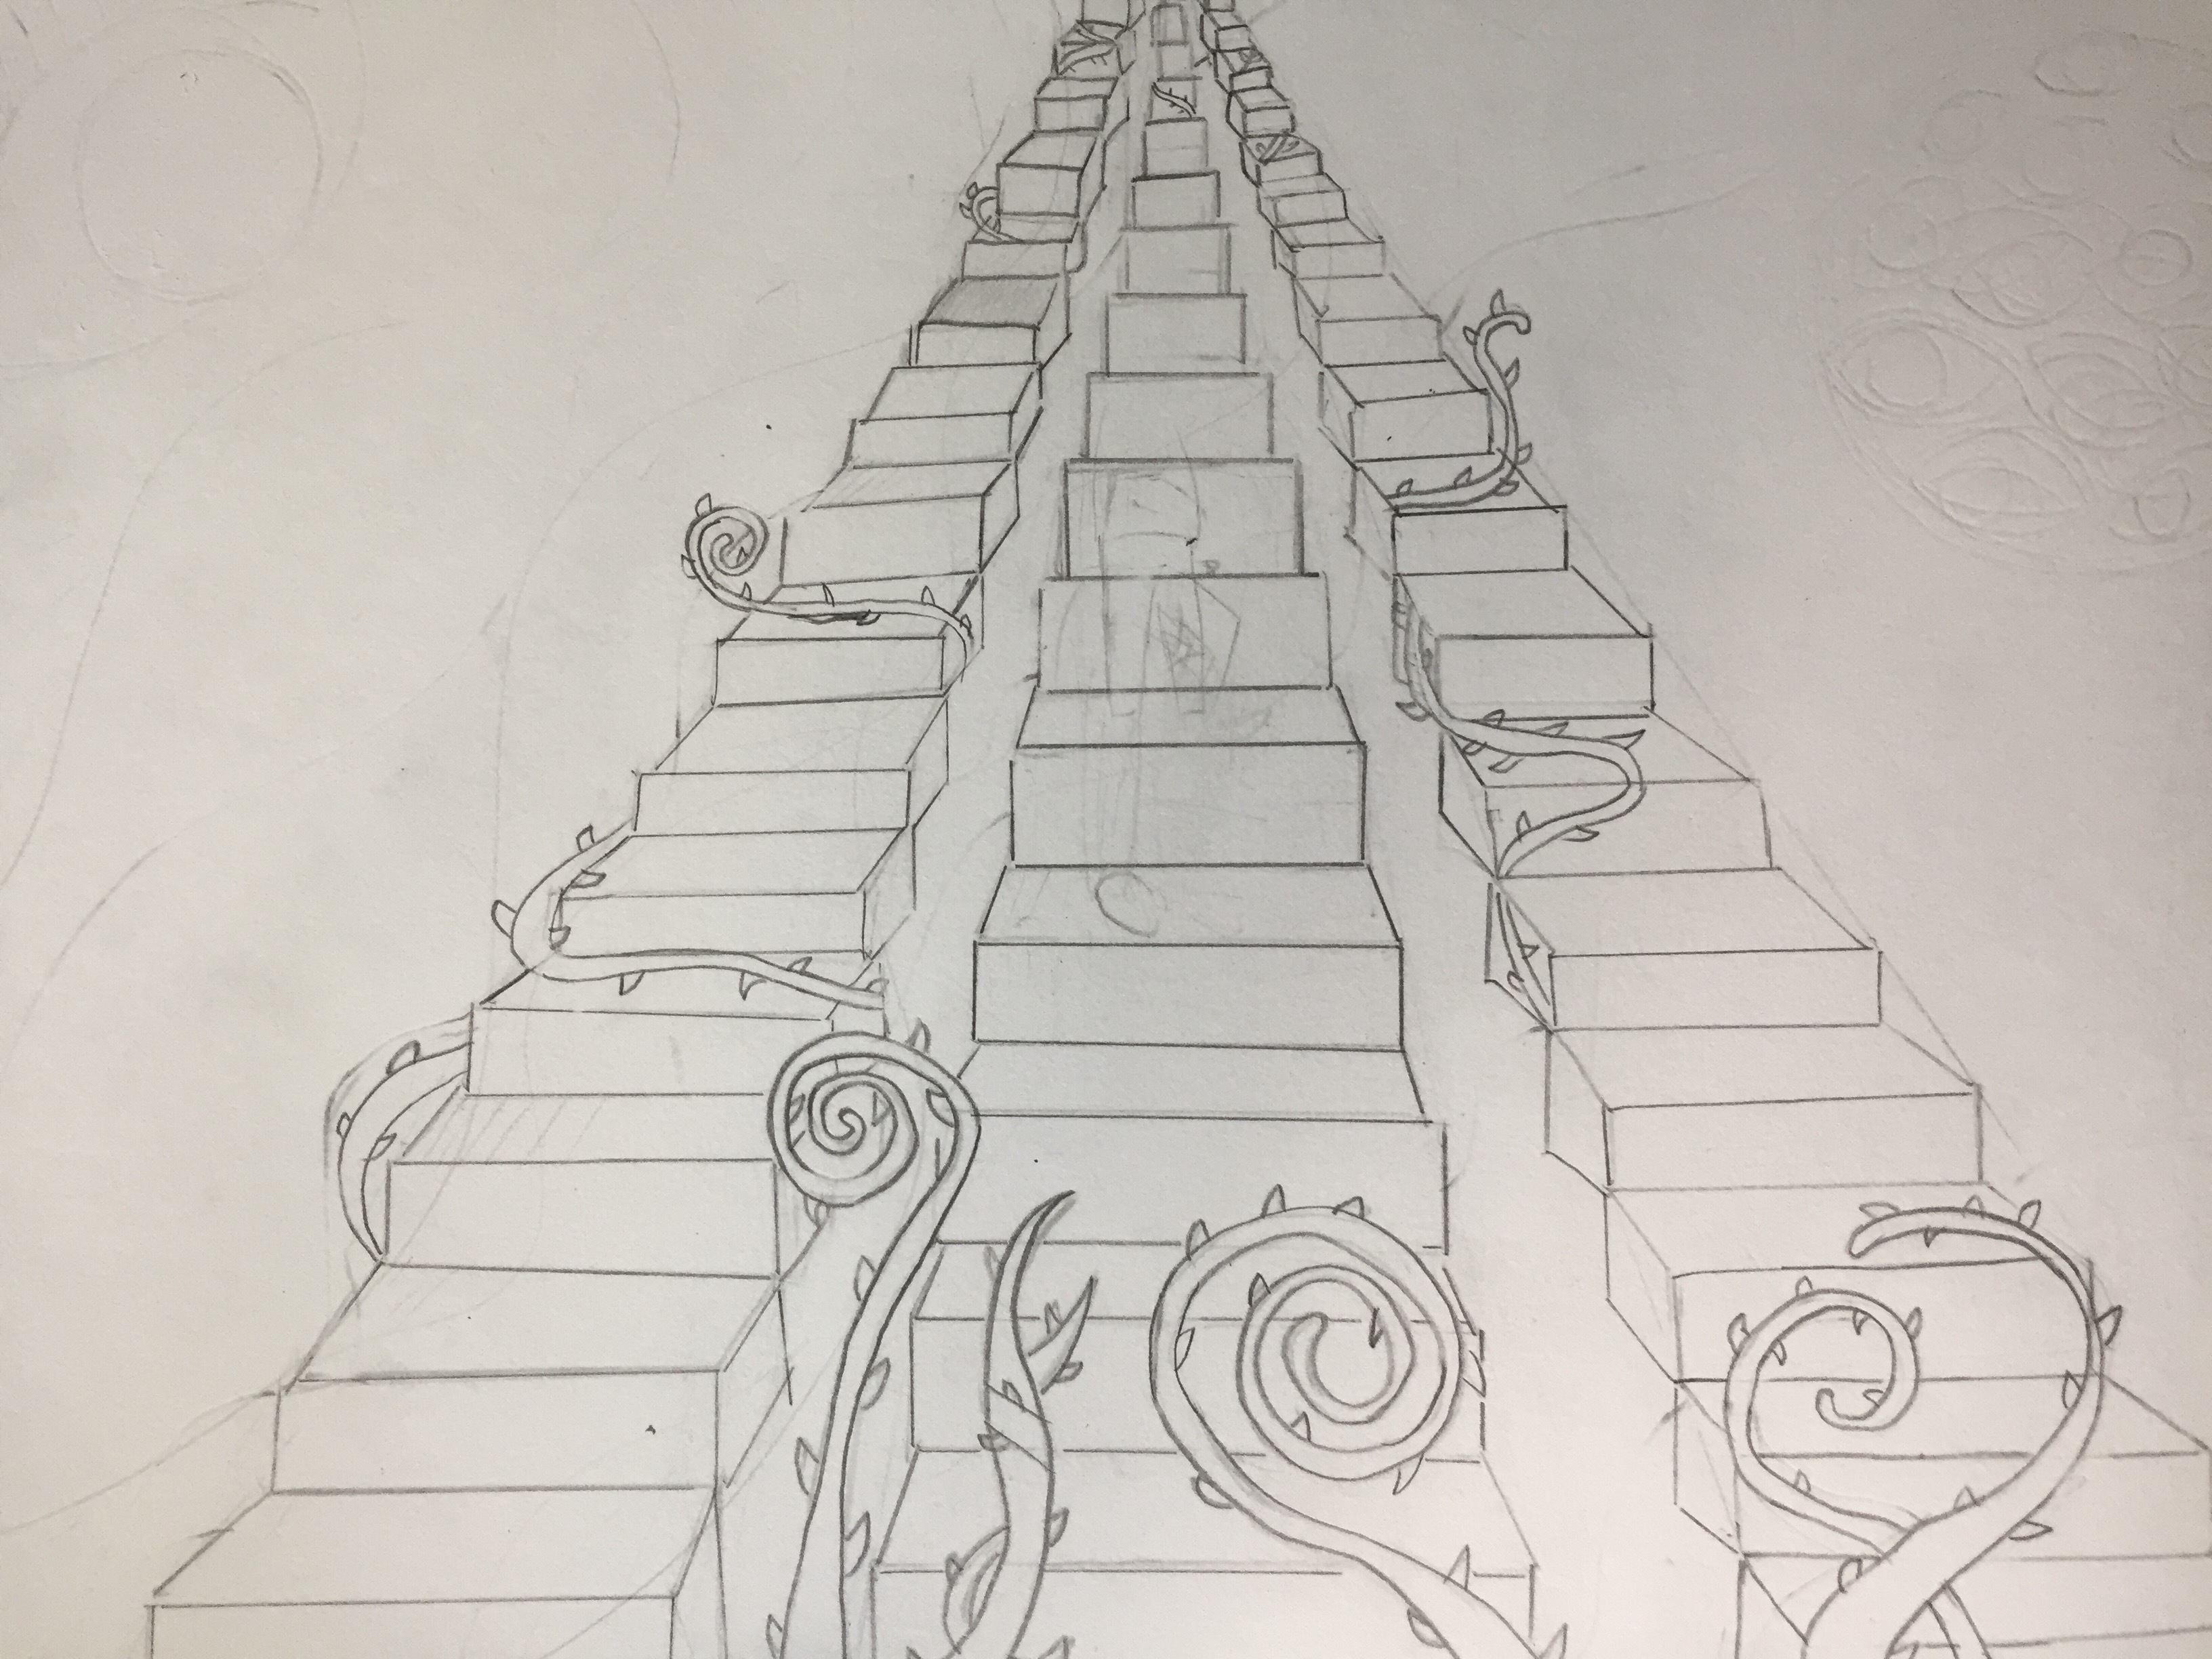
One-Point Perspective: The Friendly Starting Line
One-point perspective uses a single vanishing point on the horizon line. It is perfect for scenes where the viewer faces something directly: a hallway, a road, a room, a tunnel, a bridge, or a row of shelves. If you have ever drawn a road narrowing into the distance, congratulationsyou have already flirted with one-point perspective.
To practice, draw a horizon line across the page. Place one vanishing point near the center. Then draw a rectangle for the back wall of a room. From each corner of the rectangle, lightly draw lines toward the vanishing point. Suddenly, your flat rectangle becomes a room with depth. Add a floor, ceiling, side walls, a window, a rug, or a table, and you have a scene.
One-point perspective is excellent for beginners because it teaches the big idea clearly: lines that move away from the viewer converge. It is also useful for dramatic compositions. A long hallway can pull the viewer’s eye toward a mysterious door. A city street can lead toward a glowing sunset. A library aisle can make books look like they go on forever, which is both beautiful and slightly threatening if you have homework.
Two-Point Perspective: Corners, Buildings, and Big Drama
Two-point perspective uses two vanishing points on the horizon line. It is ideal when you are looking at the corner of an object rather than straight at its front. Buildings, boxes, furniture, streets, and vehicles often look more dynamic in two-point perspective.
Start with a horizon line and place one vanishing point on the left and one on the right. Draw a vertical line between them. That line can become the nearest corner of a building or box. From the top and bottom of the vertical line, draw guide lines to both vanishing points. Add vertical lines between those guides, and you create the two visible sides of the form.
Two-point perspective makes drawings feel more natural because we often see objects from an angle. A dining table, a city block, a book on a desk, and even a refrigerator can become more convincing when you understand how their edges travel toward separate vanishing points. Yes, even the refrigerator deserves dignity.
Three-Point Perspective: Looking Up, Looking Down, Feeling Epic
Three-point perspective adds a third vanishing point, usually above or below the horizon line. This is useful when you are looking up at a tall building or down from a high place. The third vanishing point controls the vertical lines, making them converge instead of staying parallel.
Use three-point perspective when you want drama. A skyscraper viewed from the sidewalk can look enormous. A castle seen from below can feel powerful. A city seen from a rooftop can feel dizzying and cinematic. This perspective is common in comics, concept art, architecture sketches, and dynamic illustration.
The trick is moderation. If the third vanishing point is too close, the drawing can become extremely distorted. That might be perfect for a dream sequence, a superhero landing, or a goblin’s suspiciously tall tower. For a more realistic image, place the third vanishing point far away so the distortion feels believable.
Atmospheric Perspective: Depth Without Rulers
Not all perspective depends on straight lines. Atmospheric perspective creates depth through color, contrast, clarity, and value. Distant mountains often look lighter, cooler, softer, and less detailed than nearby trees or rocks. This happens because air, moisture, dust, and light affect how we see faraway objects.
Artists use atmospheric perspective in landscapes, city scenes, fantasy worlds, and backgrounds. To apply it, make foreground objects darker, sharper, and more detailed. Let distant objects become softer, lighter, and less defined. This technique can make a drawing feel spacious even without visible vanishing points.
Multiple Perspectives in One Artwork
Some artists intentionally bend or combine perspectives. A scene might include a room drawn in linear perspective, a character exaggerated with foreshortening, and background mountains softened with atmospheric perspective. This combination can make artwork feel rich and expressive.
Modern and experimental artists may also challenge traditional perspective. Instead of using one fixed viewpoint, they may show several angles at once. This can create a fragmented, energetic, or psychological effect. The goal is not always realism. Sometimes the goal is to show how something feels, not just how it appears.
How to Draw an Artwork in Different Perspectives Step by Step
Step 1: Choose a Simple Subject
Start with something manageable: a chair, a box, a room corner, a street, a coffee cup, or a small house. Do not begin with a dragon riding a motorcycle through a glass city unless you enjoy emotional turbulence.
Step 2: Decide the Viewer’s Eye Level
Ask where the viewer is. Are they standing? Sitting? Looking from the floor? Looking from a balcony? The horizon line depends on this decision. A high horizon line suggests the viewer is looking down. A low horizon line suggests the viewer is looking up.
Step 3: Pick the Perspective Type
Use one-point perspective for straight-on views, two-point perspective for angled objects, and three-point perspective for looking up or down. Use atmospheric perspective when distance, landscape, or mood matters more than geometric precision.
Step 4: Build the Scene With Basic Forms
Break objects into boxes, cylinders, spheres, and cones. A couch is a group of boxes. A lamp is a cylinder and cone. A head can be simplified into a sphere with planes. Once the forms sit correctly in space, details become much easier to add.
Step 5: Add Details After the Structure Works
Do not decorate a crooked foundation. First check whether the major shapes follow the perspective. Then add windows, patterns, furniture, textures, plants, posters, books, cables, crumbs, and all the tiny details that make a scene feel lived-in.
Step 6: Use Line Weight and Value
Thicker, darker lines can bring objects forward. Lighter lines can push objects back. Stronger contrast in the foreground and softer contrast in the background help guide the viewer’s eye. Perspective is not only about geometry; it is also about visual priority.
Common Perspective Drawing Mistakes
Mistake 1: Ignoring the Horizon Line
If every object seems to have its own private eye level, the drawing becomes confusing. Keep the horizon line consistent unless you are intentionally creating a surreal effect.
Mistake 2: Placing Vanishing Points Too Close Together
When vanishing points are too close, objects can look warped. This may be useful for a dramatic comic panel, but for everyday realism, spread vanishing points farther apart, sometimes even beyond the edges of the page.
Mistake 3: Adding Details Too Early
Artists often fall in love with details before the structure is ready. A beautifully shaded window still looks strange if the building leans like it just heard bad news. Block in the big forms first.
Mistake 4: Forgetting Ellipses
Cylinders in perspective create ellipses. Cups, wheels, bowls, columns, jars, and pipes all need ellipses that match the angle of the form. A good ellipse can make a simple object feel solid; a confused ellipse can make a cup look like it is plotting something.
Perspective Exercises That Actually Help
Draw twenty boxes in one-point perspective. Then draw twenty in two-point perspective. Rotate them. Stack them. Make them float. Turn them into houses, books, crates, robots, or tiny apartments for imaginary mice. Repetition builds confidence.
Another useful exercise is drawing the same object from three angles: eye level, low angle, and high angle. Try a chair. From eye level, it looks ordinary. From below, it becomes surprisingly dramatic. From above, it becomes a map of shapes. This exercise teaches you that the subject does not change, but the viewpoint changes everything.
You can also take a photo of a street, room, or building and trace the perspective lines lightly over it. Find the horizon line. Locate the vanishing points. Notice which edges converge and which stay vertical. This trains your eye to recognize perspective in real life.
Digital Tools for Drawing Perspective
Digital art programs often include perspective grids, rulers, snapping tools, layers, and transform options. These tools can speed up the process, especially for comics, backgrounds, architecture, and concept art. However, do not let the software do all the thinking. A grid is helpful, but understanding why the grid works is what makes you flexible.
Use digital layers to separate rough perspective guides from clean line art. Lower the opacity of your guide layer, draw over it, and hide it when finished. This keeps your artwork clean while still giving you structural support. Traditional artists can do the same thing with light pencil lines, tracing paper, or a kneaded eraser.
Using Perspective for Storytelling
Perspective can make a scene speak before the viewer reads a single caption. A character drawn from below may seem confident, powerful, or intimidating. A character drawn from above may seem small, thoughtful, or isolated. A close perspective can create intimacy. A distant perspective can create loneliness, scale, or mystery.
For example, imagine drawing a student standing outside a giant school building. At eye level, the scene may feel normal. From a low angle, the school might look overwhelming, like a fortress of algebra. From above, the student may look tiny but brave. Same subject, different emotional effect.
How Perspective Improves Composition
Perspective naturally guides the viewer’s eye. Roads, hallways, fences, rivers, rooftops, and shadows can all lead toward a focal point. This is useful when you want the viewer to notice a character, doorway, glowing object, or important detail.
Good perspective also creates rhythm. Repeating windows, tiles, trees, or streetlights become smaller as they move into the distance. This repetition adds order and movement. The viewer feels pulled into the artwork instead of left standing outside it with a confused sandwich.
of Experience: What Drawing in Different Perspectives Teaches You
The first time you seriously try to draw an artwork in different perspectives, it may feel like your pencil has joined a rebellion. Straight lines drift. Boxes wobble. Chairs look like they belong in a haunted furniture catalog. That is normal. Perspective drawing often feels awkward before it feels natural, because you are training your brain to think in space instead of only copying outlines.
One of the most useful experiences is drawing the same room from multiple viewpoints. Sit at a desk and sketch the room straight ahead. Then sit on the floor and draw it again. Finally, stand on a chair or look from a doorway and draw the same space from above. You will notice that familiar objects suddenly become unfamiliar. The table is no longer just “a table.” It becomes a set of planes. The bed becomes a large rectangular form. The bookshelf becomes a grid of smaller boxes. This shift is powerful because it teaches you to see structure beneath appearance.
Another memorable exercise is drawing a simple object, such as a mug, in several positions. Place it at eye level, then below your eye level, then above it. The rim changes from a thin line to a wide ellipse. The handle changes shape. The side plane becomes more or less visible. A mug may seem boring until perspective turns it into a tiny engineering project with caffeine potential.
Drawing from life also builds patience. Photos are useful, but real observation teaches you to compare angles, measure relationships, and notice small distortions. You begin to ask better questions: Is this edge really horizontal? Does that line tilt toward the vanishing point? Is the far leg of the chair shorter because it is farther away? These questions sharpen your eye.
There is also an emotional lesson. Perspective reminds you that every scene has more than one truth. A building can look friendly from the front, dramatic from below, and lonely from far away. A person can seem confident in one composition and vulnerable in another. Artists are not just recording objects; they are choosing viewpoints. That choice carries meaning.
Over time, perspective becomes less like a strict math test and more like a creative tool. You start using it to exaggerate mood, design stronger scenes, and invent spaces from imagination. You may still make mistakeseveryone doesbut you will understand how to fix them. The page becomes less flat. Your drawings gain weight, distance, and atmosphere. Best of all, you stop fearing backgrounds. That alone deserves a tiny parade.
Conclusion
Learning to draw an artwork in different perspectives is one of the most valuable skills an artist can develop. It teaches you how to create depth, organize space, guide the viewer’s eye, and tell stronger visual stories. One-point perspective gives you clarity. Two-point perspective gives you natural angles. Three-point perspective gives you drama. Atmospheric perspective gives you distance and mood. Together, they help transform a flat surface into a world that feels believable, expressive, and alive.
Start simple. Draw boxes, rooms, streets, chairs, mugs, and buildings. Move the horizon line. Shift the vanishing points. Try low angles, high angles, close-ups, and wide views. The more perspectives you practice, the more choices you gain as an artist. And once you can choose the viewpoint with confidence, your artwork stops merely showing thingsit starts directing the audience’s experience.
Note: This original article was written for web publication and is based on established art education principles, practical drawing methods, and widely taught perspective techniques. No source links or external citation tags are included in the article body.
