Skincare
DIY Snow Drift Candle Holders
Jul
Winter décor is funny. One day you’re calmly sipping cocoa, and the next you’re aggressively auditioning
pinecones for a starring role on your dining table. If you want something that looks luxe, glows like a
cozy cabin window, and doesn’t require a glitter-cleanup therapy session, DIY snow drift candle holders
are your new best friends.
The idea is simple: turn plain glass candle holders (votives, jars, short tumblersanything that can safely hold
a tea light) into frosty little “snowbanks” that look like wind-blown drifts. Done well, they feel less
“kids’ craft corner” and more “winter hotel lobby… but in your house.”
Below you’ll find a few approachesbecause not everyone has the same supplies, patience level, or tolerance for
waiting for glue to dry. You’ll get step-by-step instructions, design tips for realistic snowy texture, and
safety pointers (because the goal is cozy glow, not chaos glow).
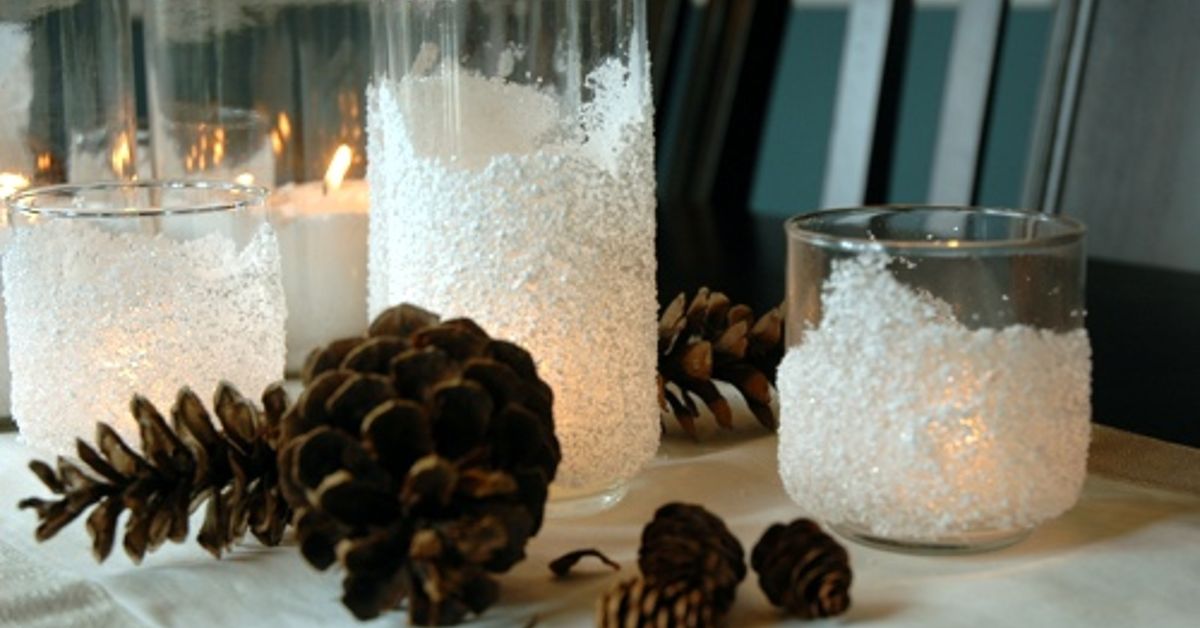
What Makes a “Snow Drift” Candle Holder?
A snow drift candle holder has two main features:
- Layered snowy texture that looks uneven and wind-shaped (not a flat coat of white).
- Light-friendly translucence so candlelight diffuses softly through frosty areas.
Think of the effect like frosted windows on a cold morningexcept you made it on purpose and you’re proud of it.
These are perfect for winter tablescapes, holiday centerpieces, mantel styling, or a “my home is a snow globe”
vibe without actually living inside one.
Materials You’ll Need
Core supplies (choose what fits your method)
- Glass holders: votives, mason jars, old candle jars (cleaned), or small glass bowls
- Craft adhesive: decoupage glue, craft glue, or a clear-drying all-purpose glue
- “Snow” texture: Epsom salt, faux craft snow, baking soda (optional), or a premade snow paste
- Brush or foam brush (for applying adhesive)
- Tray or parchment paper (for easy cleanup)
- Optional sparkle: white/iridescent glitter (fine grade looks most “icy”)
For the drift shape (optional but makes it look extra real)
- Lightweight spackle, modeling paste, or air-dry clay (for sculpted “banks”)
- Craft stick or old spoon (for shaping)
Lighting options
- Battery tea lights (recommended for easiest, safest glow)
- Standard tea lights (only if your holder is heat-safe and decorations stay away from the flame)
Before You Start: Prep Like a Pro
Most “my snow fell off” craft heartbreak comes down to one thing: greasy glass. Candles, hands, and kitchen air
leave residue that adhesives hate. A quick prep step pays off big.
- Wash glass in warm soapy water and dry completely.
- Degrease the outside with rubbing alcohol and let it air-dry.
- Plan the glow: decide if you want full coverage or a “window” area where glass stays clearer.
If you want that dreamy, frosted-luminary effect, keep the snow texture mostly on the outside and let the
candlelight shine through the glass.
Method 1: Classic Frosted Drift (Epsom Salt + Glue)
This is the MVP method: affordable, fast, and it naturally creates that crystalline “ice fog” look. Epsom salt
catches light beautifully and looks like packed snow when layered.
Step-by-step
- Brush on adhesive in a thin, even coat where you want snow.
-
Build the drift line: apply a slightly thicker band of adhesive around the bottom third of the
glass, then feather it upward in uneven curves (like wind pushed snow higher in some spots). - Sprinkle Epsom salt over the glue. Rotate the jar and press gently so it grips.
- Shake off excess onto a tray. (Save it and reusewinter crafting is not a one-time event.)
-
Optional sparkle: while still tacky, dust with a tiny pinch of fine glitter. Less is more. You’re
going for “icy shimmer,” not “disco blizzard.” - Dry fully (usually a couple of hours; overnight is safest before sealing).
Make it look like a real drift
- Vary the edge: don’t stop the snow in a perfect straight line. Let it wave up and down.
- Cluster texture: add a second pass of glue in a few spots and re-salt to create “packed” areas.
- Keep the top cleaner: leaving more clear glass near the top makes the drift effect convincing.
Optional seal (recommended if you’ll handle them a lot)
Once fully dry, you can lightly seal the outside with a clear spray sealer (used in a well-ventilated area) or a
very thin top coat of clear-drying craft medium. Avoid heavy sealing coatstoo much moisture can dissolve or dull
the crystalline look.
Method 2: Faux Snow Paste Drifts (Extra Fluffy, Extra Cute)
If you love the look of fluffy snowbanks (like a cartoon winter wonderland, but chic), this method gives you
dimension. You can use a premade snow paste or make a simple thick mixture that dries textured.
How to create the “drift” texture
- Apply adhesive where you want the drift to start.
-
Stipple on snow paste with a brush or sponge, concentrating heavier texture near the bottom and
tapering upward. -
Shape the bank: use a craft stick to nudge the paste into soft mounds. Imagine wind pushing snow
into gentle ridges. - Add sparkle while wet if you want a subtle icy sheen.
- Dry completelytextured products often need overnight drying.
Why this looks great
Candlelight hits raised texture and creates tiny highlights and shadowsexactly what makes snow look real in
photos. It’s basically built-in winter drama.
Method 3: Sculpted Snowbanks (Spackle or Air-Dry Clay)
This is for people who want their candle holder to look like it’s sitting in a mini snowdrift. It’s especially
pretty on short, wide holderslike low tumblers or chunky votivesbecause the drift shape reads clearly.
Option A: Lightweight spackle (fast shaping)
- Mask the glass if you want a clean “window” area.
-
Sculpt the base: spread spackle around the lower portion in uneven mounds. Keep it thicker in a
few spots like wind piled snow there. - Texture it by tapping with a stiff brush or sponge.
- Let dry fully (follow product guidance; overnight is often best).
-
Paint or dust with white paint if needed, then add a light adhesive coat and sprinkle with faux
snow or Epsom salt for that crisp finish.
Option B: Air-dry clay (clean edges, durable base)
- Form a clay “collar” around the bottom of the holder (like a little snow berm).
- Pinch and smooth into driftssoft slopes, not sharp peaks.
- Let dry completely until hard.
- Paint white and finish with a light sprinkle texture (optional but recommended for realism).
If you’re crafting with younger teens in the house, air-dry clay is often a calmer option than hot glueless
“oops” potential, more “look what I made.”
Design Ideas: Make Them Look Expensive (Without Being Expensive)
1) The “Frosted Window” look
Leave a vertical oval area mostly clear, and concentrate the snow texture around it. When you add a tea light,
the clear-ish section glows like a tiny winter window.
2) The “Drift + Garland” centerpiece
Cluster three holders of different heights on a tray. Add faux pine, a few berries, or dried orange slices around
the base. The candles do the cozy work; the greenery does the “I styled this on purpose” work.
3) Minimal Scandinavian snow
Skip glitter, keep the drift low, and use matte white texture. Pair with plain linen and wood accents for a clean
winter tablescape that feels calm instead of chaotic.
Safety Notes (Because Fire Doesn’t Care About Your Aesthetic)
Even if you’re making the cutest winter candle holders in the zip code, a candle is still an open flame.
Prioritize safety:
- Use battery tea lights when possibleespecially for parties, kids’ rooms, or pet-friendly spaces.
- Keep decorations away from flame and avoid placing anything flammable on the inside rim.
- Choose sturdy holders on a stable, heat-resistant surface.
- Never leave a burning candle unattended, and keep it away from curtains and clutter.
If you’re under 18 or crafting with kids, involve an adult for hot glue, spray sealers, and any use of real
flames. Cozy is supposed to feel safe.
Troubleshooting: Fix Common “Snow Drift” Problems
My snow looks patchy
You probably used too thin a glue layer in spots or sprinkled too lightly. Add a second thin coat of adhesive and
reapply texture in the bare areas.
My Epsom salt clumped
That happens if glue is too wet/thick in one spot or the air is humid. Shake off excess, let it dry, then touch
up with a light second pass instead of one heavy coat.
My drift edge is too straight
Nature doesn’t do ruler lines. Go back with a brush and add a few upward “tongues” of snow texture to break up the
horizon.
Texture falls off when handled
Let it dry longer and consider a light seal coat. Also, hold the glass from the bottom or the clear areastry not
to rub the textured snow surface.
Gift Ideas (Because Everyone Loves a Cozy Glow)
- Hostess gift: pair a snow drift holder with battery tea lights and a mini hot cocoa kit.
- Neighbor gift: add a tag that says “A little winter glow for your home.”
- Teacher gift: use a small jar holder and include a note: “Thanks for helping us shine.”
Conclusion
DIY snow drift candle holders are the rare craft that checks every box: easy, inexpensive, forgiving, and wildly
photogenic. Whether you go with a crisp Epsom-salt frost, fluffy snow paste drifts, or sculpted snowbanks, you end
up with décor that looks like winter magicwithout needing an interior designer or a truckload of new stuff.
Keep the drift shape organic, let the light shine through where it can, and choose the safest lighting option for
your home. Then sit back and enjoy the glow like you planned it all along (which you did).
Experiences & Real-World Tips From Making Snow Drift Candle Holders
People expect these to be “one and done,” but the best-looking snow drift candle holders usually come from a
second pass and a little patience. The most common experience is this: you apply your first coat of adhesive, you
sprinkle your snow texture, you step backand it looks… fine. Then you add one more layer in just a few spots,
and suddenly it looks like a real winter drift. That layered texture is what makes the light sparkle and what
makes the holder feel dimensional instead of flat.
Another shared “aha” moment is how much glass prep matters. When crafters skip the alcohol wipe, the snow tends to
slide, patch, or rub off later. When they clean properly, the texture grabs and stays put, even if the holder
gets moved around for parties or photos. This becomes extra obvious on recycled candle jars, which often have a
thin film of leftover fragrance oils. If your snow refuses to stick, it’s almost always a prep issue, not a
talent issue.
Many DIYers also notice that the drift line is where the realism lives. If the “snow” stops in a perfect ring,
it reads as craft material. If it rises and dips like wind pushed it there, it reads as nature. A simple trick is
to imagine where wind would catch: around handles, near embossed logos, and along corners. You can intentionally
build snow heavier in those places and lighter elsewhere. It’s a small design choice that makes the holder look
curated.
Then there’s the texture debate: Epsom salt looks wonderfully icy, but it can shed a little if it’s thick and
unsealed. Faux snow looks fluffy and uniform, but it can look too “perfect” unless you vary the thickness. The
craft experience many people land on is a hybrid: use Epsom salt for the frosty window glow, and add a few small
sculpted drifts near the bottom with paste or spackle for depth. You get the best of both worldssparkle and
dimensionwithout turning the project into a whole weekend.
Lighting is another thing that surprises people. Battery tea lights are not just “safer”they also create a
consistent glow that photographs well and won’t overheat a sealed or decorated jar. When someone uses a real tea
light inside a heavily textured holder, they sometimes notice the glass warms more than expected, especially if
the candle is left burning too long. That’s why so many crafters end up using real flames for short, supervised
moments (like dinner) and switching to LEDs for long evenings, parties, or décor that stays out for weeks.
Finally, the biggest “experience” tip is the simplest: make a set. One holder is cute, but three to five holders
in slightly different sizes looks like a styled collection. Even if each one has tiny imperfections, the group
reads intentional. And winter décor is forgiving like that: if it glows warmly and looks snowy, everyone assumes
you bought it from a fancy shopand you’re free to smile like you didn’t just sprinkle Epsom salt on your kitchen
counter five minutes ago.
