Body Care
Boarding up Windows with Plywood: 2 DIY Methods
Jun
When a hurricane, tropical storm, or severe wind event is heading your way, windows suddenly become the most nervous part of the house. They just sit there, shiny and fragile, acting confident while the weather forecast looks like a blender full of angry clouds. That is where boarding up windows with plywood comes in.
Plywood is not magic. It will not turn your home into a bunker, and it will not impress your neighbors as much as shiny permanent storm shutters. But when installed correctly, plywood can help reduce the risk of broken glass, wind-driven rain, flying debris, and the unpleasant indoor experience known as “why is my living room full of leaves?”
This guide explains two practical DIY methods for boarding up windows with plywood: the outside overlap method and the recessed inset method. Both are used by homeowners in storm-prone areas, and both work best when you prepare before everyone in town suddenly remembers that plywood exists.
Why Boarding up Windows with Plywood Matters
During severe storms, wind can turn ordinary outdoor items into airborne troublemakers. A patio chair, loose branch, roof shingle, or garden decoration can hit glass hard enough to crack or shatter it. Once a window fails, wind and rain can enter the home, causing water damage and increasing pressure inside the structure.
The main goal of plywood window protection is simple: create a strong temporary barrier between the glass and flying debris. Think of it as giving your windows a football helmet. Not glamorous, but much better than sending them into the storm wearing only a thin pane of optimism.
Permanent storm shutters and impact-resistant windows are usually the stronger long-term solutions. However, plywood remains popular because it is widely available, relatively affordable, easy to cut, and reusable when labeled and stored correctly. For homeowners who do not already have shutters, plywood panels can be a sensible emergency preparation project.
Choosing the Right Plywood for Storm Protection
For boarding up windows, use exterior-grade plywood, commonly CDX plywood, with a minimum thickness of 5/8 inch. Some homeowners choose 3/4 inch plywood for additional strength, especially for larger openings. Avoid thin panels, particleboard, interior plywood, or warped scraps from the mysterious corner of the garage. If the board looks like it already lost a fight with humidity, do not put it in charge of defending your windows.
Exterior-grade plywood is designed to handle moisture better than interior-grade panels. That matters because storm preparation often involves rain, humidity, and water blowing sideways in a way that feels personally rude. The panels should be flat, free of major knots, and large enough to cover each window with proper overlap or fit securely inside a recessed opening.
Basic Materials and Tools
- 5/8-inch or 3/4-inch exterior-grade plywood
- Tape measure and pencil
- Circular saw or handsaw
- Power drill and drill bits
- Lag screws for wood-frame homes or expansion bolts for masonry
- Large washers
- Barrel bolts for recessed masonry openings, if using Method 2
- Work gloves, eye protection, and sturdy shoes
- Exterior paint or wood sealer for long-term reuse
- Permanent marker for labeling panels
Safety note: board up windows before weather turns dangerous. Do not climb ladders, handle large panels, or use power tools during high winds, lightning, heavy rain, or evacuation orders. If upper-story windows are difficult to reach, hire help or use approved storm shutters. Gravity has never cared about DIY enthusiasm.
Before You Start: Measure, Label, and Plan
Good storm preparation starts with measuring every glass opening. That includes regular windows, glass doors, French doors, sliding doors, skylights, and any older garage door windows. If wind can break it, water can enter it, or debris can smash it, add it to the list.
For most exterior overlap installations, measure the width and height of the window opening from the outside. Then add enough extra material for the panel to overlap the opening. A common approach is to add 8 inches to both the width and height, creating a 4-inch overlap on each side. If a window sill sticks out at the bottom, you may need less overlap at the bottom and should secure the top and sides carefully instead.
After cutting each panel, label it clearly. Write something like “Kitchen Window – Up Arrow” or “Bedroom 2 – Front Side.” This may feel unnecessary while the sun is shining. It will feel brilliant when dark clouds arrive and you are trying to remember which rectangle of wood belongs to which rectangle of panic.
Method 1: The Outside Overlap Method
The outside overlap method is the most common DIY method for boarding up windows with plywood. It works by placing the plywood panel over the exterior of the window opening so the board overlaps the frame or surrounding wall. The panel is then fastened into the home’s structure using screws or bolts appropriate for the wall material.
Best For
This method is best for wood-frame homes, homes with siding, and some masonry homes where a recessed inset is not available. It is also useful when you want reusable panels that can be installed again before future storms.
Step 1: Measure the Window Opening
Measure the exterior window opening carefully. Add about 8 inches to the width and height so the plywood overlaps the opening by about 4 inches on each side. For example, if the window opening is 36 inches wide and 48 inches tall, cut the plywood to about 44 inches by 56 inches.
Do not assume every window is the same size just because they look similar. Houses enjoy tiny surprises. Measure each opening individually and write the dimensions down.
Step 2: Cut the Plywood Panels
Place the plywood on a stable work surface and cut it to size using a circular saw. Wear eye protection and gloves. If the opening is larger than one sheet of plywood, join two pieces together with a 2-by-4 brace along the seam. Fasten the brace securely with exterior screws so the two panels behave like one larger panel instead of two boards having a disagreement in the wind.
Step 3: Mark Fastener Locations
Draw a guide line about 2 inches in from the edge of the plywood. Mark holes at each corner and then every 12 inches around the panel. These holes help distribute pressure and keep the board from flexing excessively.
For homes with wood, vinyl, or aluminum siding, try to anchor fasteners into framing members around the window, not just thin trim or siding. A stud finder can help identify solid framing. Screwing plywood into weak material is like attaching a seat belt to a paper bag: technically an action, emotionally unhelpful.
Step 4: Drill Pilot Holes
Drill holes through the plywood at your marks. Then hold the panel in place over the window and mark the corresponding locations on the house. Remove the panel and drill pilot holes into the framing or masonry, depending on your home’s exterior.
Use lag screws for wood-frame homes. For masonry, use expansion bolts or other masonry-rated anchors. Always choose corrosion-resistant hardware, especially in coastal areas where salty air loves to bully metal.
Step 5: Install the Panel
Lift the plywood into position. This is easier with two people, especially for large panels. Place washers on the screws or bolts before tightening. The washers help spread pressure and prevent the fastener head from sinking into and weakening the plywood.
Tighten the fasteners until the panel is secure, but do not crush the wood. The goal is firm and stable, not “I am trying to drill this board into another dimension.”
Step 6: Remove and Store After the Storm
Once officials say it is safe to go outside, remove the panels. Inspect them for damage, let them dry, and store them in a dry place. Keep washers, screws, bolts, and nuts together in labeled bags. If you plan to reuse the panels, paint or seal them to slow down moisture damage.
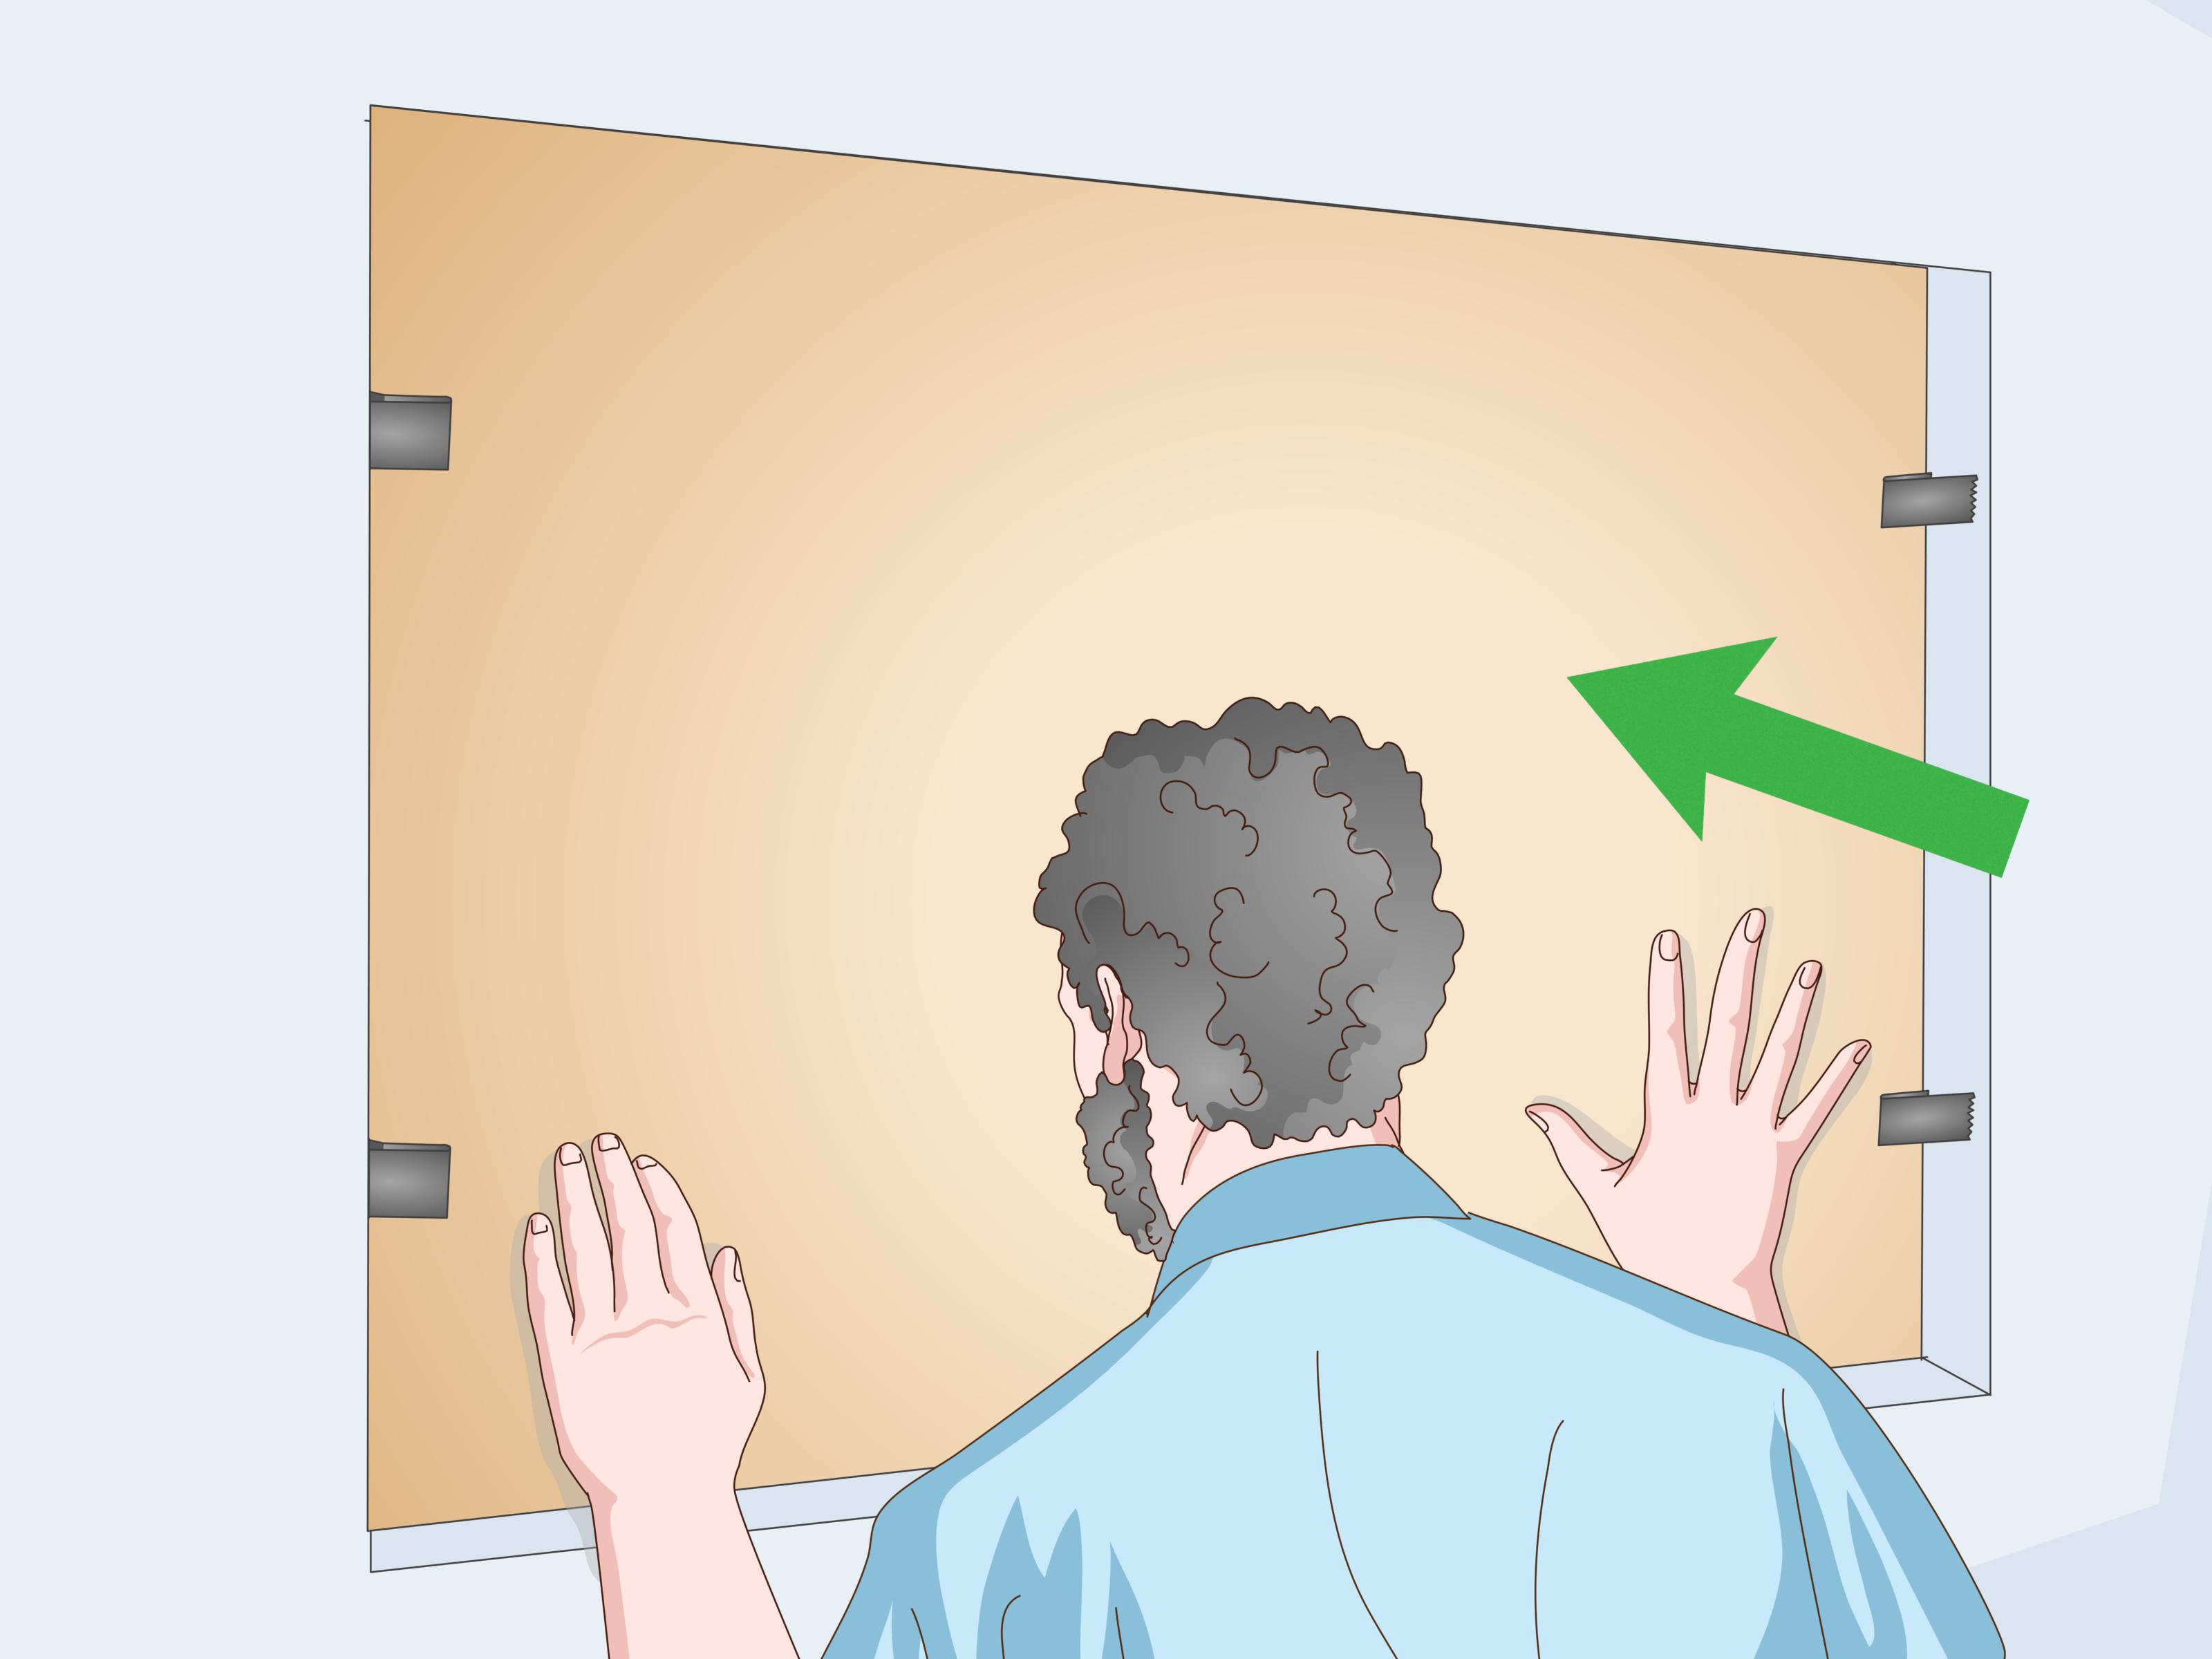
Method 2: The Recessed Inset Method
The recessed inset method is often used on masonry homes where the window sits inside a deep exterior opening. Instead of overlapping the wall, the plywood is cut to fit snugly inside the window recess. Barrel bolts or similar hardware hold the panel in place from inside the opening.
Best For
This method is best for brick, block, concrete, or stucco homes with window openings that have a recess of at least a couple of inches. It can look cleaner than the overlap method and may reduce the chance of wind getting under the panel edges when installed correctly.
Step 1: Check the Window Recess
Look at the exterior window opening. If the window is set back inside a masonry frame, measure the depth of the recess. A deeper inset gives the plywood panel more room to sit securely. If the recess is too shallow, the outside overlap method may be better.
Step 2: Measure the Inside Dimensions
Measure the width and height inside the recessed opening. For this method, the panel should fit inside the opening rather than overlap it. Cut carefully. A panel that is too large will not fit; a panel that is too small may rattle, shift, or allow wind to grab the edges.
Aim for snug, not impossible. You should not need a dramatic soundtrack and a sledgehammer to install the board.
Step 3: Attach Barrel Bolts to the Plywood
Install barrel bolts along the edges of the plywood panel. Many standard-size windows need one bolt on each side, but larger openings may require additional bolts spaced along the longer edges. Position the bolts so they slide outward into holes drilled into the masonry recess.
Make sure the bolts are square to the panel edge. If they are crooked, they may not slide properly into the receiving holes. Crooked hardware is the tiny villain of many otherwise respectable DIY projects.
Step 4: Mark and Drill the Masonry Holes
Place the panel into the recess and mark where each barrel bolt touches the masonry. Remove the panel and drill holes at those marks using the correct masonry bit. Drill straight so the bolts can slide in smoothly.
When working with brick, drill into the brick rather than the mortar whenever possible. Mortar can be weaker and may crumble more easily. If you are unsure about your wall material, ask a building professional or experienced hardware associate before drilling.
Step 5: Fit the Panel in Place
Set the plywood panel into the recessed opening and slide the barrel bolts into their holes. The panel should sit firmly with minimal movement. Test the fit before storm season, not when the sky is already making dramatic movie-trailer noises.
Step 6: Label, Seal, and Store
Just like the overlap method, label every panel with the window location and orientation. Seal the wood if you want it to last longer. Store the panels flat or upright in a dry area where they will not warp.
Common Mistakes to Avoid
Using Tape Instead of Plywood
Tape does not stop windows from breaking. It may create a false sense of security and waste time that should be spent on real storm preparation. If tape worked against hurricane debris, hardware stores would sell it in the “miracle” aisle next to unicorn roof clips.
Waiting Until the Last Minute
The worst time to buy plywood is when everyone else is buying plywood. Supplies can disappear quickly before a major storm. Cut, label, and pre-drill panels early in the season if you live in a hurricane-prone area.
Using the Wrong Fasteners
Fasteners must match the wall material. Lag screws are commonly used for wood-frame structures, while masonry homes need expansion bolts, masonry anchors, or recessed hardware. A strong board with weak fasteners can become flying debris, which is the opposite of the assignment.
Covering Only the Windward Side
Storms can shift direction. Wind can wrap around a home. Debris does not politely approach only from the front yard. Protect all vulnerable glass openings whenever possible, not just the side facing the expected wind.
Forgetting Doors and Garage Openings
Sliding glass doors, French doors, and garage windows deserve attention too. Garage doors can be a weak point during high winds, especially older models. If your garage door is not wind-rated, consider reinforcement options or professional upgrades.
How to Make Plywood Panels Easier to Reuse
Reusable plywood panels save time, money, and stress. After cutting each panel, label it on both sides. Add arrows showing the top edge. Number the panels and create a simple map of your home’s openings. Store fasteners for each window in a separate labeled bag.
Apply exterior paint or wood sealer to reduce moisture damage. Store panels somewhere dry, such as a garage, shed, or covered storage area. Keep them off damp concrete if possible. A small amount of organization now can save you from playing “plywood puzzle” while emergency alerts are buzzing on your phone.
When Plywood Is Not Enough
Plywood is a temporary emergency measure, not a permanent substitute for engineered storm protection. In high-risk coastal areas, impact-resistant windows, approved metal shutters, polycarbonate panels, fabric storm panels, or professionally installed systems may offer stronger and faster protection.
If your home has large second-story windows, unusually shaped openings, weak exterior walls, or local code requirements, talk with a licensed contractor. Also check local building rules and homeowner association requirements before drilling permanent anchors into exterior walls.
Real-World Experience: What Homeowners Learn After Boarding up Windows
The first lesson many homeowners learn is that plywood is heavier than it looks. A 4-by-8 sheet seems innocent at the store, leaning there quietly like a giant wooden cracker. Then you try carrying it across the yard in a breeze and discover it has chosen to become a sail. This is why experienced DIYers cut panels early, get help lifting them, and avoid installing large boards alone.
The second lesson is that labels are not optional. During calm weather, you may believe you will remember which panel fits the dining room window. You will not. All plywood rectangles begin to look suspiciously identical when the forecast is intense and the family dog is judging your preparedness. A permanent marker, an up arrow, and a window name can save a surprising amount of frustration.
The third lesson is that pre-drilling makes the job dramatically easier. Trying to hold a heavy panel against a wall while drilling new holes from scratch is tiring and inaccurate. Pre-drilled panels let you move faster and install boards with less guesswork. If you use permanent anchors, cover them after storm season so dirt, paint, and insects do not turn next year’s installation into a tiny archaeological dig.
The fourth lesson is that hardware storage matters. Screws, washers, nuts, barrel bolts, and anchors have a magical ability to vanish when needed most. Put the hardware for each panel into labeled bags and store those bags with the panels. Some homeowners tape the bag to the back of the panel; others keep everything in a dedicated storm-prep bin. Either way, do not rely on the famous household drawer of random screws. That drawer contains every screw except the one you need.
The fifth lesson is to test the system before the season. A dry run on a calm weekend will reveal problems early: panels cut too tight, holes slightly off, fasteners that do not bite, or a window you forgot to measure. Fixing those issues with blue skies overhead is much better than discovering them while rain is blowing sideways and your neighbor is already two panels ahead.
The sixth lesson is that teamwork helps. One person can hold the panel while another drives the screws. One person can read labels while another stages the boards by each window. A simple assembly line makes the whole job faster. It also reduces the chance that someone will invent new vocabulary while trying to balance plywood, washers, and a drill at the same time.
The seventh lesson is to respect evacuation orders. Boarding up windows protects property; it does not make staying safe in a dangerous evacuation zone guaranteed. If local officials tell residents to leave, leave. Plywood can wait. People cannot be replaced, even if they are very good at labeling panels.
Finally, experienced homeowners learn that storm preparation is not one dramatic task. It is a system. Trim trees, clear gutters, bring in loose outdoor items, charge devices, review insurance, prepare emergency supplies, and know your evacuation route. Boarding up windows with plywood is one important piece of the plan, but the best protection comes from doing many small things before the weather gets loud.
Conclusion
Boarding up windows with plywood is one of the most practical DIY storm-preparation steps for homeowners who do not have permanent shutters or impact-resistant windows. The outside overlap method works well for many wood-frame and siding homes, while the recessed inset method can be effective for masonry homes with deep window openings.
The key is doing the job correctly: use 5/8-inch or thicker exterior-grade plywood, measure carefully, choose the right fasteners, protect every vulnerable glass opening, and label panels for reuse. Plywood is not the fanciest storm protection, but installed properly and prepared early, it can help your windows stand a better chance when the forecast turns ugly.
Prepare before the rush, store your panels well, and keep safety first. Your future selfthe one not sprinting through a hardware store during a hurricane watchwill be extremely grateful.
