
Hair Care
Very Sucky Mini Kirby Fume Extractor – Make:
Aug
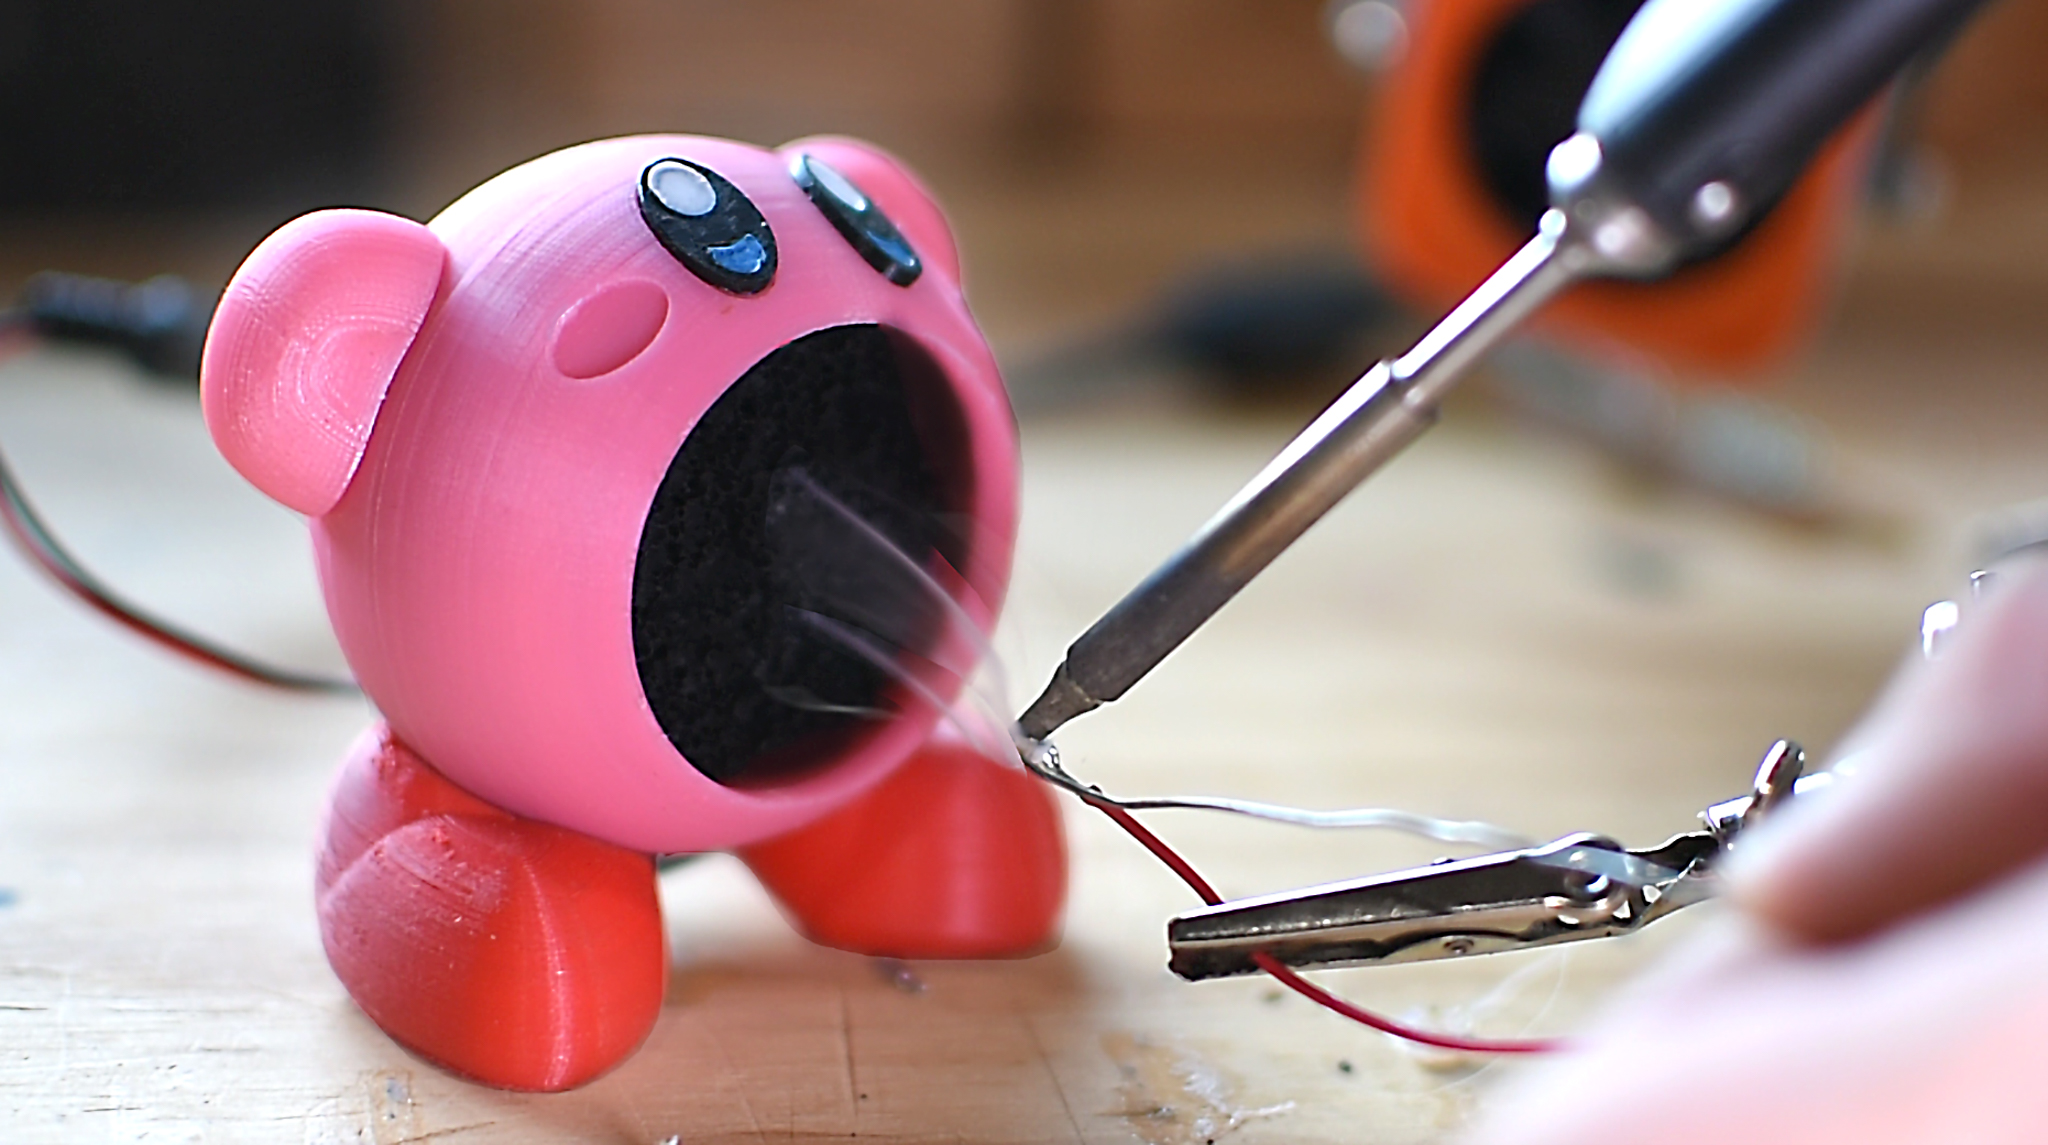
If your workbench has ever looked like a tiny robot crime scenewires everywhere, solder smoke curling upward, and a half-finished LED project judging you silentlythe Very Sucky Mini Kirby Fume Extractor is exactly the kind of maker project that makes safety feel less like homework and more like a side quest. It is small, pink, surprisingly practical, and yes, it is designed to suck. Proudly.
Inspired by the Make: project created by hobbyist designer and 3D printer Chris Borge, this mini fume extractor turns a familiar pop-culture shape into a compact soldering helper. The concept is wonderfully simple: a 3D printed character-style shell houses a small fan and an activated carbon filter, pulling solder fumes away from your face while you work. It is not a replacement for a professional lab-grade extraction system, but for occasional soldering, tiny repairs, hobby electronics, and “I just need to attach two wires without inhaling mystery smoke” moments, it is a charming upgrade from waving fumes away with your hand like a medieval wizard.
What Is the Mini Kirby Fume Extractor?
The Mini Kirby Fume Extractor is a small, 3D printed, desktop-friendly solder fume extractor designed around a 40mm computer case fan and a 10mm activated carbon filter. Instead of using a bulky black box that looks like it escaped from an industrial supply closet, this project wraps the function in a playful Kirby-inspired body. The result is part tool, part desk mascot, and part reminder that good workshop habits are easier to keep when your gear is fun to use.
The original Make: design prints in multiple parts. The body, arms, eyes, and feet are assembled separately, which helps reduce painting and makes the final object look cleaner when printed in different filament colors. The fan is press-fit into the housing, the filter sits behind it, and the body halves thread together without needing extra screws or complicated hardware. That matters because the best DIY tools are the ones you can actually finish before losing a tiny M2 screw to the carpet dimension.
Why Solder Fume Extraction Matters
Solder smoke is not just “spicy air.” The visible plume usually comes from heated flux, not just the metal solder itself. Rosin-based flux fumes can irritate the eyes, nose, throat, and lungs, and repeated exposure is associated with respiratory sensitization and occupational asthma. Lead-free solder reduces lead-related concerns, but it does not magically turn flux fumes into lavender aromatherapy. Breathing less of it is still the smart move.
A fume extractor works by pulling smoke away from the breathing zone. The closer the extractor sits to the solder joint, the better it can capture the plume before it spreads. Large professional systems may use hoods, ducts, HEPA filtration, activated carbon, or external exhaust. A small DIY extractor like this one uses a compact fan and carbon filter, making it a “better than nothing” solution for light hobby use. It should be paired with good ventilation, clean work habits, and realistic expectations.
The Charm of Going Mini
Traditional bench fume extractors are effective, but many are larger than the projects they are supposed to help with. For casual makers, that creates a problem: if the tool is annoying to set up, it stays on the shelf. The Mini Kirby Fume Extractor solves the behavior problem as much as the engineering problem. It is small enough to keep near the soldering station, cute enough to leave out, and simple enough to use without turning every repair into a full laboratory procedure.
The 40mm fan is the star of the tiny show. It is not going to move air like a shop vacuum, but it is compact, affordable, easy to source, and well matched to a character-shaped enclosure. A 100mm fan may pull more air, but it also demands a bigger body, more desk space, and more structural support. The Kirby design embraces the limitations: small fan, small filter, small footprint, big personality.
Core Materials and Tools
Primary Materials
- 40mm mini computer fan: A 12V two-wire fan works well, although a USB fan can simplify wiring.
- 10mm activated carbon filter: This helps reduce odors and capture some contaminants from the air stream.
- 3D printer filament: Pink, black, and red filament create the character-inspired look without excessive painting.
- Power source: Depending on the fan, this may be a USB cable, 12V adapter, or barrel jack connection.
- Glue or adhesive: Used for attaching decorative parts such as arms, eyes, and feet.
Helpful Tools
- 3D printer
- Soldering iron and solder, if wiring a fan manually
- Wire cutters and strippers
- Permanent marker or paint for small details
- Sandpaper or deburring tool for cleanup
Design Analysis: Why the Build Works
The best part of this project is that the design is honest. It does not pretend to be a certified industrial extractor. It does not promise to purify an entire room. It is a small capture device intended to sit close to the work and pull fumes away from the user. That narrow goal is exactly why it makes sense.
The multi-part print is also a smart design choice. Single-piece novelty prints can be convenient, but they often require supports, awkward post-processing, and lots of painting. Separating the eyes, arms, feet, and body lets makers use colored filament instead of trying to paint tiny curves while whispering motivational speeches to a toothpick. The mating holes help align the parts, while the dovetail-style foot connection allows the body to tilt for better positioning.
That tilt is more important than it sounds. Solder smoke rises quickly, and a fixed fan sitting at the wrong angle may pull air from everywhere except the actual smoke plume. Being able to angle the extractor toward the joint improves usability. In a small device, placement is everything. A mini fan cannot win a fight against bad positioning, but it can do useful work when placed a few inches from the source.
Build Process: From Filament to Fume Fighter
Step 1: Print the Parts
Print the body, face details, arms, feet, and connecting pieces according to the model instructions. PLA is usually fine for a decorative desktop tool because the extractor should not touch the soldering iron or hot components. PETG can add durability if your workspace gets warm, but the main priority is clean print quality and accurate fit.
Step 2: Clean and Test Fit
Before gluing anything, dry-fit the pieces. Check that the fan seats properly, the filter fits without crushing, and the body halves thread together smoothly. If the fan opening is slightly tight, remove small imperfections carefully rather than forcing the fan into place like you are trying to win an argument with plastic.
Step 3: Wire the Fan
If using a USB-powered fan, this step may be nearly plug-and-play. If using a two-wire 12V fan, connect it to a compatible power supply. Keep polarity correct, insulate connections, and avoid exposed conductors. A small inline switch can make the extractor more convenient, although unplugging it works too.
Step 4: Install the Filter
Place the activated carbon filter behind the intake path as designed. The filter should be snug enough to stay in position but not so compressed that it blocks airflow. Air must move through the filter, not around it. If smoke slips around the edges, you have created a tiny fan-powered bypass machine, which is less impressive than it sounds.
Step 5: Assemble the Character
Glue on the eyes, arms, and feet. Add pupils with paint or marker if needed. Let the adhesive cure fully before handling. The final build should feel stable, lightweight, and easy to position. At this point, you have a fume extractor that looks like it inhaled a soldering station and decided to make that its career.
Safety Notes for Real-World Use
Use the Mini Kirby Fume Extractor as a helper, not a magic shield. Place it close to the solder joint, keep your face out of the plume, and work in a ventilated area. Replace the carbon filter regularly, especially when odor reduction drops or airflow becomes weak. A dirty filter can restrict air and make the fan less effective.
For frequent soldering, professional extraction is recommended. A more serious setup may include HEPA filtration for fine particles, activated carbon for vapors and odors, a stronger fan, and a hood or nozzle designed for source capture. If you solder daily, teach electronics, run a makerspace, or work in a commercial environment, treat ventilation as a proper safety system, not a decorative accessory.
Who Should Build This Project?
This project is ideal for hobbyists, students, light electronics tinkerers, cosplayers adding LEDs, keyboard builders, model makers, and anyone who solders occasionally and wants a compact extractor that is easy to keep nearby. It is also a great conversation starter for makerspaces because it turns safety into something approachable. People are far more likely to use a fume extractor when it is cute, visible, and already on the bench.
It may not be the right project for high-volume soldering, professional electronics assembly, or enclosed spaces with poor ventilation. It is also not a substitute for learning proper soldering technique. Lower soldering temperatures, clean tips, appropriate flux, and efficient work habits can reduce fume generation in the first place. The best fume is the one you do not create; the second-best fume is the one Kirby eats before it reaches your nose.
Common Improvements and Customization Ideas
Add a Better Mount
One useful upgrade is an articulated arm or helping-hands mount. A mini extractor performs best when it can be positioned precisely. Mounting it to a flexible arm lets you aim it at the smoke plume without sacrificing bench space.
Use a USB-C Power Input
A USB-C power option can make the extractor easier to use with common chargers and battery banks. Just make sure the fan receives the correct voltage. Not every USB-C board outputs 12V automatically, so choose components carefully.
Improve the Filter Stack
If space allows, experiment with a thin pre-filter plus activated carbon. A larger housing could even support HEPA-style filtration, though that may require a stronger fan to overcome airflow resistance. In tiny extractors, filter density and fan pressure must be balanced.
Print Alternate Characters
The same concept could become a tiny robot, a dragon, a vacuum cleaner, a space creature, or a miniature shop monster. The important engineering idea is not the character itself; it is the combination of a close-positioned intake, compact fan, accessible filter, and easy-to-use body.
SEO Perspective: Why This Project Gets Attention
From a content perspective, the Mini Kirby Fume Extractor is a perfect maker-web topic because it combines function, personality, and search-friendly specificity. People search for “DIY solder fume extractor,” “3D printed fume extractor,” “mini fume extractor,” “40mm fan solder extractor,” and “activated carbon solder filter.” This project intersects all of those terms while adding a memorable visual hook.
It also solves a real user problem: bulky tools do not get used. Search engines favor content that satisfies intent, and the intent here is not just “what is a fume extractor?” It is “how can I make one that fits my bench, looks fun, and is realistic for hobby use?” A strong article should answer the safety question, explain the build, discuss limitations, and offer practical improvements. Cute gets the click; usefulness earns the bookmark.
Hands-On Experience: Living With a Very Sucky Little Bench Buddy
The first thing you notice when using a mini character-style fume extractor is psychological, not technical: you actually want to place it on the bench. That sounds silly until you compare it with the average boxy extractor, which often lives in a drawer, behind a monitor, or under a pile of jumper wires. The Mini Kirby design feels like a small shop companion. It sits there looking cheerful, as if it has one job and exactly enough brain cells to do it.
In practical use, positioning makes the biggest difference. Put the extractor too far away and the solder smoke will drift upward like it has somewhere more important to be. Move the intake close to the joint, however, and the fan can pull the plume sideways before it reaches your face. For tiny PCB repairs, LED wiring, keyboard switch work, and quick cable fixes, that is a meaningful improvement. You still smell some flux, especially with a small carbon-only filter, but the smoke no longer heads straight for your breathing zone.
The 40mm fan has limits. It is quiet and compact, but it does not create the deep pull of a larger blower. That means the extractor rewards tidy soldering. Short joints, clean flux application, and keeping the iron tip at the correct temperature all help. If you flood the board with flux and linger on the pad like you are caramelizing onions, the poor little fan will do its best, but it may look emotionally overwhelmed.
Maintenance is simple, which is another reason the design works. The threaded body makes filter access easier than designs that depend on hidden screws. Replace the carbon filter when it looks dirty, smells saturated, or noticeably reduces airflow. It is also worth brushing dust from the fan grill and checking that no loose filament strands or glue blobs are blocking the air path. Small fans are dramatic creatures; a tiny obstruction can reduce performance more than expected.
The novelty shape also has a teaching advantage. In a shared workspace, a fun extractor encourages questions. Someone asks, “Why is Kirby eating smoke?” and suddenly you are explaining flux fumes, source capture, activated carbon, and why soldering directly under your nose is not a personality trait. That makes the project useful beyond its airflow rating. It turns safety into a visible habit.
After a few sessions, the biggest takeaway is that the Mini Kirby Fume Extractor is not trying to be the strongest extractor in the room. It is trying to be the one you actually use. For occasional hobby soldering, that matters. A modest tool on the bench beats a powerful tool in the closet. And if the modest tool happens to look like it is inhaling your bad decisions one rosin-scented puff at a time, even better.
Conclusion
The Very Sucky Mini Kirby Fume Extractor is a delightful example of maker culture at its best: practical, playful, customizable, and just serious enough about safety to earn a permanent spot beside the soldering iron. It uses accessible parts, a compact 3D printed body, a small fan, and an activated carbon filter to create a tool that helps pull fumes away during light soldering work.
Its greatest strength is not raw power. It is usability. Because it is small, fun, and easy to keep nearby, makers are more likely to turn it on before soldering. That simple habit can make a real difference in comfort and exposure reduction. For heavy or professional use, invest in proper fume extraction with stronger airflow and more complete filtration. But for casual electronics projects, this little pink smoke-snacker is a smart reminder that workshop safety does not have to be boring. Sometimes, it can be very suckyin the best possible way.
Note: This article is written for informational and educational web publishing. For frequent soldering, classroom use, makerspace use, or commercial work, use properly designed fume extraction and follow applicable workplace safety guidance.

