
Body Care
How to Update Your Vertical Blinds! – Remodelaholic
Aug
Vertical blinds have a special talent: they remain perfectly functional while making a room look as though it has been waiting for a makeover since the invention of the fax machine. They control light, provide privacy, and slide neatly away from patio doors, but older vinyl vanes, yellowed plastic, rattling hardware, and bulky valances can make an otherwise attractive room feel dated.
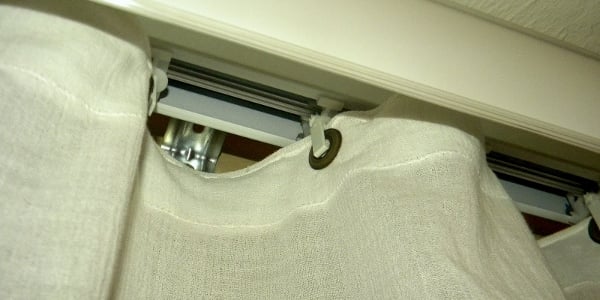
The good news is that you may not need to remove the entire system. If the headrail still operates smoothly, you can clean it, repair broken parts, replace the vanes, soften it with fabric, disguise the hardware, or reuse the existing track to create a curtain-style window treatment. The original Remodelaholic project used the last approach, attaching a handmade fabric panel to the existing vertical-blind clips for a softer and more modern result.
This guide explains how to update vertical blinds without wasting useful hardware, along with practical advice for choosing materials, measuring correctly, improving safety, and deciding when a full replacement makes more sense.
Why Update Vertical Blinds Instead of Removing Them?
Traditional vertical blinds are common on sliding glass doors and wide windows because they move in the same direction as the door. They can be opened partially, rotated to control glare, or stacked completely to one side for easy access. That basic design remains useful even when the style feels outdated.
Keeping the existing headrail can also save time and reduce waste. Removing a full track may leave screw holes, damaged drywall, mismatched paint, or an inconveniently empty opening that suddenly needs a custom treatment. Reusing it lets you improve the room without turning a Saturday decorating project into a three-week renovation saga.
An update is especially worthwhile when:
- The headrail is firmly attached and level.
- The carriers slide smoothly from side to side.
- Most hooks or carrier stems are still intact.
- The blinds cover an unusually wide door or window.
- You are decorating a rental and want minimal wall damage.
- Your budget favors fabric, replacement vanes, or small repair parts over a complete custom system.
Inspect the Existing Blind System First
Before buying fabric or greeting a can of spray paint with dangerous enthusiasm, test the complete mechanism.
Check the headrail
Rotate the vanes until they are perpendicular to the rail, then open and close the blinds. Operating vertical blinds while the vanes are turned across the track can strain the carriers and cause twisting or breakage. Manufacturer installation guidance commonly recommends opening and closing the blind with the slats positioned perpendicular to the headrail.
Examine the carrier stems and clips
Look for cracked hooks, missing stems, or carriers that refuse to rotate with their neighbors. Replacement stems, clips, valance pieces, headrails, and vanes are widely available, so one damaged part does not automatically require replacing everything. Retailers continue to sell individual vertical-blind repair components and replacement headrails for this purpose.
Inspect the vanes
A few broken or warped vanes can be replaced. However, if nearly every vane is brittle, heavily yellowed, permanently bent, or cracked around the hanging holes, replacing the full set is usually more practical than performing plastic surgery on each slat. Widespread discoloration and distortion often indicate that the material itself has deteriorated.
Update Option 1: Clean and Repair What You Have
Sometimes the blinds are not truly outdated; they are simply wearing several years of dust, fingerprints, kitchen residue, and mysterious household grime. A detailed cleaning can make white, ivory, or textured vanes look noticeably fresher.
How to clean vinyl vertical blinds
- Close the blinds so the vanes form a flat surface.
- Dust from top to bottom with a microfiber cloth or vacuum brush attachment.
- Rotate the vanes and clean the opposite sides.
- Wipe each vane with a soft cloth dampened with warm water and a small amount of mild dish soap.
- Dry the vanes completely to prevent water spots and streaks.
- Clean the headrail, wand, valance, and window trim before reinstalling any removed pieces.
Working from top to bottom prevents loosened dust from landing on areas you have already cleaned. Regular cleaning also helps reduce accumulated household dust and allergens. Home-maintenance and EPA guidance recommends routine dust removal from blinds, shades, and other indoor surfaces.
How to clean fabric vanes
Begin with a vacuum brush on the lowest practical suction setting. Test any damp-cleaning method in an inconspicuous location because dyes, coatings, backing materials, and adhesives may react differently. Manufacturers recommend checking colorfastness before cleaning the visible surface.
Avoid soaking fabric vanes unless the care instructions specifically allow it. Water can distort the fabric, loosen bonded layers, or leave tide marks that somehow look more dramatic than the original stain.
Update Option 2: Hang a Curtain on the Existing Vertical-Blind Track
This is the signature Remodelaholic-inspired solution: remove the hard vertical vanes but keep the working track and carriers. A curtain panel fitted with evenly spaced eyelets or reinforced openings can then hang from the original clips.
The result combines the softness of drapery with the side-to-side movement of vertical blinds. It is particularly useful for a sliding glass door that must remain easy to open every day.
Materials you may need
- Light-filtering or privacy curtain fabric
- Measuring tape
- Fabric scissors
- Sewing machine or iron-on hemming tape
- Small metal eyelets or reinforced curtain rings
- Eyelet-setting tool
- Hammer and a protective work board
- Matching thread
- Step stool
Step 1: Count the carriers
Remove the existing vanes carefully and count the clips or carriers on the headrail. The number determines how many attachment points your curtain requires. Do not assume the spacing by looking up at the rail and whispering, “That seems about right.” Count twice.
Step 2: Measure the covered opening
Measure from the attachment point on the carrier to the desired finished bottom edge. For a patio door, leave enough clearance to prevent the fabric from dragging across the floor.
Measure the full track width, then add fullness. A panel made at approximately 1.5 times the track width will have gentle folds; twice the width creates a fuller appearance. Extremely bulky fabric may not stack neatly at the side, so more fullness is not automatically better.
Step 3: Choose the right fabric
Use fabric that is attractive from both sides because the back may be visible through the glass from outdoors. A light-filtering weave offers softness while preserving natural light. Privacy fabric is better when neighboring homes or nighttime visibility are concerns. Blackout material provides stronger light control but may be too heavy for an aging headrail.
Before committing, clip a folded sample to two or three carriers and slide it along the track. This quick weight test can prevent you from sewing a magnificent curtain that the hardware regards as a personal attack.
Step 4: Sew or bond the hems
Hem the side and bottom edges. Fold the top edge over to create a reinforced band strong enough to support the attachment points. Sew a second line across the band if the fabric is loosely woven.
For a no-sew version, use fusible web or heavy-duty iron-on hemming tape approved for the fabric. Reinforce the top with a strip of compatible fabric before installing eyelets. Adhesive alone should not carry the full weight of a large curtain unless the product is designed for that purpose.
Step 5: Mark and install the eyelets
Divide the usable width of the panel by the number of carriers to establish even spacing. Mark every location before cutting any holes. Install the eyelets according to the manufacturer’s directions on a sturdy work board, not directly on stone, tile, glass, or the dining table you promised not to damage.
Step 6: Attach and test the panel
Clip each reinforced opening into a carrier. You can alternate the direction of the attachment points to encourage soft, wave-like folds. Slowly rotate and traverse the system while watching for snagging, excessive strain, or uneven movement.
If the curtain closes smoothly but looks slightly flat, steam it lightly or allow it to hang for a day. Fabric often relaxes after installation.
Update Option 3: Replace Only the Vertical Vanes
When the headrail works well, replacing the vanes is one of the fastest updates available. New vinyl, textured PVC, or fabric vanes can change the color and improve privacy without disturbing the mounting hardware.
Replacement vanes are especially practical when only a few pieces are damaged. Some manufacturers and retailers even recommend ordering extra vanes with a new blind so matching replacements are available later.
How to measure replacement vanes
- Remove one undamaged vane.
- Lay it flat without stretching or bending it.
- Measure from the top edge to the bottom edge.
- Record the width, which is commonly around 3.5 inches but should never be assumed.
- Compare the hanging-hole shape with the replacement product.
- Confirm whether the new vanes require bottom weights or connecting chains.
Buy enough vanes to replace the entire visible set when changing color or texture. Mixing old and new white slats frequently produces several unexpected shades of “white,” none of which agree with one another.
Update Option 4: Paint or Cover the Existing Slats
Painting or covering vanes can work when the slats are structurally sound and the project is primarily decorative. These methods require more preparation than replacement, but they allow custom colors, patterns, and textures.
Painting vinyl or plastic vanes
Clean each vane thoroughly and let it dry. Lightly scuff the surface only if recommended for the material and coating you plan to use. Apply a primer and paint specifically labeled as compatible with that type of plastic or vinyl.
Test one spare vane first. Confirm that the finish dries without remaining tacky, cracking when flexed, or causing adjacent vanes to stick together. Work outdoors or in a properly ventilated area and follow all instructions on the coating label.
Keep paint away from the headrail, carrier gears, hanging slots, chains, weights, and sliding contact points. Decorative paint belongs on the visible surface, not inside the mechanism where it can become surprisingly effective glue.
Adding fabric or removable wallpaper
Thin fabric, decorative paper, or removable wallpaper can be cut to fit individual vanes. Use a lightweight material so the carriers are not overloaded. Test the adhesive on one vane and check the result after several days of sun exposure.
Pattern alignment requires planning. Number the vanes before removing them, lay them side by side, and position the design across the full set. When closed, the blinds can form a large mural; when open, the pattern separates into narrow decorative stripes.
This treatment works best in low-humidity rooms. Bathrooms, damp basements, and doors exposed to condensation may cause paper edges or fabric coverings to lift.
Update Option 5: Hide the Headrail and Add Decorative Layers
A bulky plastic valance can make vertical blinds look older than the vanes themselves. Replacing or disguising it may be enough to modernize the entire window.
Add a fabric-covered valance
Wrap the existing valance insert with fabric, or create a lightweight upholstered cover that attaches without interfering with the moving carriers. Coordinate the material with pillows, curtains, or nearby upholstery rather than trying to match every color in the room.
Build a simple cornice
A shallow wood or foam-board cornice can conceal the headrail. Leave sufficient clearance for the vanes to rotate and stack. Make the cover removable so the track remains accessible for future repairs.
Layer stationary curtain panels
Mount decorative curtains outside the vertical blinds and leave them stationary at the sides. This softens the hard lines, makes the opening appear wider, and allows the blinds to continue handling daily privacy and light control.
Mounting the curtain rod higher than the door frame can visually increase ceiling height. Just confirm that the panels will not catch in the door, block a floor vent, or become the household pet’s newest climbing gym.
When Should You Replace the Entire System?
An update is not always the smartest investment. Replace the complete blind when the headrail is bent, carriers repeatedly jam, multiple gears are stripped, brackets are loose or damaged, or the operating system presents a safety concern that cannot be corrected appropriately.
Modern alternatives for wide windows and sliding doors include:
- Panel-track shades: Wide fabric panels that slide horizontally and create a cleaner contemporary look.
- Vertical cellular shades: Honeycomb construction that can provide better insulation than conventional vinyl vanes.
- Sheer vertical shades: Soft fabric treatments with adjustable internal vanes.
- Sliding shutters: Durable panels with strong architectural presence.
- Traverse drapery: Curtains designed to open and close along a track.
- Roller shades: A streamlined option when the door layout permits unobstructed operation.
A practical treatment for a sliding door should generally open in the same direction as the door and withstand frequent daily use. Panel tracks, curtains, vertical cellular shades, sliding shutters, and updated vertical blinds are all commonly recommended alternatives.
How to Measure for a Complete Replacement
Accurate measurements matter because large openings magnify small mistakes. First decide whether the new treatment will be mounted inside the frame or outside it.
Inside mount
Measure the inside width at the top, middle, and bottom. Measure the height at the left, center, and right. Also measure the available depth so the headrail can fit without colliding with handles, trim, or the moving door.
Outside mount
Measure the area you want the treatment to cover rather than only the glass. Add overlap at the sides and top for improved privacy and light control. Some vertical-blind measuring instructions recommend adding several inches on each side, but exact allowances vary by product, valance, control type, and manufacturer.
Record every measurement to the nearest one-eighth inch and follow the ordering instructions for the specific brand. Manufacturers may apply their own factory deductions, so do not subtract an assumed amount unless the instructions explicitly tell you to do so. Home Depot and Lowe’s both recommend measuring in multiple locations because window openings are not always perfectly square.
For sliding doors, remember to account for the handle, baseboard, door opening, stack width, and the side on which the treatment should collect.
Do Not Overlook Cord Safety
Older vertical blinds may use pull cords, beaded chains, or continuous loops. Accessible cords can present a strangulation hazard, particularly in homes where young children live or visit. The U.S. Consumer Product Safety Commission recommends choosing cordless window coverings whenever possible and keeping existing cords inaccessible.
The ANSI/WCMA A100.1-2022 window-covering safety standard took effect on June 1, 2024, pushing most newly manufactured products toward cordless or inaccessible-cord designs.
When updating an older system, consider converting to wand control or replacing it with a compliant cordless product. Do not place cribs, beds, chairs, benches, or climbable furniture near accessible cords. A decorative makeover is lovely, but safety is considerably more fashionable.
Consider Light Control and Energy Performance
Vertical blinds are excellent for directing daylight and reducing glare, but ordinary vinyl vanes provide limited insulation compared with tightly fitted cellular shades or lined drapery. The U.S. Department of Energy notes that properly selected window coverings can help manage summer solar heat and winter heat loss. It also identifies cellular shades as a particularly effective interior insulation option.
For a hot, sunny patio door, consider light-colored vanes, solar-control fabric, or lined curtains. For a cold or drafty opening, vertical cellular shades or thermal drapery may be more effective than simply replacing one set of vinyl vanes with another.
Privacy also changes throughout the day. A fabric that looks pleasantly translucent in afternoon sunlight may reveal silhouettes after dark when indoor lights are on. Test a sample at night before using it across an entire glass door.
Real-World Experience: Lessons From Updating Vertical Blinds
The most important lesson from updating vertical blinds is that the condition of the headrail matters more than the appearance of the slats. The first time I evaluated an old set, I focused entirely on the yellowed vanes. I imagined fresh fabric, better color, and a graceful curtain that would make the room look taller. Then I opened the blinds and heard a sequence of clicks, scrapes, and one sound that can only be described as a tiny plastic object surrendering to destiny.
That test changed the plan. Before purchasing decorative materials, I removed the vanes and cleaned the empty track. Dust had collected around several carriers, and two stems were twisted. After cleaning and replacing the damaged pieces, the headrail moved smoothly again. That inexpensive repair made the creative update possible.
The second lesson involved fabric weight. A substantial curtain sample looked beautiful in the store, but even a small folded section pulled noticeably on the carriers. The lighter alternative was less dramatic on the bolt, yet it formed better folds and moved much more easily after installation. For a reused blind track, the best fabric is not necessarily the most luxurious one. It is the fabric that looks attractive without making the mechanism file for early retirement.
Spacing the attachment points also required patience. Measuring only the curtain width and dividing by the number of clips seemed simple, but the side hems reduced the usable area. Marking from the center outward produced a more balanced result. It also prevented the final eyelet from landing awkwardly close to one edge.
Another useful discovery was that a single large panel did not need enormous fullness. Extra fabric creates soft waves, but too much material forms a bulky stack beside the door. On a frequently used patio entrance, a moderate amount of fullness gave the best balance of appearance and function. The curtain cleared the doorway, remained easy to close, and did not swallow half the wall when open.
Nighttime testing was equally important. The chosen fabric provided comfortable privacy during the day, but it became more transparent after sunset. Adding a second lightweight lining panel solved the problem without dramatically increasing the load on the track. A separate liner also made future washing and replacement easier.
The valance produced one of the biggest visual improvements. Removing the original plastic cover exposed an unattractive metal track, but wrapping the valance insert in coordinating fabric turned it into a deliberate design detail. The change required very little material and helped the reused hardware look like part of the room rather than a leftover component.
Finally, the project reinforced the value of keeping every update reversible. The fabric panel could be unclipped for cleaning, the headrail remained accessible, and no permanent adhesive was applied to the moving parts. That approach is ideal for renters, budget-conscious homeowners, and anyone whose decorating preferences occasionally change before the paint has fully dried.
The finished treatment did not behave exactly like conventional curtains or exactly like vertical blinds. It combined elements of both: soft fabric, side-to-side operation, filtered daylight, and uncomplicated access to the door. Most importantly, it turned a functional but dated feature into something intentional without discarding hardware that still had years of useful service left.
Conclusion
Updating vertical blinds can be as simple as cleaning the vanes and replacing a broken clip, or as creative as transforming the existing headrail into a moving curtain track. The best method depends on the condition of the mechanism, the weight of the new material, the amount of privacy required, and how frequently the door or window is used.
Start by testing the hardware. Preserve a smooth, secure headrail; repair minor damage; and replace a failing or unsafe system. From there, choose an update that complements the room without sacrificing practical light control and access. With careful measuring and a little restraint around the spray paint, even famously unfashionable vertical blinds can become a useful part of a modern interior.

