
Beauty Unlocked
20 Easy DIY Jewelry Organizer Ideas
Jul
Jewelry has a magical talent for disappearing exactly when you need it. One earring joins a secret witness protection program. Necklaces tie themselves into sailor knots. Rings migrate to the bottom of drawers like tiny metal raccoons. The good news? You do not need a luxury walk-in closet or a velvet-lined armoire to fix the chaos. With a few smart DIY jewelry organizer ideas, you can turn everyday materials into practical, pretty storage that keeps necklaces untangled, earrings paired, rings visible, and bracelets easy to grab.
The best jewelry organization system is not the fanciest one. It is the one you will actually use on a sleepy Monday morning when coffee has not yet entered your bloodstream. That means your organizer should match your habits, your space, and your collection. If you wear the same gold hoops every day, they deserve a landing spot near your mirror. If you own statement necklaces that could double as small chandeliers, they need hooks and breathing room. If tiny studs are your weakness, compartments are your new best friend.
Below are 20 easy DIY jewelry organizer ideas that work for small apartments, bedroom dressers, closets, dorm rooms, vanities, and anyone who has ever whispered, “Where is the other earring?” into the void.
Why DIY Jewelry Organizers Work So Well
DIY jewelry storage solves three common problems: tangling, damage, and forgetfulness. When jewelry is piled together, chains knot, metals scratch, and delicate pieces can bend or tarnish faster. When jewelry is hidden in a closed box, you may simply forget what you own. A good homemade jewelry organizer gives each piece a home while keeping your favorite accessories visible enough to enjoy.
Another advantage is customization. Store-bought organizers are useful, but they often assume everyone owns the same mix of necklaces, bracelets, rings, watches, brooches, and earrings. Real life is messier. Maybe you have 40 pairs of earrings and three necklaces. Maybe your bracelet collection is beginning to look like a tiny jewelry store. DIY lets you build around your actual collection instead of forcing your collection into a box that was clearly designed by someone who owns one necklace and a dream.
20 Easy DIY Jewelry Organizer Ideas
1. Framed Chicken Wire Earring Holder
Take an old picture frame, remove the glass, and staple chicken wire or wire mesh to the back. Hang it on the wall and hook earrings through the openings. This DIY earring organizer is especially useful for dangly earrings because each pair stays visible and separated. Paint the frame white, black, gold, or a fun accent color to match your bedroom decor.
2. Cork Board Jewelry Display
A cork board is one of the easiest wall-mounted jewelry organizer ideas. Cover the cork with fabric, secure it with staples, and add pushpins or small hooks. Use it for necklaces, bracelets, hoop earrings, and lightweight accessories. The beauty of cork is flexibility: you can move pins around whenever your collection grows or your styling mood changes.
3. Pegboard Jewelry Wall
Pegboards are not just for garages and craft rooms. A small painted pegboard can become a stylish jewelry wall with hooks, mini shelves, baskets, and dowels. Use hooks for necklaces, small cups for rings, and narrow shelves for perfume or watches. This is a smart option if you want a vertical jewelry organizer that saves dresser space.
4. DIY Drawer Divider Tray
If you prefer jewelry hidden away, create a drawer organizer using cardboard, foam board, or thin wood strips. Divide the drawer into sections for rings, earrings, bracelets, and necklaces. Line the compartments with felt to reduce scratches. This idea works beautifully for minimalist bedrooms because the jewelry stays organized without turning your dresser into a glittery obstacle course.
5. Ice Cube Tray Ring and Stud Organizer
An ice cube tray is surprisingly good at organizing small jewelry. Each cube section can hold rings, stud earrings, charms, pins, or delicate chains. Choose a silicone or plastic tray that fits inside your vanity drawer. It is cheap, washable, and wonderfully low-drama. Your rings get tiny apartments, and nobody has to share a lease.
6. Vintage Teacup Jewelry Storage
Vintage teacups, saucers, and small bowls make charming jewelry holders for rings, bracelets, and everyday earrings. Place them on a dresser tray or inside a drawer. This idea is perfect for thrift-store lovers because mismatched pieces look intentional when grouped together. Bonus: it gives those lonely teacups a second career beyond looking adorable in a cabinet.
7. Driftwood Necklace Hanger
For a coastal, rustic, or boho look, use a piece of clean driftwood as a necklace hanger. Screw small hooks along the bottom, attach hanging hardware to the back, and mount it on the wall. Long necklaces hang freely, which helps prevent tangles. If you cannot find driftwood, a sanded branch or narrow wood strip works just as well.
8. Wooden Dowel Bracelet Stand
Make a simple bracelet organizer with a wooden dowel, a small base, and two supports. Paint or stain the wood, then slide bangles, cuffs, scrunchies, or watches onto the dowel. This DIY bracelet holder is great for people who like to see all their options at once. It also makes your dresser look a little like a boutique, minus the boutique price tags.
9. Repurposed Cutlery Tray Organizer
A cutlery tray can become an instant jewelry drawer organizer. Long sections are ideal for bracelets and necklaces, while smaller sections work for earrings and rings. Add felt, velvet, or adhesive drawer liner to make it softer. Bamboo cutlery trays look polished, but even a basic plastic tray can work if it fits your drawer and your budget.
10. Shadow Box Jewelry Cabinet
A shadow box can become a mini jewelry cabinet with a little creativity. Add hooks inside for necklaces, small foam strips for rings, and mesh or ribbon for earrings. Because a shadow box has depth, it protects pieces from dust better than an open board. Choose one with a glass door if you want your jewelry visible but still protected.
11. Over-the-Door Jewelry Organizer
If you have limited wall and drawer space, use the back of a closet or bedroom door. Attach adhesive hooks, a slim towel bar, or a hanging fabric organizer. Necklaces can hang from hooks, bracelets can loop over bars, and earrings can clip to ribbons. This is a practical jewelry storage idea for dorms, rentals, and small bedrooms.
12. Rake Head Necklace Holder
An old metal rake head can become a rustic necklace organizer. Clean it well, remove any sharp edges, paint it if desired, and mount it securely to the wall. The tines act like hooks for necklaces and bracelets. This project is ideal for farmhouse decor, garden lovers, or anyone who enjoys telling guests, “Yes, that used to be yard equipment.”
13. Clay Ring Dishes
Air-dry clay is perfect for making small ring dishes. Roll it flat, cut a circle or organic shape, gently curve the edges, and let it dry. Paint it with acrylic paint or seal it with a clear finish. Place one by your bed, one near the sink, and one on your vanity so rings always have a safe landing spot.
14. Embroidery Hoop Earring Holder
Stretch lace, mesh, or decorative fabric inside an embroidery hoop, tighten it, and trim the edges. Hang earrings through the fabric. This DIY earring holder is lightweight, affordable, and pretty enough to display on a wall. Use several hoops in different sizes for a gallery-style jewelry display that feels handmade in the best way.
15. Tiered Tray Jewelry Station
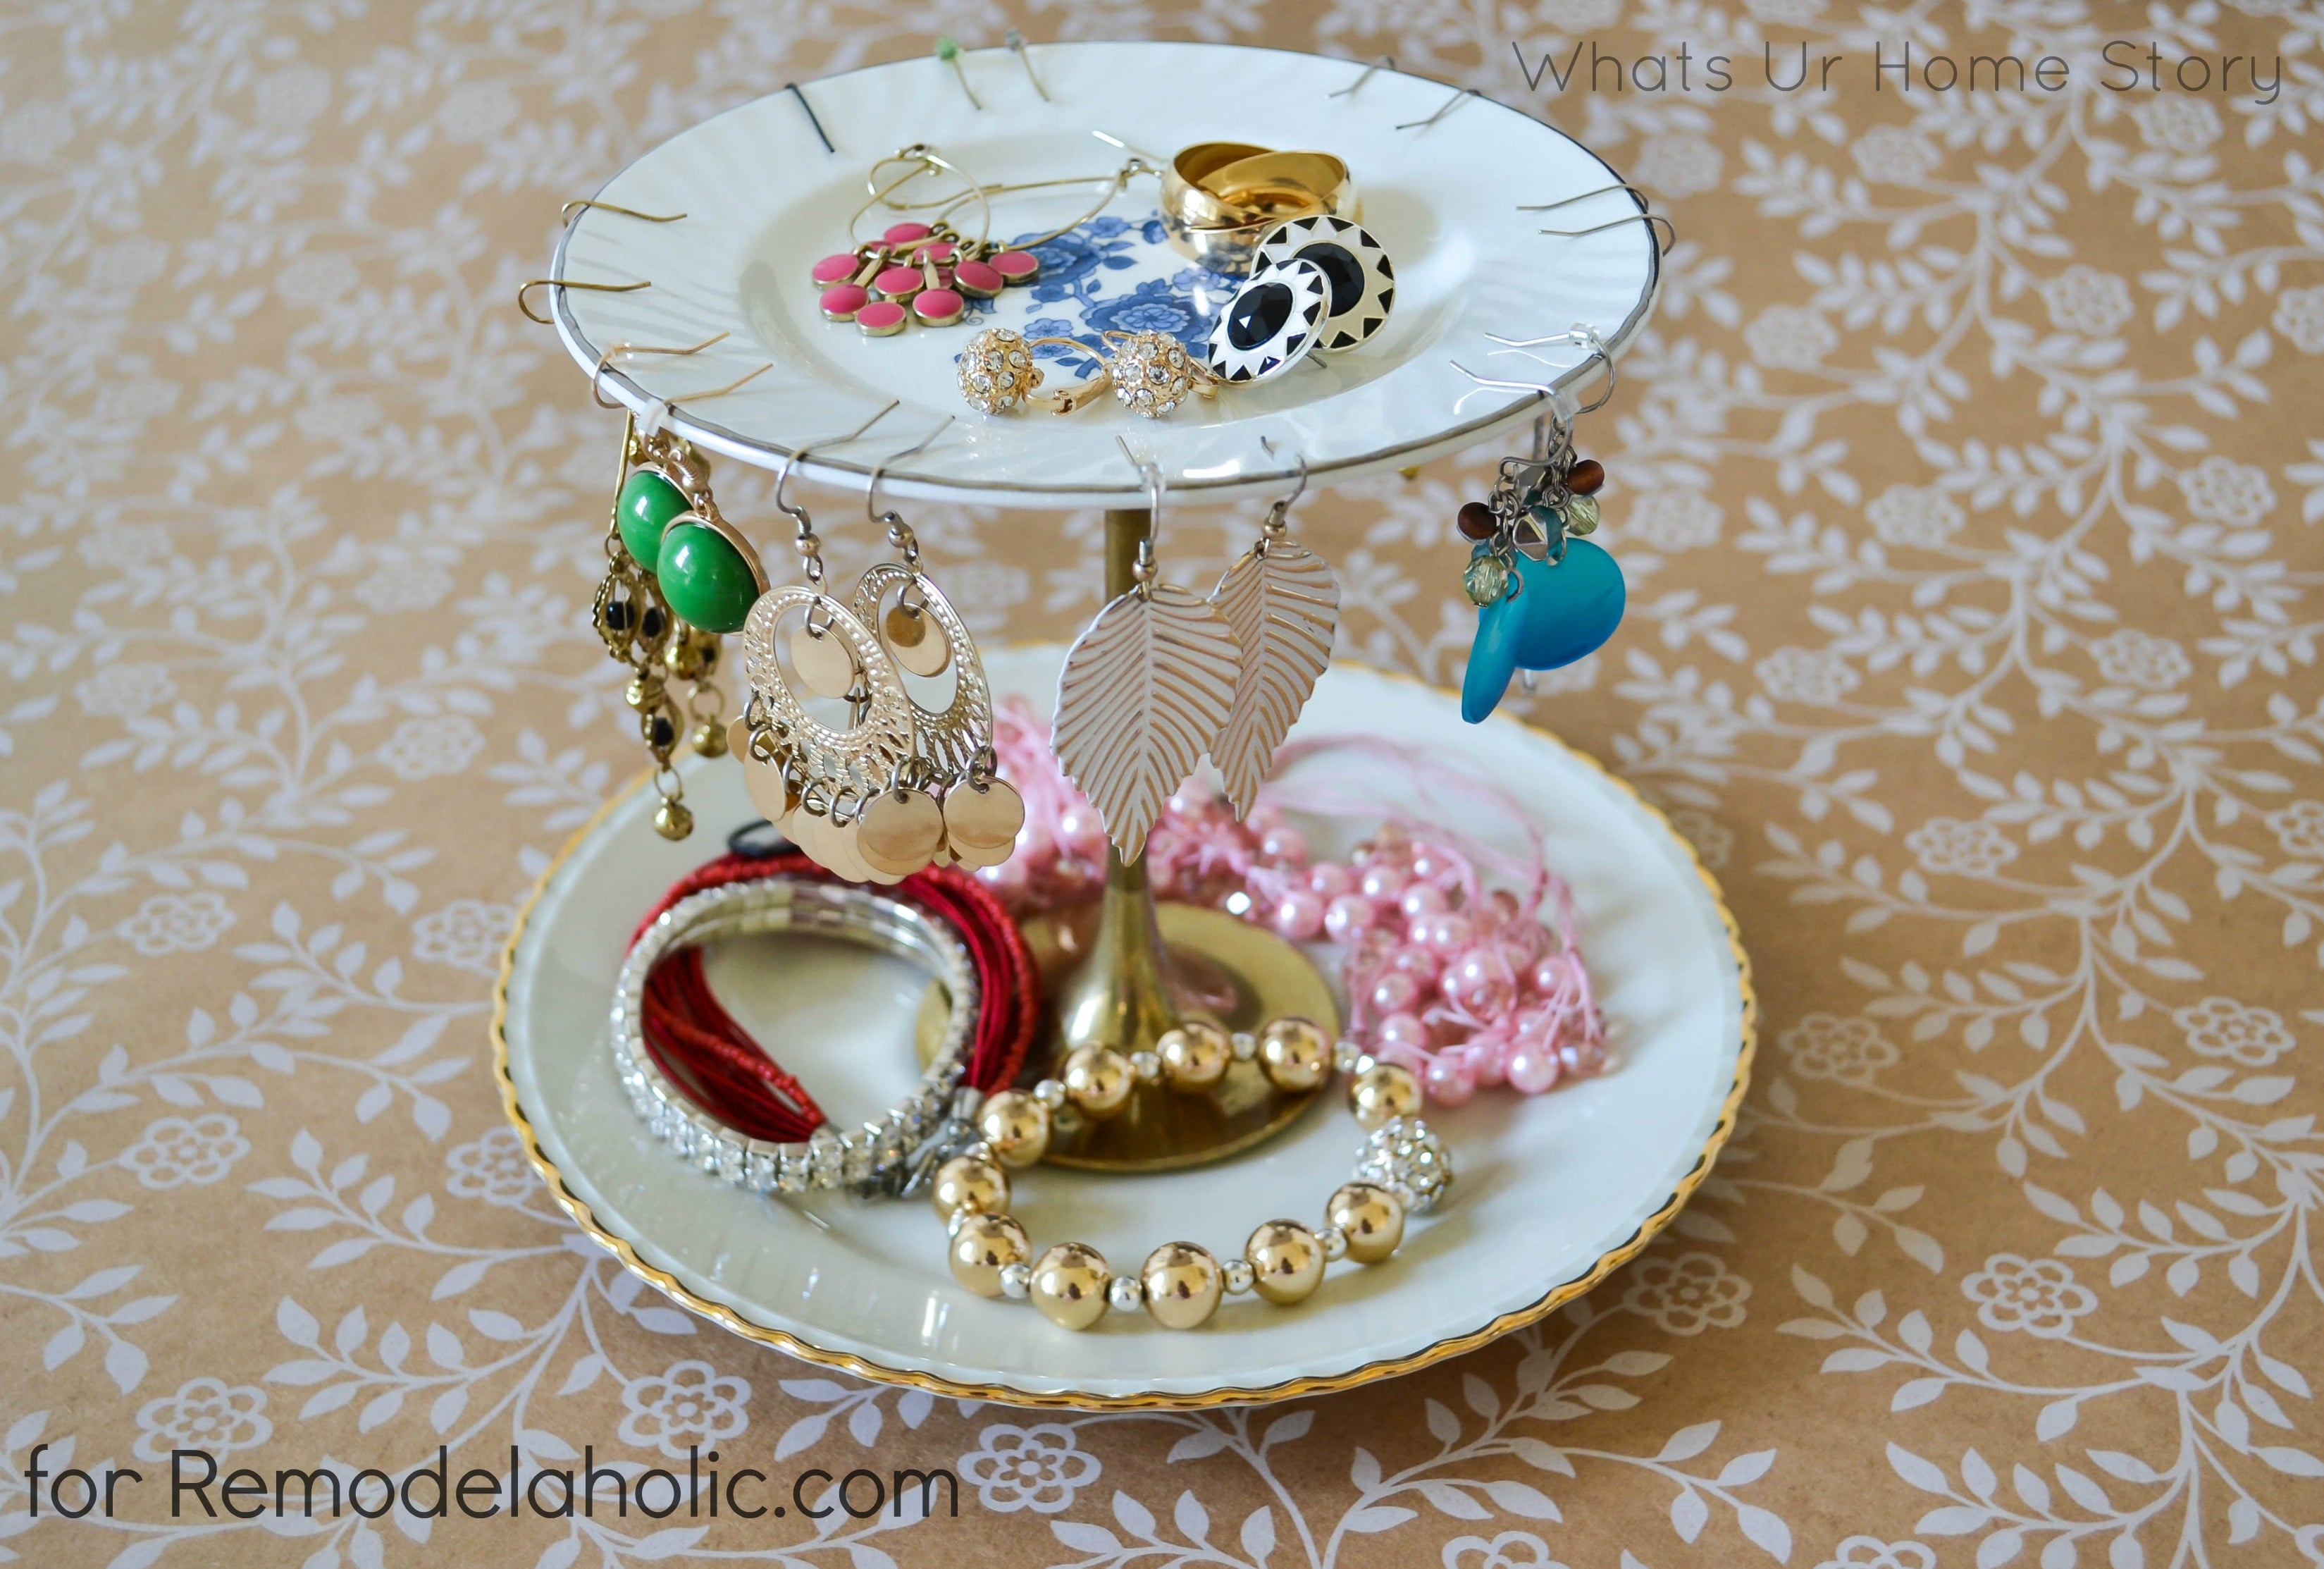
A tiered tray can organize jewelry by category and frequency of use. Place rings and studs on the top tier, bracelets in the middle, and larger accessories on the bottom. You can make a DIY tiered tray using plates and candlesticks or repurpose a serving stand. It works especially well on vanities where jewelry, perfume, and hair clips tend to gather.
16. Magnetic Strip for Metal Accessories
A magnetic strip can hold small metal items such as hairpins, some brooches, and certain earrings. Mount it inside a closet door or near your vanity. Be careful with delicate fine jewelry, gemstones, watches, or anything that could be scratched or affected by magnets. For costume pieces and accessory odds and ends, it can be a clever clutter catcher.
17. Small Jars for Beads, Charms, and Backup Earring Backs
Tiny glass jars are excellent for the small pieces that usually vanish: earring backs, charms, chain extenders, spare clasps, beads, and pins. Label each jar or group them in a small tray. This idea is especially helpful if you make jewelry or repair pieces at home. The jars keep tiny parts from becoming drawer confetti.
18. DIY Necklace Rail With Hooks
Install a narrow wooden rail with screw-in cup hooks to create a simple necklace organizer. Space the hooks far enough apart so chains do not overlap too much. Mount the rail inside a closet, beside a mirror, or above a dresser. This project is beginner-friendly and can be completed with basic tools, paint, hooks, and a little patience.
19. Travel Jewelry Roll
A DIY jewelry roll is a smart project for travel or compact storage. Use fabric scraps, felt, ribbon, and small pockets to create sections for rings, earrings, and necklaces. Add snap closures or ties so everything stays put. This is perfect for weekend trips, weddings, or anyone whose suitcase has ever turned a necklace into modern art.
20. Shoebox Jewelry Drawer With Mini Compartments
Do not underestimate the humble shoebox. Cover it with decorative paper or fabric, then add cardboard dividers to create compartments. Use it inside a drawer or on a closet shelf. A lidded shoebox protects jewelry from dust and gives you a budget-friendly organizer for seasonal pieces, statement necklaces, or accessories you wear less often.
How to Choose the Right DIY Jewelry Organizer
Before you start cutting cardboard or buying hooks with the confidence of a home improvement celebrity, take inventory. Sort jewelry by type: necklaces, bracelets, rings, studs, hoops, watches, brooches, and sentimental pieces. Then sort again by how often you wear each item. Everyday jewelry should be the easiest to reach. Special-occasion jewelry can live in a drawer, box, or cabinet.
Think about visibility. Some people wear more of what they can see, making wall-mounted organizers ideal. Others dislike visual clutter and prefer drawer dividers or closed boxes. Both approaches are valid. The right jewelry storage solution is the one that reduces friction. If putting away earrings requires opening three lids and solving a puzzle, you will eventually abandon the system and return to the ancient method known as “pile on dresser.”
Also consider materials. Fine jewelry benefits from soft, lined compartments and separate storage to avoid scratches. Silver pieces may need anti-tarnish strips or pouches. Costume jewelry should not be crushed under heavier items. Avoid storing most jewelry in humid areas, especially bathrooms, because moisture can encourage tarnish and damage some finishes. A bedroom drawer, closet shelf, or vanity is usually a safer choice.
Best Materials for Homemade Jewelry Organizers
You can make an effective jewelry organizer from materials you already own. Frames, cork boards, pegboards, hooks, ribbons, teacups, trays, small bowls, cardboard, fabric scraps, jars, dowels, and drawer liners are all useful. For a polished look, choose a consistent color palette. For example, use gold hooks with a white frame, natural wood with linen fabric, or matte black hardware with a dark-stained rail.
Adhesive hooks are great for renters, but check the weight limit before hanging heavy statement necklaces. Screw-in hooks are more secure for permanent displays. Felt, velvet, microfiber cloth, and soft drawer liners help protect delicate pieces. Clear containers work well for visibility, while lidded boxes are better for dust protection.
Common Jewelry Organization Mistakes to Avoid
The first mistake is mixing everything together. Necklaces and bracelets are not friendly roommates. Chains tangle, pendants scratch, and delicate pieces lose the fight against chunky cuffs. Give each type of jewelry its own zone.
The second mistake is building a system for an imaginary version of yourself. If you are not a person who carefully winds necklaces into tiny envelopes after every wear, do not design a system that requires that. Use hooks. Use trays. Make the reset easy.
The third mistake is forgetting about growth. Leave a little empty space in your organizer. Jewelry collections tend to expand through birthdays, sales, travel souvenirs, and mysterious “I deserve this” moments. A little breathing room keeps the system from collapsing after one new pair of earrings.
Personal Experience: What Actually Works in Real Life
After trying more jewelry organization methods than I care to admit, the biggest lesson is simple: the best DIY jewelry organizer is usually the least fussy one. I once had a beautiful little jewelry box with tiny drawers and a mirror. It looked elegant. It also became a tiny museum of things I never wore because opening each drawer felt like too much effort when I was rushing out the door. Pretty, yes. Practical, not quite.
The system that worked better was a combination approach. Everyday earrings went into a small dish near the mirror. Rings lived in a clay tray on the nightstand. Necklaces hung on hooks inside the closet door, sorted roughly by length. Bracelets went on a wooden dowel stand. Nothing was complicated, which is exactly why it worked. The easier it was to put jewelry away, the less likely it was to end up scattered across the dresser like shiny breadcrumbs.
Another helpful experience: wall organizers are wonderful, but only if you do not overload them. A framed earring holder looks charming when earrings have space around them. Add too many pairs, and suddenly it looks like a craft fair had a stressful morning. The same goes for necklace hooks. If five necklaces share one hook, they will tangle. Use more hooks than you think you need, and leave space between longer pieces.
Drawer organizers are better for people who dislike visual clutter. If your bedroom already has patterns, books, candles, plants, laundry, and three water glasses you insist are all “current,” a wall full of jewelry may feel overwhelming. In that case, a felt-lined drawer tray or repurposed cutlery organizer keeps everything calm and hidden. The trick is to make the drawer shallow enough that you can see everything at once. Deep bins invite chaos.
Travel jewelry storage deserves special attention. Throwing jewelry into a pouch seems harmless until you arrive at your destination with a necklace knot that requires tweezers, prayer, and emotional support. A jewelry roll with separate sections is worth making. Even a simple piece of felt with ribbons for rings, a strip for earrings, and a few small pockets can save time. For necklaces, threading each chain through a straw or wrapping it in tissue before placing it in the roll can help prevent tangles.
The most satisfying DIY jewelry organizer projects are the ones that reuse objects with personality. A vintage saucer from a thrift store, a frame from the back of a closet, a piece of wood from a weekend project, or a shoebox covered in pretty paper can become storage that feels personal. Organization does not have to look sterile. It can look warm, collected, and a little imperfect.
Finally, maintenance matters more than the organizer itself. Once a month, take five minutes to return pieces to their proper homes, remove broken items, polish what needs attention, and decide whether you still wear everything. A jewelry organizer is not a magical force field against clutter. It is more like a polite assistant. It will help, but you still have to hand it the earrings.
Conclusion
DIY jewelry organizer ideas can transform a messy collection into a system that is beautiful, affordable, and easy to maintain. Whether you choose a framed earring holder, pegboard jewelry wall, drawer divider tray, driftwood necklace hanger, clay ring dish, or repurposed shoebox organizer, the goal is the same: protect your pieces, make them easy to find, and help you enjoy what you already own.
Start with your habits, not a fantasy version of your habits. Keep everyday jewelry visible and reachable. Store delicate pieces separately. Avoid humid locations. Leave space for new favorites. Most importantly, choose an organizer that makes putting jewelry away feel simple. When every necklace, ring, bracelet, and earring has a home, getting dressed becomes faster, calmer, and a lot less like a treasure hunt conducted under poor lighting.
Note: This article is original, written in standard American English, and designed for web publishing. It synthesizes practical DIY jewelry storage principles, home organization strategies, and real-world usage experience without copying source text.

