Skincare
Upcycle Glass Bottle Vase
Jun
Note: This publish-ready article is based on practical DIY, home décor, cleaning, recycling, and upcycling guidance commonly recommended by reputable U.S. home, lifestyle, and environmental sources. No external source links are included in the article body.
Somewhere in your recycling bin, a glass bottle is waiting for its second act. Not a dramatic Hollywood comeback, exactly, but close: one minute it held sparkling water, olive oil, kombucha, or a very respectable pasta sauce; the next, it becomes a stylish upcycled glass bottle vase that looks like it came from a boutique where the candles cost more than dinner.
The beauty of an upcycle glass bottle vase is that it checks every box: budget-friendly, beginner-friendly, eco-conscious, and surprisingly elegant. You do not need a full craft room, a garage full of tools, or a mysterious drawer labeled “special adhesives.” With a clean bottle, a few basic supplies, and a small amount of patience, you can create a decorative vase for fresh flowers, dried stems, kitchen herbs, party centerpieces, wedding tables, shelves, mantels, or that one lonely windowsill that has been emotionally neglected.
Upcycling is different from simply recycling. Recycling sends material into a system where it may be processed into something new. Upcycling gives an item a new purpose right at home, often making it more useful, more personal, and more beautiful than it was before. In the case of glass bottles, the raw material already has strong design potential: elegant necks, colored glass, sculptural shapes, sturdy bases, and labels that can either be removed or embraced for a vintage look.
This guide walks you through how to make an upcycled glass bottle vase from start to finish, including cleaning, label removal, paint options, decorating ideas, styling tips, safety notes, and real-world experience from the messy-but-satisfying world of DIY bottle crafts.
Why Make an Upcycled Glass Bottle Vase?
Let’s be honest: buying a vase is easy. But making one from a glass bottle is more fun, more affordable, and far less likely to result in you whispering, “Why did I spend $42 on a cylinder?”
Glass bottles are excellent for DIY home décor because they are durable, washable, and available in endless shapes. Tall wine-style bottles work well for single branches and long-stem flowers. Short sauce bottles are perfect for small bouquets. Narrow-neck bottles are ideal for bud vases because they hold one or two stems upright without needing floral foam. Colored bottles, especially amber, green, cobalt, or smoky glass, add instant character even before you decorate them.
Upcycling glass bottles also supports a low-waste lifestyle. Instead of treating bottles as disposable, you extend their usefulness. A single bottle can become a vase, candle holder, table number display, propagation vessel, dried flower arrangement, seasonal centerpiece, or handmade gift. That is a pretty impressive career change for something that previously held salad dressing.
Best Bottles to Use for DIY Vases
Not every bottle deserves a starring role, but many do. The best glass bottles for vases are stable, cleanable, and visually interesting. Look for bottles with a flat bottom, a smooth rim, and enough weight to stand securely when filled with water and flowers.
Great Bottle Choices
Wine-style bottles are classic for long stems, branches, pampas grass, eucalyptus, and minimalist arrangements. Sparkling water bottles often have elegant silhouettes and clear glass that works beautifully with painted or etched designs. Olive oil bottles can be tall and narrow, making them great for modern kitchen décor. Small juice bottles, coffee bottles, and sauce bottles are perfect for bud vases, bathroom flowers, or grouped centerpieces.
Before choosing a bottle, imagine where it will live. A tall bottle may look great on a dining table but awkward on a low shelf. A tiny bottle might disappear on a mantel unless grouped with several others. For the best visual impact, collect three to five bottles in different heights and shapes. Odd-numbered groupings usually look more natural and less like your vases are standing in formation for a school photo.
Materials You’ll Need
You can make a beautiful upcycled glass bottle vase with very basic materials. Start simple, then upgrade depending on the look you want.
Basic Supplies
- Empty glass bottle
- Dish soap and warm water
- Baking soda or white vinegar for stubborn residue
- Sponge, bottle brush, or soft cloth
- Plastic scraper or old card for label removal
- Rubbing alcohol for final surface cleaning
- Newspaper, cardboard, or drop cloth
Decorating Supplies
- Glass-safe spray paint or acrylic craft paint
- Chalk paint for a matte farmhouse finish
- Twine, jute, yarn, raffia, or macramé cord
- Hot glue, craft glue, or strong glass adhesive
- Painter’s tape for stripes or geometric patterns
- Decoupage glue and paper napkins, tissue paper, or fabric scraps
- Copper tape, lace, ribbon, beads, or charms
- Clear sealant if the vase will be handled often
You do not need all of these. In fact, please do not buy 27 supplies for one bottle unless your true hobby is collecting craft supplies and pretending it is “inventory.” A clean bottle, paint, and twine can be enough.
How to Clean and Prepare the Bottle
Good prep is the difference between a vase that looks polished and one that looks like it escaped from a recycling bin wearing a ribbon. Start by washing the bottle inside and out with warm water and dish soap. If it held oil, sauce, syrup, or anything fragrant, let it soak with hot water and a little dish soap for at least 30 minutes.
To remove labels, soak the bottle in warm water. Many labels loosen after 20 to 60 minutes. Use a plastic scraper, old credit card, or your fingernail to lift the paper. For sticky adhesive residue, rub the area with baking soda paste, cooking oil, or a commercial adhesive remover, then wash again thoroughly.
Once the bottle is clean and dry, wipe the outside with rubbing alcohol. This removes oils from your hands and helps paint or glue stick better. Let it dry completely before decorating. Moisture is the enemy of a smooth finish, and it will absolutely show up uninvited like glitter at a children’s party.
Easy Upcycle Glass Bottle Vase Ideas
There are dozens of ways to transform a plain glass bottle into a vase. The best method depends on your style: modern, rustic, coastal, boho, farmhouse, vintage, minimalist, colorful, or “I found this on Pinterest at midnight and became unstoppable.”
1. Painted Glass Bottle Vase
Painting is one of the fastest ways to change the look of a bottle. For a smooth modern vase, use spray paint made for glass. Apply several light coats instead of one heavy coat. Heavy paint tends to drip, and drips are only charming when they are intentional, which they rarely are.
Matte white, black, cream, sage green, terracotta, dusty blue, and soft beige are popular colors for home décor because they work with many interiors. Glossy paint creates a ceramic-like look, while chalk paint gives a soft, handmade finish. For a high-end effect, paint several bottles in the same color but use different heights and shapes.
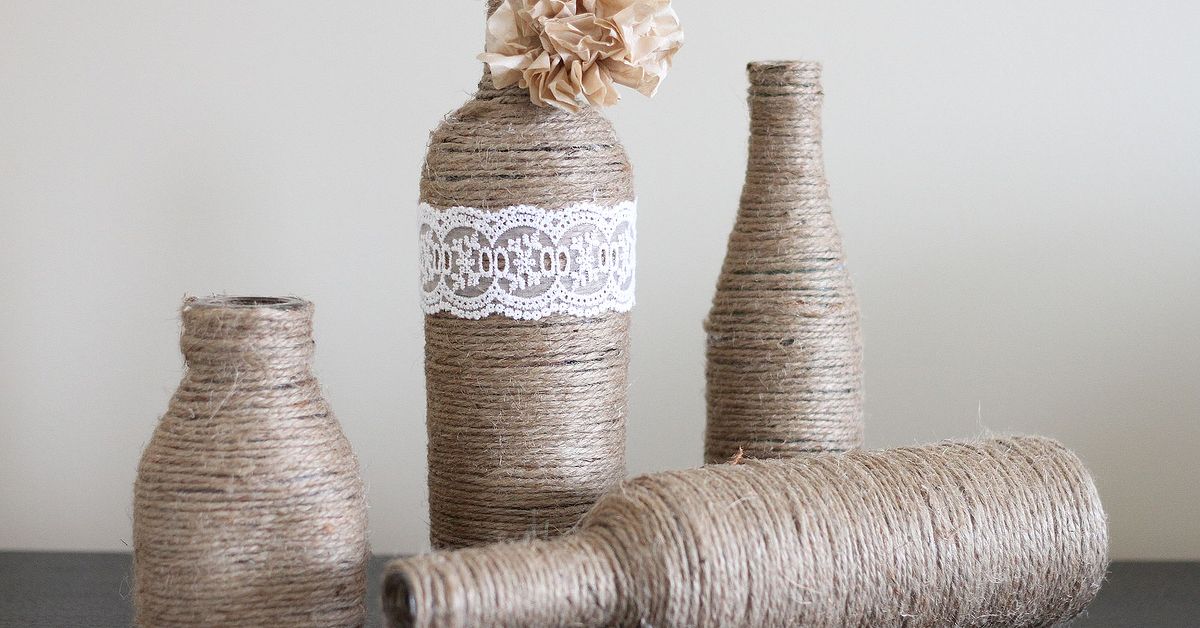
2. Twine-Wrapped Bottle Vase
A twine-wrapped glass bottle vase is ideal for farmhouse, coastal, rustic, or boho décor. Start at the bottom of the bottle and secure the end of the twine with hot glue. Wrap tightly around the bottle, adding small dots of glue as you go. Keep the rows close together for full coverage, or leave some glass exposed for a lighter look.
Natural jute twine gives a casual organic feel. White cotton cord looks coastal. Macramé cord adds texture. Colored yarn makes the project playful and kid-friendly. Just remember: the closer you get to the bottle’s curved shoulder, the more the twine will try to rebel. Use extra glue and slow down around curves.
3. Frosted Glass Bottle Vase
Frosted glass creates a soft, elegant finish that works beautifully for weddings, winter décor, bathrooms, and minimalist spaces. Use frosted glass spray paint and apply it in thin coats. Clear bottles work best because they allow light to pass through after frosting.
For a simple design, wrap painter’s tape around the bottle before spraying. Remove the tape after the paint dries to reveal clear stripes. You can also use sticker letters, dots, or shapes as temporary masks. The result looks delicate and expensive, even if the bottle once contained discount lemonade.
4. Decoupage Bottle Vase
Decoupage is perfect if you love pattern, color, and a slightly artsy finish. Use thin paper, decorative napkins, tissue paper, book pages, maps, or fabric scraps. Brush decoupage glue onto the bottle, press the paper gently into place, and seal with another thin layer of glue.
Floral napkins create a romantic cottage-style vase. Old book pages feel literary and vintage. Maps work well for travel-themed décor. Tissue paper can create a watercolor-like effect. Work slowly and smooth out wrinkles, but do not panic if a few remain. Handmade texture is part of the charm, and also a convenient excuse.
5. Minimal Clear Bottle Vase
Sometimes the best design choice is doing almost nothing. Clear glass bottles can look beautiful when cleaned thoroughly and styled with simple stems. Remove the label, polish the glass, fill with water, and add a single flower, eucalyptus branch, rosemary stem, or dried grass.
This approach works especially well with bottles that already have a graceful shape. Group three clear bottles together for a casual centerpiece. Add pebbles, glass beads, or a small amount of colored water for extra detail. Minimalist décor does not mean boring; it means the bottle is confident enough to skip accessories.
Step-by-Step: Make a Simple Painted Bottle Vase
This beginner-friendly version gives you a clean, stylish vase with very little effort.
Step 1: Choose and Clean the Bottle
Select a bottle with a stable base and a shape you like. Remove the label, wash thoroughly, and let it dry completely. Wipe the outside with rubbing alcohol before painting.
Step 2: Protect Your Work Area
Work outdoors or in a well-ventilated area if using spray paint. Place the bottle on cardboard or newspaper. Wear gloves if you want to avoid paint freckles on your fingers.
Step 3: Apply Light Coats of Paint
Hold the spray can at the recommended distance on the label and apply a thin coat. Let it dry, then apply another coat. Rotate the bottle as needed. Two to four light coats usually look better than one thick coat.
Step 4: Add Decorative Details
Once the paint is fully dry, add twine around the neck, a ribbon near the base, small dots of metallic paint, or a simple charm. Keep the design balanced. If the bottle already has a strong shape, a small accent may be enough.
Step 5: Style With Flowers
Add water only after the paint and glue are fully cured. Use fresh flowers, dried stems, faux greenery, or seasonal branches. For narrow bottles, one to three stems often look best.
Flower and Stem Ideas for Glass Bottle Vases
The narrow opening of many glass bottles makes them perfect for simple floral arrangements. You do not need a professional bouquet. In fact, bottle vases often look better with fewer stems.
Try one sunflower in a tall amber bottle for a cheerful kitchen display. Use eucalyptus in a clear bottle for a spa-like bathroom touch. Place dried lavender in a frosted bottle for a soft bedroom accent. Add baby’s breath to several small bottles for wedding or party centerpieces. Use rosemary, basil flowers, or mint sprigs in tiny bottles for a fresh kitchen windowsill arrangement.
For fall, use wheat, dried grasses, branches, or preserved leaves. For winter, try evergreen sprigs, white berries, or bare branches. For spring, use tulips, daffodils, or small wildflowers. For summer, go bright with zinnias, daisies, cosmos, or whatever survived your garden after the squirrels held their annual buffet.
Where to Use Upcycled Bottle Vases
An upcycled glass bottle vase can work almost anywhere. On a dining table, a row of matching bottles creates an easy centerpiece that does not block conversation. On a mantel, bottles in varied heights add rhythm and texture. On a bathroom shelf, a small bottle with eucalyptus or dried flowers gives the room a spa-like detail without requiring a spa-like budget.
For parties, bottle vases are practical and inexpensive. Use them for wedding tables, baby showers, bridal showers, backyard dinners, birthday parties, or holiday gatherings. You can paint them to match the color scheme, wrap them in ribbon, or add table numbers with tags tied around the neck.
In a home office, a small bottle with one flower can soften the desk area. In the kitchen, herb stems in glass bottles feel fresh and useful. On a porch or patio, heavier bottles can hold dried grasses or faux stems, though painted bottles should be protected from harsh weather unless sealed properly.
Safety Tips for Upcycling Glass Bottles
Glass is beautiful, but it deserves respect. Always inspect bottles for cracks or chips before using them. Do not use damaged glass as a vase, especially around children, pets, or busy table settings. If the rim is sharp or uneven, choose another bottle.
If you plan to cut glass bottles, use proper glass-cutting tools, eye protection, gloves, and careful sanding. Bottle cutting is a more advanced project and is not necessary for making a vase. For most people, the safest and easiest option is to use the bottle as-is.
When using spray paint, sealants, or strong adhesives, work in a ventilated area and follow product directions. Let painted bottles cure fully before adding water or flowers. If you decorate the outside with paper, yarn, or fabric, avoid soaking the bottle in water during future cleaning. Instead, wipe gently with a damp cloth.
Common Mistakes to Avoid
The first mistake is rushing the cleaning step. Paint and glue do not bond well to leftover label adhesive, oil, or dust. If your design peels, bubbles, or slides around, the bottle probably was not clean enough.
The second mistake is using too much paint at once. Thick paint causes drips, uneven texture, and long drying times. Multiple thin coats create a smoother finish.
The third mistake is overdecorating. A bottle can quickly go from charming to “craft store explosion.” Choose one main finish, such as paint, twine, frost, or decoupage, then add small accents if needed.
The fourth mistake is ignoring proportion. A tiny bottle with giant flowers may tip over. A tall bottle with short stems may look awkward. Match the flowers to the vase height and neck width for a balanced arrangement.
Creative Variations for Every Style
Modern Style
Use matte black, white, taupe, or clay-colored paint. Keep the design simple and pair with sculptural branches or a single dramatic stem.
Farmhouse Style
Paint the bottle white or cream, lightly distress the surface, and wrap the neck with jute twine. Add cotton stems, lavender, or wildflowers.
Coastal Style
Use sea-glass colors, white cotton cord, shells, or rope. Fill with dried grasses or airy white flowers.
Boho Style
Wrap the bottle with macramé cord, add beads, or use warm earthy paint colors. Style with pampas grass, bunny tails, or dried palms.
Vintage Style
Keep old labels if they are attractive, or use decoupage with book pages, floral paper, or antique-style prints. Add lace or velvet ribbon for extra charm.
Experience Notes: What Making Upcycled Glass Bottle Vases Teaches You
After making a few upcycled glass bottle vases, you start seeing bottles differently. A plain condiment bottle no longer looks like trash; it looks like “potential.” A pretty beverage bottle becomes “future mantel décor.” A tiny jar becomes “bud vase energy.” This is how the craft brain works. It is mostly harmless, though your recycling bin may begin to feel personally judged.
One of the biggest lessons is that preparation matters more than fancy materials. The first time many people try this project, they focus on paint colors, ribbon, or flowers, then discover that a stubborn label patch ruins the finish. Taking extra time to remove adhesive, wash the bottle, and dry it completely makes the finished vase look cleaner and more professional. It is not glamorous, but neither is sanding drywall, and somehow entire home renovation shows are built on that.
Another experience-based tip: collect bottles gradually. Do not force yourself to use every bottle immediately. Some shapes are simply better than others. Tall narrow bottles are elegant, but they can tip if the flowers are too heavy. Short wide bottles are stable, but they may need fuller arrangements. Small bottles are adorable in groups but underwhelming alone. Once you have several sizes, styling becomes much easier.
Paint testing is also worth the effort. Different glass surfaces react differently depending on texture, coating, and cleanliness. A quick test on the back or bottom of the bottle helps you see whether the paint covers evenly. Matte spray paint often gives the most modern look, while chalk paint creates a softer handmade finish. Metallic paint can look chic in small amounts, but if you cover everything in gold, the vase may start auditioning for a holiday parade.
Twine wrapping is simple, but it rewards patience. If you wrap too loosely, gaps appear. If you use too much glue, lumps show. Start at the bottom, keep steady tension, and rotate the bottle slowly. A small dot of hot glue every few rows is usually enough. Around the neck and shoulder, go slower because the curve naturally pushes the twine out of place. This is the part where the bottle tests your character.
Fresh flowers are not the only option. Dried arrangements often work better for decorated bottles because they do not require frequent water changes. Pampas grass, dried lavender, wheat, eucalyptus, and preserved flowers can last for months. If you use fresh flowers, keep water levels low enough that the outside decorations do not get soaked. For paper, twine, or fabric-covered bottles, avoid placing them where splashing is likely.
One surprisingly useful trick is making a “vase set” instead of a single vase. Three recycled bottles painted the same color instantly look intentional, even if they started life as three unrelated containers. Use different heights for dimension. Place them on a tray, wooden board, or runner, and add simple stems. This works beautifully for dining tables, entry consoles, bathroom counters, and party centerpieces.
Another lesson: imperfections often make the piece better. A tiny wrinkle in decoupage, a bit of uneven texture in chalk paint, or a slightly rustic twine wrap can make the vase feel handmade rather than factory-perfect. The goal is not to create something that looks mass-produced. The goal is to create something personal, useful, and attractive from an item that might otherwise be discarded.
Upcycled glass bottle vases also make thoughtful gifts. Fill one with flowers from the garden, dried lavender, or a handwritten tag. For housewarmings, use neutral colors. For birthdays, choose bright paint or patterned paper. For holidays, add seasonal ribbon or greenery. The gift feels personal without being expensive, which is the sweet spot between “I care” and “I did not panic-buy this in a checkout line.”
Most importantly, this project teaches creative confidence. Once you turn one bottle into a vase, you may start experimenting with jars, candle containers, cans, thrifted vessels, and old ceramics. That is the real value of upcycling: it changes how you see everyday objects. Instead of asking, “Should I throw this away?” you begin asking, “What else could this become?” Sometimes the answer is a vase. Sometimes it is storage. Sometimes it is still trash, and that is okay too. Not every bottle is destined for greatness. But the good ones? They deserve flowers.
Conclusion
An upcycle glass bottle vase is one of the easiest ways to create beautiful DIY home décor without spending much money or sending useful materials straight to the bin. With a clean bottle, a thoughtful finish, and the right flowers or dried stems, you can turn ordinary glass into a stylish accent for nearly any room.
Whether you love painted vases, twine-wrapped farmhouse décor, frosted glass, decoupage patterns, or minimalist clear bottles, the project is flexible enough for beginners and creative enough for experienced crafters. Start with one bottle, keep the design simple, and let the shape guide you. Before long, you may find yourself admiring empty bottles at the grocery store like they are tiny architectural masterpieces. That is when you know the upcycling spirit has officially moved in.
