Beauty Unlocked
3 Ways to Make Origami Paper Claws
Jun
Origami paper claws are one of those crafts that look suspiciously powerful for something made from a humble sheet of paper. One minute, you have printer paper. Five minutes later, you have dramatic dragon fingers, wolf claws, monster nails, or the perfect accessory for a last-minute Halloween costume. No glue. No scissors. No advanced wizard license required.
This guide explains 3 ways to make origami paper claws, from a classic beginner-friendly finger claw to a longer costume-style claw and a stronger folded version that holds its shape better during play. These methods are simple enough for kids with supervision, fun enough for teens, and oddly satisfying for adults who claim they are “just helping” but then make ten claws for both hands.
The main idea is simple: fold paper into a tapered triangular pocket that slips over your fingertip. The magic is in the crease lines. Sharp folds create structure, while the final tuck locks the claw together. Use regular printer paper, construction paper, lightweight cardstock, or colored origami paper depending on how dramatic you want your claws to be.
Before You Start: Materials and Safety Tips
For all three methods, you only need paper and a flat surface. A table works best because clean creases make cleaner claws. You can also use a ruler or bone folder to press folds, but your fingernail works fine too. Origami is delightfully low-budget, which is excellent news if your craft drawer currently contains three dried markers and one mysterious button.
Best Paper for Origami Claws
The easiest paper to use is standard letter-size printer paper, especially for beginners. It folds cleanly, is easy to find, and creates a claw that fits most fingers. For smaller hands, cut the paper in half or use 6-inch square origami paper. For larger claws, use full-size letter paper or thin cardstock.
Avoid paper that is too thick at first. Heavy cardstock can fight back like it has personal issues. Thin paper is easier to fold, but it may collapse faster. A medium-weight sheet gives the best balance between flexibility and strength.
Safety First, Because Paper Claws Still Have Points
Paper claws are toys, not weapons. Do not poke anyone near the eyes, face, pets, or furniture that belongs to someone who pays rent. If children are making these claws, an adult should supervise the folding and play. The tips are made of paper, but they can still scratch. Keep the drama theatrical, not medical.
Way 1: Classic Origami Paper Claws
This is the most popular version of paper finger claws. It is fast, easy, and perfect for beginners. If you want a full set of monster claws, make one claw per finger. For maximum effect, use black, red, green, silver, or bright neon paper. Nothing says “craft table chaos” like ten glowing goblin fingers.
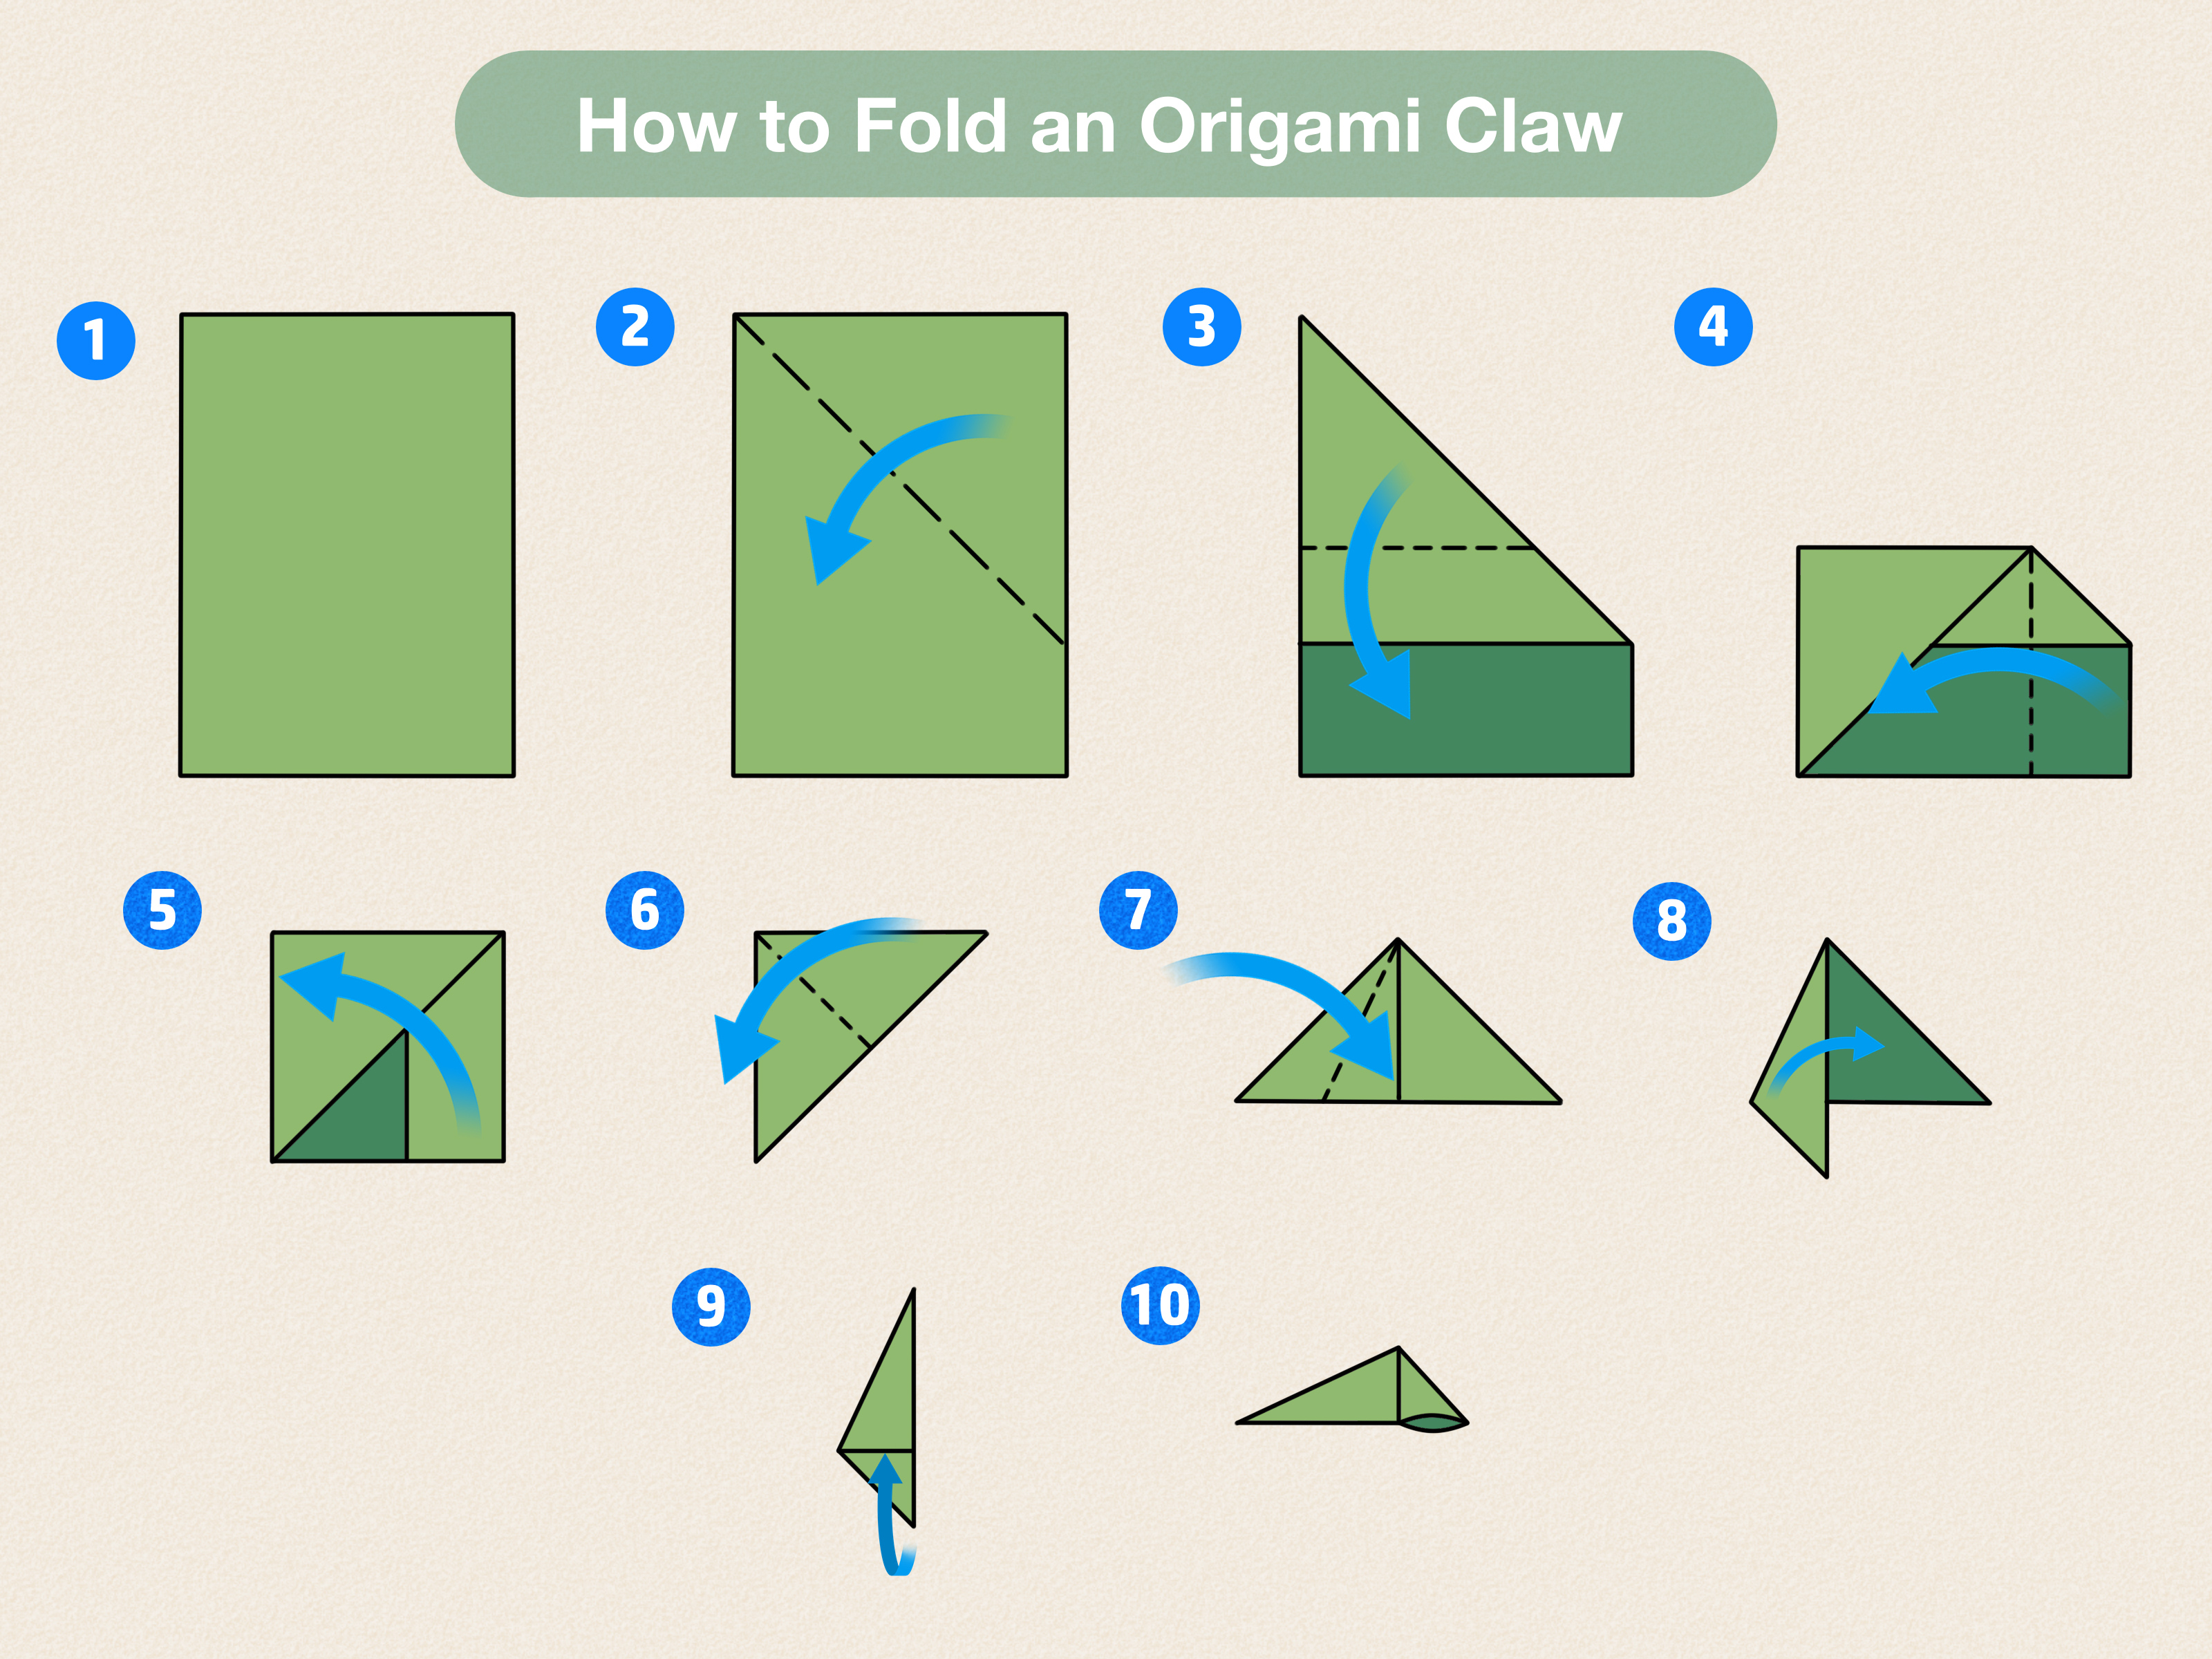
Step 1: Place the Paper Vertically
Start with one rectangular sheet of paper. Place it on the table in portrait position, with the short edges at the top and bottom. Smooth it flat so the corners line up neatly. The cleaner your starting position, the less your claw will look like it survived a tiny tornado.
Step 2: Fold the Top Right Corner Down
Take the top right corner and fold it diagonally toward the left side of the paper. The top edge should line up with the left edge, forming a triangle at the top. Press the crease firmly. This first diagonal fold begins the pointed claw shape.
Step 3: Fold the Top Left Corner Down
Now fold the top left corner diagonally toward the right side. You should see a pointed top forming. Crease it well. At this stage, the paper should look like it is politely auditioning to become a wizard hat.
Step 4: Fold the Bottom Section Up
Bring the lower rectangular portion upward so it meets the base of the triangle. Press the fold. This step converts the loose rectangle into a more compact shape and prepares the paper for the final wrap.
Step 5: Fold One Side Across the Center
Take the right side and fold it toward the center, following the angle of the triangle. Crease firmly. Then fold the left side over the top, wrapping it around the shape. You are building the body of the claw, so keep the edges aligned.
Step 6: Tuck the Loose Flap
Find the small pocket created by the folds and tuck the loose flap inside. This locks the claw together without tape or glue. Press everything flat, then gently open the base so your finger can slide inside.
How to Wear the Classic Claw
Slip your fingertip into the pocket at the wide end. The pointed end should extend beyond your finger like a paper talon. If it feels too loose, pinch the sides slightly. If it feels too tight, open the pocket gently and try again. Origami is patient. Paper is patient. Your fingers, however, may have opinions.
Way 2: Long Origami Paper Claws for Costumes
The long claw method is ideal for Halloween costumes, dragon hands, werewolf paws, witch fingers, superhero props, and general living-room villain behavior. These claws are longer and more dramatic than the classic version, but they are still made with a single sheet of paper.
Step 1: Use a Full Sheet of Printer Paper
Start with a full letter-size sheet. For extra-long claws, you can use legal-size paper or lightweight craft paper, but standard printer paper is easier to control. Place it vertically on your work surface.
Step 2: Make a Long Diagonal Fold
Fold the top right corner down toward the opposite side, creating a long diagonal edge. Press the crease firmly from the point down to the base. This fold determines the length and angle of the finished claw, so take your time.
Step 3: Fold the Opposite Side Inward
Bring the top left area inward so the paper begins forming a narrow triangle. You want the shape to become longer and slimmer than the classic claw. Think “elegant dragon,” not “crumpled grocery receipt.”
Step 4: Fold the Bottom Edge Up
Fold the lower rectangular section upward to create a cleaner triangular form. Press the crease hard. A strong crease helps the long claw stay pointed instead of flopping around like a sleepy paper noodle.
Step 5: Wrap the Sides Around
Fold one side across the center, then wrap the other side over it. The shape should narrow as you fold. Keep the tip sharp and the base wide enough to fit over a finger. This is the moment when the claw starts looking impressively dramatic.
Step 6: Lock the Flap Into the Pocket
Tuck the final flap into the pocket created by the folds. Flatten the claw, sharpen the tip with your fingers, and gently open the base. Try it on. If it points slightly sideways, congratulationsyou have invented the suspicious goblin edition. Refold with tighter alignment for a straighter claw.
Best Uses for Long Paper Claws
Long origami claws are excellent for costumes and photo props. They work especially well with black gloves because the paper pocket can slide over each fingertip while the glove helps hold everything in place. For a dragon costume, use green or metallic paper. For a werewolf look, brown, gray, or black paper works well. For a spooky witch costume, try purple or dark red paper and exaggerate the point.
Way 3: Stronger Origami Paper Claws That Hold Their Shape
The third method focuses on durability. These claws are not invinciblelet’s not ask paper to do the job of steelbut they are sturdier than basic versions. The secret is sharper creases, layered folds, and slightly thicker paper.
Step 1: Choose Better Paper
Use construction paper, thin cardstock, or heavier printer paper. If the paper is too stiff, folding becomes difficult. If it is too thin, the claw may bend quickly. A medium-weight paper gives structure without turning the project into a wrestling match.
Step 2: Fold a Precise Triangle
Begin as you would with the classic claw: fold the top corner diagonally to create a triangle. Line up the edges carefully and press the crease. Then fold the opposite corner down so the top becomes a strong point.
Step 3: Reinforce the Center Fold
Fold the body of the paper toward the center, then unfold and crease again. This repeated crease creates a stronger guide line. It also helps the claw keep its tapered shape. Do not rush this step. Origami rewards careful folding the way cats reward patience: occasionally, but gloriously.
Step 4: Wrap Tightly
Fold one side over the center and press hard. Fold the other side around it tightly. The tighter the wrap, the stronger the claw. Make sure the base is not sealed shut, because your finger still needs somewhere to go. A claw without a finger pocket is just a tiny paper traffic cone.
Step 5: Tuck Deeply
Push the final flap deep into the pocket. Press the locked area flat. If the flap keeps slipping out, your folds may be too loose, or the paper may be too slippery. Try textured paper or make the final fold slightly sharper.
Step 6: Shape the Finger Pocket
Open the base carefully. Use your finger to round the pocket slightly. Do not pull too hard or you may loosen the tucked flap. The finished claw should feel snug, pointed, and more stable than the lightweight version.
Helpful Tips for Better Origami Paper Claws
Make Every Crease Sharp
Sharp creases are the difference between a fierce paper claw and a sad folded napkin. Run your fingernail along each fold, or use a ruler edge to press it flat. Clean creases make the claw easier to lock and more comfortable to wear.
Match the Claw Size to the Finger
Not every finger needs the same size claw. Thumbs may need slightly larger claws, while pinkies need smaller ones. For a better fit, experiment with different paper sizes. Half sheets are great for children, while full sheets usually work well for adults.
Use Color for Character
Color changes everything. White paper can become ghost claws. Black paper looks like monster talons. Red paper feels dramatic and comic-book inspired. Metallic paper creates a robot or dragon effect. You can also decorate finished claws with markers, scales, stripes, or fake nail designs.
Make a Full Set
One claw is funny. Five claws are impressive. Ten claws mean you have committed to the bit, and we respect that. To make a matching set, use the same size paper for each claw and repeat the folds consistently. Keep the first finished claw nearby as a model.
Common Mistakes and How to Fix Them
The Claw Falls Off
If the claw slides off your finger, the pocket is too wide. Pinch the sides gently or refold using a smaller sheet. You can also wear thin gloves underneath for more grip. Avoid using tape unless you are making a costume prop and do not care about traditional no-glue origami rules.
The Tip Looks Blunt
A blunt tip usually means the diagonal folds were not aligned tightly. Go back and sharpen the point by pressing the folds closer together. You can also pinch the tip gently after the claw is finished.
The Paper Tears
Paper tears when it is folded too aggressively, refolded too many times, or forced into a tight tuck. Use smoother pressure and avoid yanking the flap into place. If you are using thin paper, switch to a slightly stronger sheet.
The Claw Looks Crooked
Crooked claws come from uneven starting folds. Make sure the corners meet cleanly and the edges line up before pressing each crease. If the claw still looks tilted, call it a monster design choice and move on with confidence.
Creative Ideas for Origami Paper Claws
Origami paper claws are not just for wearing around the house while whispering, “I am the creature of the craft table.” They are also useful for costumes, party activities, classroom crafts, sleepover projects, and rainy-day entertainment.
For Halloween, make black claws and pair them with a dark hoodie or gloves. For a dragon party, use green paper and draw scale patterns. For superhero play, make silver claws inspired by comic-book characters. For a silly photo booth, create claws in rainbow colors and let guests choose their “monster mood.”
You can also turn paper claws into decorations. Attach several to a wreath for a spooky door display, place them around candy bowls, or use them as table props for a monster-themed party. Just remember that if you leave paper claws around the house, someone will absolutely put them on and sneak up behind you. This is not a prediction. This is a law of crafts.
Why Origami Paper Claws Are Great for Kids and Beginners
Paper claws are a good beginner origami project because they teach several useful folding skills: diagonal folds, alignment, creasing, wrapping, and tucking. The finished result is wearable, which makes the project more exciting than a flat practice fold. Kids get a quick reward for careful work, and adults get a craft that does not require glitter cleanup. Everybody wins.
This project also encourages patience. The first claw may look strange, the second one usually improves, and by the fifth claw, most people feel like folding champions. That learning curve is part of the fun. Origami is not about perfection; it is about turning a flat sheet of paper into something surprising with your own hands.
Experience Section: What Making Origami Paper Claws Actually Feels Like
The first time you make origami paper claws, there is a good chance you will underestimate them. They look simple. They are simple. And then somehow the first one comes out slightly crooked, too loose, or shaped like a confused beak. This is normal. The paper is not judging you, although it may appear smug.
In practice, the most important lesson is that the first fold controls almost everything. When that first diagonal fold is clean, the rest of the claw behaves. When it is messy, every later step becomes a small negotiation. I have found that slowing down for the first two folds saves time later. It is tempting to rush because the project is short, but neat alignment is what makes the claw look sharp and wearable.
Another helpful experience is testing different paper. Regular printer paper is the easiest for learning, but colored construction paper makes the final claws look much better in photos. Thin origami paper creates crisp folds, but it may not stay on larger fingers as well. Lightweight cardstock gives stronger claws, though it can be harder to tuck at the end. If you are making claws for a group of kids, printer paper is the safest starting point because mistakes are cheap and easy to replace.
Making a full set also teaches rhythm. After the third or fourth claw, your hands remember the steps. Fold, crease, wrap, tuck, open. It becomes almost automatic. This is when the project gets fun because you can experiment with size, color, and shape. One set might become werewolf claws. Another set might become dragon talons. A third set might become “office meeting claws,” although wearing them during a serious video call is a personal choice with professional consequences.
The funniest part is watching people try them on. Even adults immediately curl their fingers and make dramatic claw gestures. Children usually invent a character within ten seconds. Someone will become a tiger. Someone will become a villain. Someone will use the claws to scratch their own back and declare the craft a practical invention. That playful transformation is why paper claws remain popular: the result is instant, wearable, and a little ridiculous in the best way.
If you are making these for a party or classroom, prepare extra paper. People rarely stop at one claw. They want a full hand, then a second hand, then a matching set for a friend. It helps to demonstrate the first claw slowly, then let everyone fold along. Keep one finished example visible so beginners can compare the shape. Encourage imperfect claws too. A crooked claw can become a zombie claw. A short claw can become a cat claw. A giant claw can become a dragon thumb. Origami is wonderfully forgiving when imagination is invited to help.
The biggest practical tip from experience is to keep the finger pocket comfortable. A tight claw may look cool but quickly becomes annoying. A loose claw falls off and gets blamed for having “bad engineering.” The best fit is snug enough to stay on but loose enough to remove easily. If kids are wearing them, remind them not to run, poke, or swipe near faces. Paper claws are for pretend play, costumes, and laughternot surprise attacks on siblings.
Overall, making origami paper claws is one of those crafts that delivers far more fun than the materials suggest. It is inexpensive, quick, customizable, and surprisingly satisfying. With a few sheets of paper and a handful of careful folds, you can create claws for Halloween, cosplay, party games, classroom activities, or a random Tuesday when your hands simply need to look more dragon-like.
Conclusion
Learning 3 ways to make origami paper claws gives you a simple craft with plenty of creative possibilities. The classic claw is best for beginners, the long claw is perfect for costumes, and the stronger claw works well when you want a sturdier fit. Each version uses basic folding techniques, requires minimal supplies, and can be customized with different colors, patterns, and sizes.
Whether you are planning a Halloween costume, entertaining kids, decorating for a monster-themed party, or just enjoying a quick paper craft, origami claws are a fun project with instant results. Start with one sheet, fold carefully, tuck the flap securely, and soon you will have a full set of paper talons ready for dramatic poses and harmless mischief.
Note: This article is written as original, publish-ready web content based on widely used origami paper claw folding methods, common craft practices, and practical hands-on paper-folding experience.
