
Beauty Unlocked
How to Grow Watercress
May
Note: This article is written for web publication in standard American English and focuses on practical, real-world methods for growing watercress at home.
Watercress is the leafy green that acts like it has a personal trainer, a spa membership, and a tiny pepper shaker hidden in every leaf. It grows fast, tastes bold, loves water, and makes a plain sandwich feel as if it suddenly graduated from culinary school. Better yet, learning how to grow watercress is surprisingly simple once you understand its one big demand: keep its roots consistently wet.
Unlike lettuce, spinach, or kale, watercress is a semi-aquatic perennial. In nature, it grows along clean, cool, moving streams and spring-fed waterways. At home, you do not need a private mountain brook or a dramatic backyard waterfall. A container, a tray of clean water, rich growing medium, and a little attention can give you steady harvests of peppery leaves for salads, soups, omelets, rice bowls, and sandwiches.
This guide explains how to grow watercress from seed, cuttings, or transplants; how to set up a container system; how to harvest it without ruining the plant; and how to avoid common mistakes. It also includes practical growing experiences at the end, because gardening advice becomes much more useful when it has a little dirt under its fingernails.
What Is Watercress?
Watercress, botanically known as Nasturtium officinale, is a fast-growing edible plant in the mustard family, Brassicaceae. That means it is related to familiar crops such as mustard greens, radishes, cabbage, broccoli, and arugula. Its flavor is fresh, sharp, and peppery, especially when grown in cool weather. If arugula is a friendly tap on the shoulder, watercress is a cheerful little wake-up call.
The plant has tender green leaves, hollow stems, and small white flowers when it matures. It can root at stem nodes, spread quickly in wet conditions, and regrow after cutting. Because of that vigorous growth habit, home gardeners should keep watercress contained rather than letting it escape into natural waterways. In some regions, it can behave aggressively outside cultivation.
For the home grower, the safest and easiest method is container growing. A pot sitting in a water-filled tray gives watercress the wet root zone it loves while keeping the plant manageable, clean, and close to the kitchen.
Best Growing Conditions for Watercress
Watercress is not difficult, but it is specific. It does not want dry soil, hot stress, or dirty standing water. Give it cool temperatures, constant moisture, and bright light, and it will reward you with repeat harvests.
Light
Watercress grows best in full sun during cool weather and partial shade during warm weather. In many home gardens, 4 to 6 hours of sunlight is enough. If you live in a hot climate, morning sun and afternoon shade are ideal. Strong afternoon heat can make the leaves smaller, tougher, and more bitter.
Temperature
Watercress prefers cool conditions. It grows especially well in spring and fall, when daytime temperatures are mild and nights are cool. Once temperatures climb high, the plant may flower, slow down, or develop a stronger flavor. In hot summer regions, move containers to a shaded patio, use shade cloth, or grow watercress indoors near a bright window.
Water
Moisture is the secret to success. The roots should never dry out. However, “wet” does not mean “forgotten swamp bucket behind the garage.” Use clean water, refresh it regularly, and avoid stagnant, smelly conditions. A simple method is to place a drainage-holed pot inside a larger tray or basin that holds 1 to 2 inches of water. Refill as needed and change the water every few days.
Soil and Growing Medium
Watercress grows well in organically rich, saturated soil. For containers, a soilless potting mix works beautifully because it holds moisture while still allowing some oxygen around the roots. A mix containing peat or coco coir plus perlite or vermiculite is a good choice. Garden soil can become heavy and compacted in containers, so use it only if it is clean, fertile, and not clay-like.
Soil pH
Watercress prefers a slightly acidic to neutral pH, roughly around 6.5 to 7.5. Most quality potting mixes land close enough for home growing. If your plants look pale despite consistent moisture and light, a simple pH test may help identify whether nutrients are becoming unavailable.
How to Grow Watercress in Containers
Container growing is the best method for most home gardeners. It is tidy, easy to manage, and safer than collecting plants from unknown streams. It also works for renters, balcony gardeners, patio growers, and anyone whose backyard is more “concrete rectangle” than “English countryside.”
Supplies You Need
You will need watercress seeds, cuttings, or transplants; a shallow container with drainage holes; a larger tray or basin; soilless potting mix; clean water; and a bright location. A container 6 to 8 inches deep is usually enough. Wide containers are better than narrow ones because watercress spreads sideways as it grows.
Step 1: Fill the Pot
Fill your container with moist potting mix. Press it down gently, but do not pack it like cement. The roots need moisture, but they also need air. Water the mix thoroughly before planting so it is evenly damp from top to bottom.
Step 2: Sow Seeds or Plant Cuttings
To grow from seed, scatter watercress seeds thinly over the surface and cover them with a very light layer of mix. Keep the surface consistently moist until germination. To grow from cuttings, choose fresh watercress stems with several nodes. Remove the lower leaves and place the stems in water until roots appear, then plant them in the container.
Step 3: Set the Pot in Water
Place the planted pot inside a tray or basin filled with clean water. The water should reach the lower part of the pot so the growing medium stays saturated. Check daily at first. Small containers can dry faster than expected, especially in warm weather or windy spots.
Step 4: Keep Water Fresh
Change the tray water every few days. This helps prevent odors, algae buildup, and poor root conditions. If mosquitoes are a concern in your area, do not allow water to sit unattended for long periods. Refreshing the water regularly keeps the system healthier and far less annoying.
Step 5: Feed Lightly
Watercress does not need heavy fertilizer, but container plants appreciate gentle nutrition. Use a diluted balanced liquid fertilizer every few weeks, especially after repeated harvests. Avoid overfeeding. Too much nitrogen can create lush growth that is tender but weak, and nobody wants dramatic watercress that collapses at the first sign of weather.
How to Grow Watercress Indoors
Growing watercress indoors is possible and surprisingly convenient. A sunny windowsill, grow light, or bright kitchen shelf can support small harvests. Indoor watercress is especially useful in winter, when outdoor gardens look like they have entered their “do not disturb” era.
Use a shallow pot with drainage holes and place it in a waterproof tray. Keep the tray filled with a small amount of fresh water. Give the plant bright light for several hours a day. If stems become long, pale, and floppy, the plant needs more light. A simple LED grow light can solve that problem quickly.
Indoor plants also need airflow. Do not crowd the container against a cold window or hide it in a damp corner. Good airflow reduces fungal problems and keeps leaves fresher. Harvest lightly and often to encourage new growth.
How to Grow Watercress Outdoors
Outdoor watercress can be grown in containers, raised beds with very moist soil, pond-edge planters, or controlled water gardens. The key word is controlled. Because watercress can spread from stem fragments, avoid planting it directly into natural streams, drainage ditches, or ponds connected to wild waterways.
A patio container is the easiest outdoor setup. Place the pot where it receives morning sun and some afternoon shade. During cool spring weather, full sun may be fine. During hot summer weather, shade is your friend. Keep the water tray filled and refresh the water often.
If you have a lined garden pond or water feature, use a separate basket or container rather than planting watercress loose. This makes harvesting easier and prevents the plant from taking over like it has been elected mayor of the pond.
Growing Watercress from Cuttings
One of the easiest ways to start watercress is from cuttings. You can use fresh, healthy stems from a nursery plant or a clean bunch of watercress purchased from a reliable grocery source. Choose stems that are green and crisp, not slimy or yellowing.
Place the stems in a glass of clean water and keep them in bright indirect light. Change the water daily. Within several days, you may see roots forming from the nodes. Once the roots are about an inch long, move the cuttings into moist potting mix and place the container in a water tray.
This method is quick, satisfying, and great for beginners. It also feels a little magical, as if your salad decided it wanted a second career.
Watercress Care and Maintenance
Pruning
Regular harvesting is also pruning. Pinch or cut stems above a leaf node to encourage branching. Do not cut the plant down to bare stubs. Leave several inches of growth so it can recover quickly.
Mulching
For outdoor containers, a thin layer of clean straw or leaf mold around the surface can help reduce temperature swings and conserve moisture. Keep mulch light and avoid burying the stems too deeply.
Water Quality
Use clean tap water, filtered water, or rainwater collected safely from a clean system. Do not use water from questionable ditches, livestock areas, polluted runoff, or unknown natural sources. Watercress is eaten raw in many dishes, so clean growing conditions matter.
Pest Management
Watercress may attract aphids, flea beetles, slugs, and caterpillars. Inspect leaves regularly, especially the undersides. A strong rinse of water can remove aphids. Handpick slugs and caterpillars when possible. For container plants, moving the pot to a cleaner, brighter, better-ventilated location often reduces pest pressure.
Disease Prevention
Most disease problems come from stale water, overcrowding, poor airflow, or heat stress. Thin crowded growth, harvest regularly, and change tray water frequently. If leaves become mushy, yellow, or foul-smelling, remove affected growth and refresh the setup.
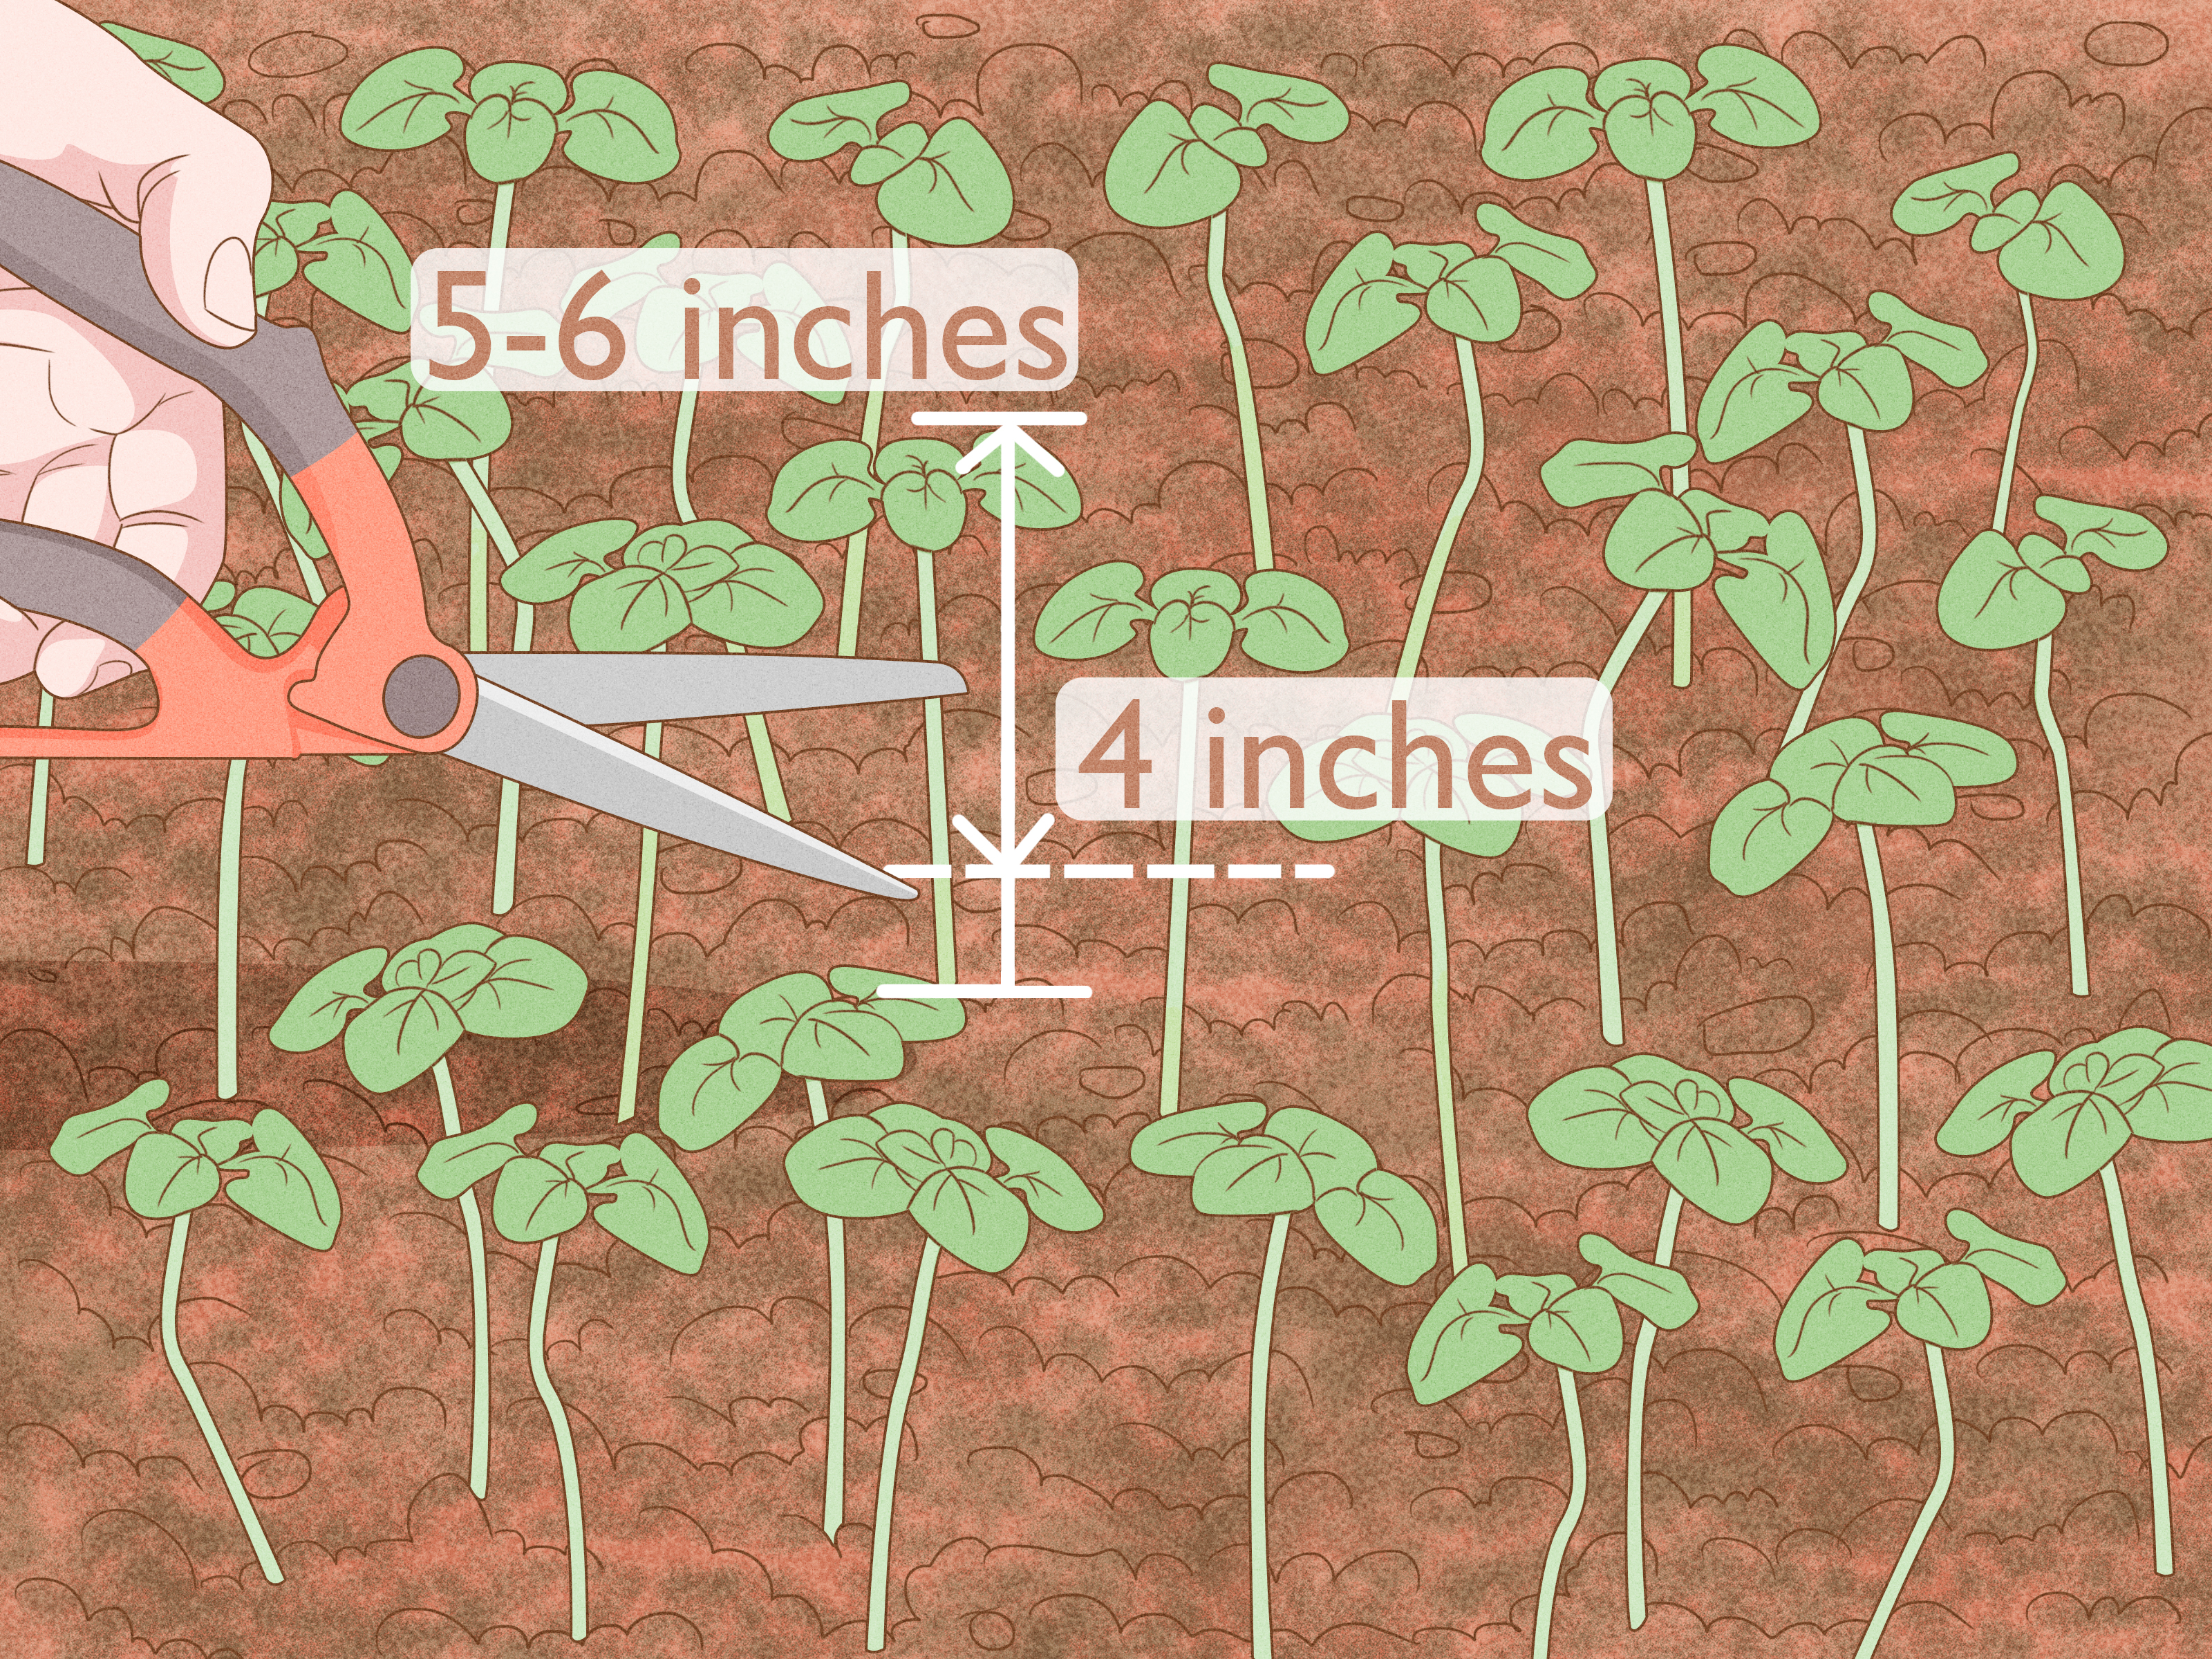
When and How to Harvest Watercress
You can begin harvesting when stems are well established and the plant has several inches of growth. The youngest leaves and tender stems have the best flavor. Use clean scissors to cut stems, leaving enough plant behind for regrowth.
The best flavor usually comes before flowering, especially in cool weather. Once plants flower, the leaves may taste stronger and more bitter. If your plant bolts, cut it back, move it to a cooler location if possible, and let it regrow.
For continuous harvests, take small amounts often rather than cutting everything at once. A healthy container can provide repeated harvests over many weeks. In mild climates or protected indoor setups, watercress can keep producing for a long season.
How to Wash and Store Fresh Watercress
Always wash watercress thoroughly under cool running water before eating it, even when you grew it yourself. Do not wash produce with soap, detergent, or household cleaners. Gently swish the stems and leaves, remove grit, and dry them with a salad spinner or clean towel.
To store harvested watercress, wrap it loosely in a damp paper towel and place it in a breathable container or produce bag in the refrigerator. Use it as soon as possible for the best texture and flavor. If the stems wilt slightly, a brief soak in cold water can help revive them.
Common Mistakes When Growing Watercress
Letting the Soil Dry Out
This is the number one mistake. Watercress is not a “water when you remember” plant. Dry roots can quickly lead to limp, stressed growth. Keep the container sitting in water and check it regularly.
Using Stagnant Water
Watercress loves moisture, not neglect. Refresh the water often. Stagnant water can smell bad, attract pests, and weaken the plant.
Growing It in Too Much Heat
Hot weather can cause bitter leaves and flowering. Use shade, grow indoors, or focus on spring and fall crops if your summers are intense.
Harvesting Wild Watercress Carelessly
Avoid harvesting wild watercress from unknown waterways. Water quality can be unsafe, and wild plants may carry contaminants or parasites. Growing your own in clean containers is much safer and more reliable.
Letting It Escape
Because watercress can root from fragments, do not dump leftover plants into streams, ponds, or drainage areas. Compost plant material responsibly or dispose of it where it cannot spread.
How to Use Homegrown Watercress in the Kitchen
Fresh watercress is excellent in salads, but it deserves more than being tossed into a bowl and forgotten. Add it to egg salad, chicken salad, avocado toast, grain bowls, noodle soups, omelets, and roasted vegetable plates. It pairs well with lemon, olive oil, garlic, potatoes, eggs, salmon, beans, and creamy dressings.
For a quick side dish, toss washed watercress with lemon juice, olive oil, a pinch of salt, and toasted seeds. For a warm dish, stir it into soup right before serving so it wilts gently without losing its bright flavor. In sandwiches, watercress adds crunch and peppery contrast, especially with turkey, roast beef, cucumber, or cream cheese.
Practical Growing Experience: What Actually Works
After growing watercress in different small-space setups, one lesson becomes obvious: consistency matters more than fancy equipment. The best container is not necessarily the most expensive planter or the most attractive ceramic bowl. It is the one that keeps the roots wet, allows easy water changes, and fits somewhere you will actually remember to check it.
A simple nursery pot sitting inside a plastic storage tray often works better than a decorative pot with no drainage. Drainage holes allow the potting mix to wick water upward while preventing the roots from sitting in a completely airless block of mud. When the tray water is refreshed every few days, the plants usually stay greener and cleaner. If the water is ignored too long, the plant may still survive, but the smell will file a complaint.
Starting from cuttings is the most beginner-friendly method. Grocery-store watercress can root quickly when the stems are fresh. The trick is to choose bunches with firm stems and lively green leaves. Yellow, slimy, or bruised bunches rarely perform well. Once roots appear, transplanting into moist mix gives the cuttings better support than leaving them in plain water forever.
Light is another detail that teaches fast. In a bright kitchen window, watercress may grow nicely but lean toward the glass. Rotating the pot every few days helps keep growth even. Under weak light, stems stretch and look thin. Under harsh afternoon sun in summer, leaves can look tired by midafternoon. Morning sun with afternoon shade is often the sweet spot, especially on balconies and patios.
Harvesting lightly and often gives better results than waiting for one giant harvest. Cutting a few stems at a time encourages branching and keeps the plant tender. When plants are allowed to grow too tall, the lower stems may become tangled, and airflow drops. A quick trim makes the whole container look younger, like it just got a haircut and suddenly remembered its purpose.
Another useful habit is rinsing the plant before and after harvest. A gentle rinse while it is still growing can knock off dust, aphids, or potting mix particles. After harvest, washing under cool running water is still necessary before eating. Because watercress is often used raw, cleanliness is part of the growing process, not an optional final flourish.
For people in warm climates, the most realistic approach is seasonal growing. Watercress shines in cool months. During hot weather, it may bolt or taste sharper. Rather than fighting the plant, grow it in spring and fall, or move a smaller container indoors under bright light. This keeps the project enjoyable instead of turning it into a daily negotiation with the sun.
The biggest surprise is how productive a small container can be. A wide pot on a balcony can supply enough leaves for sandwiches and garnishes every week. It may not replace an entire salad garden, but it adds fresh flavor with very little space. For gardeners who like quick rewards, watercress is wonderfully encouraging. It grows fast enough to keep beginners motivated and flavorful enough to make experienced gardeners keep planting it again.
Conclusion
Learning how to grow watercress is mostly about recreating the plant’s favorite natural conditions in a clean, controlled way. Give it constant moisture, cool temperatures, bright light, and fresh water, and it will grow with impressive enthusiasm. For most home gardeners, a container in a water-filled tray is the easiest and safest setup. It keeps the plant close, productive, and manageable while reducing the risks that come with wild harvesting or uncontrolled spreading.
Watercress is practical, flavorful, and surprisingly fun to grow. It does not need a large yard, expensive gear, or expert-level gardening skills. Start with seeds, cuttings, or transplants; keep the roots wet; refresh the water; harvest regularly; and enjoy one of the boldest leafy greens you can grow at home. Your salads will thank you. Your sandwiches may become a little smug.
