
Body Care
How to Cut In Paint Like a Pro (DIYer’s Guide) – Bob Vila
Aug
Rolling paint across the middle of a wall is the fun part. It is broad, fast, and wonderfully forgiving. Cutting inthe careful brushwork along ceilings, trim, corners, doors, windows, and other obstaclesis where the room decides whether it will look professionally finished or vaguely like it lost an argument with a paint can.
The good news is that cutting in paint is not a mysterious talent reserved for contractors with supernatural wrists. It is a repeatable technique built on preparation, the right brush, controlled paint loading, and a simple sequence of strokes. Learn those habits, practice for a few minutes, and you can create crisp paint lines without spending an entire afternoon applying painter’s tape to every stationary object in the house.
What Does “Cutting In” Paint Mean?
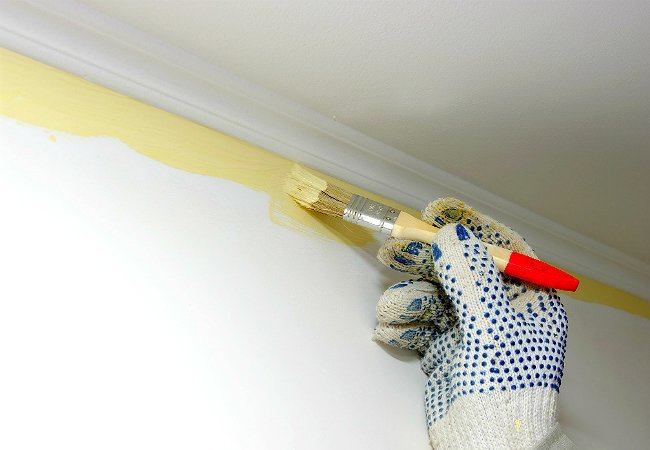
Cutting in means using a brush to paint a narrow border where a roller cannot safely or neatly reach. Typical areas include the ceiling line, inside corners, baseboards, crown molding, window and door casings, built-in cabinets, outlets, switches, and the edges of an accent wall.
Most painters create a band about 2 to 3 inches wide. That gives the roller enough room to overlap the brushed paint without bumping the ceiling or trim. The goal is not merely to draw a straight line. A successful cut-in also blends into the rolled area so the finished wall has consistent color and texture.
Tools and Materials for Clean Paint Edges
- A high-quality 2-inch or 2½-inch angled sash brush
- A small cut bucket or paint pail
- Interior paint and primer, when required
- Painter’s tape for difficult or delicate boundaries
- A clean putty knife or painter’s multitool
- Drop cloths and a damp lint-free rag
- Lightweight spackle, sandpaper, and caulk for prep
- A sturdy stepladder for ceiling lines
Choose the Right Angled Brush
A 2-inch to 2½-inch angled sash brush offers a useful balance of control and paint capacity. For water-based latex or acrylic paint, choose quality nylon, polyester, or blended synthetic bristles. Tapered, flagged tips hold paint and release it gradually, while the angled profile helps form a narrow edge. Paint manufacturers, applicator companies, and home-improvement experts consistently recommend angled synthetic brushes for controlled interior cut-ins.
Prepare the Room Before You Cut In
Sharp paint lines begin before the brush touches the wall. Dust, grease, dents, loose caulk, and rough patches interfere with both adhesion and accuracy. Move furniture away from the work zone, cover floors, remove switch plates, and protect fixtures. Wash dirty areas, let them dry, fill holes, sand repairs smooth, and remove sanding dust.
Inspect the seam where walls meet trim or ceilings. If a cracked gap is visible, apply paintable caulk and smooth it before painting. A brush cannot create a perfect line over a boundary that looks like a miniature canyon.
Safety Note for Older Homes
If the home was built before 1978, painted surfaces may contain lead. Sanding, scraping, drilling, or disturbing old coatings can create hazardous dust. The U.S. Environmental Protection Agency recommends determining whether lead-based paint is present and using lead-safe practices or a lead-safe certified contractor. During interior painting, follow product-label precautions and provide adequate ventilation, especially when using coatings or preparation products that release fumes.
Should You Use Painter’s Tape?
Tape is useful around stained trim, wallpaper, cabinets, or bold color boundaries, but it is not a substitute for brush control. Apply it to clean, dry surfaces and press the edge firmly with a putty knife to limit bleed. Avoid flooding the tape with paint, and remove it according to the manufacturer’s timing instructions, pulling it slowly back over itself.
Freehand cutting becomes faster with practice, especially on textured or uneven surfaces where tape may not seal perfectly. There is no medal for refusing tape, though. Use whichever method produces the cleanest edge with the least muttering.
How to Cut In Paint Step by Step
1. Mix the Paint Thoroughly
Stir the paint from the bottom upward until color and consistency are uniform. If the project requires multiple cans of the same color, combine them in a larger container when practical. Small tint differences can become noticeable when one can ends in the middle of a wall.
2. Load the Brush Without Overloading It
Dip roughly the lower third to half of the bristles into the paint. Tap each side gently against the inside of the pail. Do not scrape the brush aggressively across the rim; scraping removes too much paint from the outer bristles and encourages dry, scratchy strokes.
A properly loaded brush holds enough paint to glide but not enough to drip. If paint is running toward the handle, the brush is not loadedit is taking a bath.
3. Start Away From the Final Edge
Place the brush on the wall about an inch from the ceiling or trim line. Press lightly to spread the bristles, then move the paint toward the boundary. Starting away from the line deposits the initial surplus in a safe area and lets you approach the edge with controlled bristle tips.
4. Establish the Line With the Bristle Tips
Hold the brush somewhat like a pencil, with a relaxed grip. Turn it so the long angled edge follows the boundary. Apply gentle pressure until a few bristle tips reach the line, then draw a smooth stroke 12 to 18 inches long. Watch the leading edge of the paint rather than staring at the whole brush.
Do not attempt a perfect line with the first heavy stroke. Lay off the paint, return with the lightly loaded tip, and refine the edge. Professionals often build accuracy through two controlled passes rather than one heroic swipe. Guidance from major paint brands and painting specialists emphasizes starting slightly away from the boundary, easing the brush toward it, and using smooth, deliberate strokes.
5. Paint a Roller-Friendly Band
After creating the clean edge, spread the remaining paint downward or outward to form a band about 2 to 3 inches wide. This border should be wide enough for the roller to overlap safely. Keep the layer even; a thick ridge at the edge may dry with a different sheen or texture.
6. Feather the Inner Edge
Use the nearly unloaded brush to soften the inner edge of the cut-in band. Lightly brush away from the finished line so the paint becomes thinner where the roller will overlap. Feathering reduces brush ridges and helps the rolled texture blend into the detailed work.
7. Cut In One Wall at a Time, Then Roll
Do not cut in the entire room and leave the borders to dry before rolling. Complete one wallor a manageable sectionthen roll while the cut-in paint remains wet. Maintaining a wet edge reduces “picture framing,” the visible difference that can appear when brushed edges dry separately from rolled paint.
8. Repeat for the Second Coat
Most projects need a second coat for uniform color and durability. Do not assume the first cut-in band will be hidden by a second rolled coat. Cut in again, following the same wall-by-wall sequence. The second pass is usually easier because the first coat provides a clearer visual boundary.
How to Handle Common Trouble Spots
Ceilings, Corners, and Trim
For ceiling lines, use a stable ladder and keep the working area near shoulder level; reaching sideways makes the brush wander. In inside corners, paint into the corner and feather back onto the active wall. Around baseboards and door casings, wipe away dust first and keep the brush parallel to the trim. A damp rag wrapped around a putty knife can remove a fresh mistake from a smooth surface.
Textured Walls
Texture creates tiny valleys where paint can slip under tape or leave pinholes. Use a firm quality brush and several light passes. For a taped accent-color boundary, sealing the tape edge with the existing base color before applying the new color can help block bleed-through.
Common Cutting-In Mistakes and Quick Fixes
- Overloaded brush: If paint drips or creeps onto trim, load only the lower portion of the bristles and deposit the first paint away from the boundary.
- Cheap or worn brush: Splayed bristles create a ragged line. One good angled sash brush costs less than repainting the ceiling edge.
- Too much pressure: A hard push fans the bristles across the line. Ease up and let only the tips define the boundary.
- Dry cut-in band: A visible frame can form when brushed paint dries before rolling. Work one wall at a time and overlap the feathered edge while wet.
- Overworking wet paint: Repeated corrections create ridges. Make one or two controlled passes, let the area dry, then sand or touch up if needed.
- Torn tape line: Peel tape slowly according to its instructions, and score any dried paint film before removal.
Pro-Level Habits That Improve Results
- Use angled work light to reveal skips, ridges, and thin spots.
- Keep a damp rag nearby because fresh mistakes are easier to erase.
- Use the brush’s narrow edge for precision and broad face for spreading.
- Breathe steadily; slow exhaling can reduce hand tension.
- Stop at natural breaks such as corners, doors, and windows.
- Clean the brush promptly so dried paint does not spread the bristles.
Real DIY Experiences: What Cutting In Teaches You
The first time many DIYers cut in a room, they make the same discovery: the brush seems to know exactly where the ceiling is and is deeply interested in painting it. The instinctive response is to grip harder, move slower, and hold your breath until your hand shakes. That combination rarely improves the line. A relaxed grip and a moving brush are steadier than a clenched hand trying to perform microscopic surgery.
One useful practice exercise is to choose a low-visibility wall behind a door or inside a closet. Load the brush, place it an inch below the ceiling, and experiment with pressure. You will feel the moment when the bristles spread enough for the angled tips to form a narrow edge. Too little pressure leaves a faint, broken line. Too much pressure creates a broad fan. The correct pressure sits between those extremes and becomes surprisingly easy to recognize after several strokes.
Another common lesson involves paint quantity. Beginners often scrape almost all the paint off the brush because they fear drips. The brush then skips and drags, requiring repeated passes that leave ridges. Later, confidence swings too far in the other direction, and the brush arrives at the wall carrying enough paint to renovate the baseboard as well. Tappingnot scrapingthe loaded brush usually produces the right balance.
Timing also changes the result. Imagine painting a bedroom by cutting in all four walls before lunch and rolling them afterward. By the time the roller reaches the first wall, the brushed border has dried. Under afternoon light, the wall may show a slightly darker frame around the perimeter. On the next room, cutting and rolling one wall at a time creates a more uniform finish because the textures blend while the paint is wet. The difference can be subtle in flat paint and very obvious in satin or eggshell.
Textured walls offer their own education. Tape that looks perfectly sealed may still bridge over tiny hollows. New paint travels underneath and produces a line resembling a small mountain range. A better approach is to press the tape carefully, apply a thin sealing coat in the existing wall color, let it dry, and then apply the accent color. Freehand work on texture improves when the brush is held at a slight angle and moved through several light passes rather than one heavy stroke.
Ceiling work teaches the importance of body position. When the ladder is too far from the active area, the painter reaches sideways, the shoulder tightens, and the line wanders. Moving the ladder more often feels slower, but the actual brushwork becomes faster and cleaner. It also reduces fatigue and the chance of stepping sideways into thin air, which remains an unpopular decorating technique.
The most encouraging experience usually comes during the second coat. The wall already has color, the boundary is easier to see, and the brush feels familiar. Strokes become longer. Reloading becomes instinctive. The painter stops checking the line every three inches and begins working in a rhythm: load, tap, deposit, approach, draw, feather, roll. At that point, cutting in stops feeling like the obstacle before painting and starts feeling like the skill that makes the entire room look finished.
Final Thoughts
To cut in paint like a pro, focus on fundamentals: prepare the surface, use a quality angled brush, load it correctly, begin slightly away from the boundary, guide the bristle tips into a clean line, feather the inner edge, and roll the wall before the border dries. Painter’s tape can help, especially on difficult surfaces, but technique creates the lasting improvement.
Your first line may not be flawless. That is normal. Keep a damp rag nearby, practice where mistakes are less visible, and judge the work from normal viewing distance rather than with your nose six inches from the ceiling. Homes are meant to be lived in, not inspected by a committee of extremely judgmental ants.
Note: This is an independently written DIY guide inspired by widely accepted painting practices and is not an official Bob Vila article. Always follow the paint, primer, tape, ladder, and tool manufacturers’ instructions.
SEO Tags

