
Makeup
Easy DIY Rustic Industrial Picture Frame
Aug
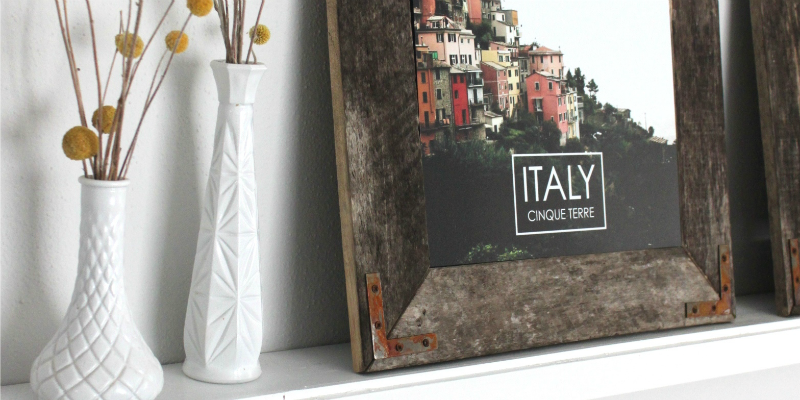
A great picture deserves better than a flimsy plastic frame that looks as though it came free with an office printer. Fortunately, you can build an easy DIY rustic industrial picture frame with basic lumber, a few dark metal accents, and beginner-friendly tools. The finished frame combines warm, weathered wood with black hardware for a style that feels equally at home in a farmhouse kitchen, modern loft, home office, or cozy living room.
This design uses square butt joints rather than complicated 45-degree miters. That choice makes the project faster, reduces measuring mistakes, and creates strong corners that suit the industrial look. Black metal corner braces provide extra reinforcement while becoming part of the design instead of something you have to hide.
The instructions below are sized for an 8-by-10-inch photograph or print, but the same method works for nearly any standard artwork size. Once you understand the basic measurement formula, you can build an entire gallery wall without purchasing a truckload of expensive custom frames.
Why Rustic Wood and Industrial Metal Work So Well Together
Rustic industrial decor succeeds because it balances two very different materials. Wood adds natural grain, warmth, and small imperfections. Metal contributes clean lines, visual weight, and a workshop-inspired character. Neither material has to work very hard. In fact, the frame looks better when you resist the temptation to decorate every available inch.
For the rustic half of the design, inexpensive pine is an excellent beginner material. It is lightweight, widely available, easy to cut, and willing to accept stains, dents, and distressed finishes. Reclaimed lumber can add authentic age, but it may also arrive with hidden nails, cracks, warped edges, or mysterious stains left by a previous life. New pine gives you more control while still allowing you to create a convincing weathered appearance.
The industrial personality comes from flat black or aged-bronze corner braces, visible screw heads, and a low-sheen finish. You do not need to cover the frame with gears, pipes, and hardware until it resembles a steampunk submarine. Four carefully positioned braces are usually enough.
Finished Size and Measurement Plan
This project creates a frame with a visible opening measuring approximately 7 1/2 by 9 1/2 inches. The slightly smaller opening overlaps the edges of an 8-by-10-inch photo, acrylic sheet, and backing board, preventing them from falling through the front.
Cut List for an 8-by-10-Inch Picture
- Two vertical pieces of 1-by-2 lumber, each 12 1/2 inches long
- Two horizontal pieces of 1-by-2 lumber, each 7 1/2 inches long
- One 8-by-10-inch acrylic or glass glazing panel
- One 8-by-10-inch backing board
- Four small black metal corner braces
A standard 1-by-2 board actually measures about 3/4 inch thick and 1 1/2 inches wide. With the horizontal boards positioned between the vertical pieces, the completed outside dimensions will be approximately 10 1/2 by 12 1/2 inches.
How to Resize the Frame
Begin with the dimensions of the photograph or artwork. Subtract about 1/2 inch from both dimensions to determine the visible opening. The overlap should cover approximately 1/4 inch on every edge.
The horizontal pieces equal the width of the visible opening. To calculate the vertical pieces, add twice the width of the frame lumber to the opening height. With 1 1/2-inch-wide boards, that means adding 3 inches.
For example, a 5-by-7-inch photograph could use an opening of approximately 4 1/2 by 6 1/2 inches. The horizontal rails would be 4 1/2 inches long, and the vertical sides would be 9 1/2 inches long.
Tools and Materials
Tools
- Tape measure
- Pencil
- Carpenter’s square or speed square
- Miter saw, circular saw, or handsaw with a miter box
- Drill and small drill bits
- Clamps
- Sanding block or random-orbit sander
- Small paintbrush or lint-free staining cloth
- Safety glasses, hearing protection, and a dust mask
Materials
- 1-by-2 pine, poplar, cedar, or reclaimed wood
- Wood glue
- 1 1/4-inch brad nails, finish nails, or suitable wood screws
- 120- and 180-grit sandpaper
- Pre-stain wood conditioner for softwood
- Dark walnut, espresso, weathered gray, or charcoal wood stain
- Clear matte or satin protective finish
- Four decorative metal corner braces with screws
- Acrylic, glass, photograph, and backing board
- Picture-frame turn buttons or offset clips
- Sawtooth hanger, D-rings, or picture wire
Acrylic is lighter and less likely to break than traditional glass, making it convenient for a frame placed in a child’s room, hallway, or busy family space. Glass generally resists scratches better. Either option works, so choose based on the location, weight, and importance of the artwork.
How to Build an Easy DIY Rustic Industrial Picture Frame
Step 1: Choose Straight Lumber
Inspect the board from several angles before buying or cutting it. Look down its length to check for bowing, twisting, or cupping. Small knots and color variations can improve the rustic appearance, but avoid boards with major cracks near the planned joints.
If you are using salvaged wood, remove every visible nail, staple, screw, and metal fragment before cutting. A hidden fastener can damage a saw blade and transform a relaxing craft afternoon into a surprisingly expensive lesson.
Step 2: Measure and Cut the Frame Pieces
Mark two 12 1/2-inch vertical pieces and two 7 1/2-inch horizontal pieces. Use a square to draw straight cutting lines across the board. Label the back of each piece so the parts do not become confused during assembly.
Clamp the wood securely and cut each piece with the finished face pointing upward when using a miter saw. If you are cutting by hand, use a miter box to keep the saw square. Cut just outside the pencil line, then carefully sand to the final measurement if necessary.
The two vertical pieces must match each other exactly, and the two horizontal pieces must also match. Even a small difference can pull the frame out of square. Whenever possible, clamp matching pieces together and trim them at the same time.
Step 3: Dry-Fit the Frame
Place the vertical boards on a flat work surface. Position the horizontal rails between them at the top and bottom. Check the opening with a square, then place the 8-by-10-inch glazing panel over the back to confirm that it overlaps the opening on all four sides.
Measure diagonally from the upper-left corner to the lower-right corner. Then measure the opposite diagonal. When both numbers match, the frame is square. Adjust the pieces until they do. This little check takes less than a minute and prevents a frame that looks as though it is permanently leaning into a strong wind.
Step 4: Add Controlled Rustic Texture
Distress the wood before staining and assembly. Lightly tap selected areas with a small hammer, drag a coarse screw across the grain, or press a short length of chain into the surface. An awl can create a few simulated wormholes, while a wire brush can emphasize softer grain.
Keep the marks random and restrained. Concentrate wear along edges and corners, where natural handling would normally occur. Do not deeply damage the joint areas or create cracks that weaken the boards. Practice every distressing method on a scrap piece first.
Step 5: Sand Without Erasing the Character
Sand the boards with 120-grit paper to remove splinters, saw marks, and sharp edges. Follow with 180-grit paper for a smoother surface. Sand in the direction of the grain and soften the corners slightly, but do not polish away every dent you just created.
Remove the dust with a vacuum and a clean, lint-free cloth. Stain applied over loose sanding dust can create dark specks and muddy patches.
Step 6: Condition and Stain the Wood
Pine and other softwoods can absorb dark stain unevenly, especially around knots and end grain. Applying a compatible pre-stain conditioner helps reduce severe blotching. Follow the instructions for the exact conditioner and stain you purchased because application and drying times vary by formula.
Test the complete finishing system on scrap wood. Apply the stain in the direction of the grain, allow it to penetrate for the recommended period, and wipe away the excess with a clean cloth. Leaving stain pooled on the surface usually produces sticky, uneven results rather than a deeper professional color.
For a layered rustic finish, begin with weathered gray and lightly add dark walnut after the first color dries. Another option is to stain the frame brown, brush on a thin coat of flat black paint, and sand selected edges after the paint dries. The brown tones will reappear beneath the black, imitating years of wear.
Step 7: Assemble the Wood Frame
Place the stained pieces face down on a protected, level surface. Apply a thin, even layer of wood glue to the ends of the horizontal rails. Position them between the vertical sides and clamp the assembly together.
Recheck the diagonal measurements before the glue begins to set. Reinforce each joint with brad nails, finish nails, or screws driven through the vertical pieces into the ends of the rails. Predrill screw holes near board ends to reduce the risk of splitting.
Wipe away squeezed-out glue immediately with a slightly damp cloth. Dried glue can prevent stain or touch-up color from penetrating, leaving pale fingerprints around the joints.
Step 8: Add the Industrial Corner Braces
Once the glue has cured, position one black metal brace over each corner. They may be installed on the front as decorative accents or on the back for a cleaner face. Front-mounted hardware creates the strongest industrial statement.
Measure from the edges so all four braces sit in consistent positions. Mark the screw holes and drill shallow pilot holes. Use a piece of painter’s tape on the drill bit as a depth guide so you do not drill through the front of the frame.
If the braces are shiny, you can leave them alone for a modern contrast or apply a compatible matte-black, hammered-metal, or aged-bronze finish before installation. Spray outdoors or in a properly ventilated area, use several light coats, and follow the product label.
Step 9: Apply a Clear Protective Finish
A matte or satin topcoat protects the stained wood without creating the glossy, furniture-showroom appearance that can fight against rustic styling. Apply thin coats, allow each coat to dry fully, and lightly sand between coats when directed by the manufacturer.
Give the finish enough time to cure before placing the photograph against it. A finish that feels dry may still be soft enough to stick to paper, acrylic, or backing material.
Step 10: Install the Photograph and Backing
Clean both sides of the glazing before assembly. Place the frame face down on a clean towel, followed by the acrylic or glass, the photograph, and the backing board. If the contents rattle, add thin archival-quality spacers or small foam pads around the backing rather than forcing the parts together.
Secure the stack with picture-frame turn buttons or offset clips screwed into the back of the wooden frame. These fasteners make it easy to replace the image later. Avoid gluing an important photograph directly to the backing board.
For valuable, signed, vintage, or irreplaceable artwork, use acid-free backing materials and archival mounting products. Keep the art from touching the glazing, and consider professional framing when preservation matters more than the thrill of announcing, “Look what I made before lunch.”
Step 11: Attach the Hanging Hardware
A small sawtooth hanger is usually sufficient for a lightweight 8-by-10-inch frame. D-rings and picture wire provide more adjustment and are often better for larger frames. Place the hardware on the upper third of the frame and verify that the screws are short enough to remain hidden from the front.
Choose wall fasteners rated for the combined weight of the frame, glazing, backing, and artwork. When the frame is heavy, use a wall stud or an appropriate anchor rather than relying on a tiny decorative nail.
Rustic Industrial Frame Design Variations
Modern Black-and-Wood Frame
Skip the heavy distressing and use smoothly sanded wood with a medium walnut stain. Add slim matte-black braces and black screws. This version works well with architectural photographs, typography prints, maps, and monochrome artwork.
Weathered Farmhouse Industrial Frame
Use a gray-brown stain, softly rounded edges, and aged iron hardware. Dry-brush a small amount of off-white paint across the grain, then wipe most of it away before it dries. The result feels rustic without becoming overly theatrical.
Reclaimed Workshop Frame
Use authentic reclaimed boards with nail holes and saw marks, provided the wood is dry, clean, structurally sound, and free of hazardous coatings. Pair it with simple steel straps or corner plates. Let the existing material supply the texture rather than adding new damage.
Clip-Style Photo Display
Instead of installing glazing, attach a small black bulldog clip to a stained wood panel inside the frame. This creates a casual display that allows photographs, notes, recipes, and children’s artwork to be changed in seconds.
Common Picture-Frame Mistakes to Avoid
Building Before Checking for Square
A frame can have four correct cuts and still be assembled crooked. Always compare the diagonal measurements before the glue cures.
Using Too Much Wood Glue
More glue does not automatically produce a stronger joint. Excess glue creates a slippery assembly and can contaminate the stained surface. Apply a complete but controlled film to both joint faces.
Overdistressing the Wood
Rustic texture should suggest age, not a recent argument with a lawn mower. Begin with fewer marks than you think you need. You can always add another dent, but removing one requires considerably more creativity.
Skipping Pilot Holes
Small decorative screws can split narrow frame boards, especially near corners. Pilot holes improve screw alignment and reduce stress on the wood.
Hanging the Frame Before the Finish Cures
Rushing can leave fingerprints, soft spots, or a lingering odor. Drying and curing are not always the same process, so follow the finish manufacturer’s timeline.
Care and Display Tips
Dust the frame with a soft, dry microfiber cloth. Spray glass cleaner onto the cloth rather than directly onto the glazing so liquid cannot run behind the frame and reach the artwork. Avoid abrasive pads, harsh solvents, and soaking the wood.
Keep important photographs away from direct sunlight, high humidity, fireplaces, heating vents, and bathrooms with frequent condensation. Light and environmental changes can fade images, discolor paper, and cause wood components to move over time.
Inspect the hanging wire, screws, turn buttons, and wall fastener occasionally. This is particularly important for larger frames or frames installed in busy hallways where they may be bumped.
Conclusion
An easy DIY rustic industrial picture frame proves that attractive home decor does not require complicated joinery or a professional workshop. Straight cuts, careful measurements, controlled distressing, and a few black metal accents can turn ordinary lumber into a personalized display piece.
The butt-joint construction is forgiving enough for a first woodworking project, while the finish offers plenty of room for creativity. Build one frame for a favorite photograph, or repeat the design in several sizes to create a coordinated gallery wall. Since every board has a different grain pattern and every distressed mark lands differently, no two frames will be exactly alikewhich is precisely the point.
Real-World Experience: Lessons From Building a Rustic Industrial Frame
The most useful lesson from this project is that simple construction still rewards careful preparation. At first glance, four square-cut boards seem almost impossible to mess up. Then the boards are placed together, one rail turns out to be slightly shorter, and the frame suddenly has the geometry of an abstract painting.
Cutting matching pieces together made the biggest improvement in accuracy. Rather than measuring each vertical side separately, I marked one piece, cut it, and used it as a physical reference for the second. I repeated the process with the horizontal rails. That approach eliminated small differences caused by thick pencil lines and repeated tape-measure readings.
Dry-fitting the glazing also revealed an issue that measurements alone did not show. My first opening was technically the same size as the photograph, but it provided almost no overlap. From the front, a thin edge of the backing appeared whenever the picture shifted. Reducing the visible opening by 1/2 inch solved the problem by creating a consistent 1/4-inch border around the image.
The finishing stage required more restraint than expected. Fresh pine does not need dozens of hammer marks to look rustic. A few shallow dents, several scratches, and slightly softened edges created enough character once dark stain settled into the low spots. Heavy distressing looked artificial, almost as though the frame had survived a small meteor shower.
Testing the stain on scrap wood was also worth the extra few minutes. The darkest sample looked sophisticated under workshop lighting but nearly black inside the room where the frame would hang. A lighter walnut tone kept the grain visible and produced better contrast with the black corner braces.
Pre-stain conditioner noticeably reduced the patchy appearance around knots and end grain. It did not make every section identical, nor should it have. The goal was to control distracting blotches while preserving natural variation. Applying stain in thin coats was easier than trying to remove an overly dark first coat.
During assembly, clamps were more valuable than extra fasteners. The boards wanted to slide as soon as glue was applied, and driving nails before checking the diagonals would have locked the frame into a slightly skewed shape. Clamping loosely, adjusting the corners, comparing both diagonal measurements, and then tightening everything produced a much cleaner result.
The visible metal braces turned out to be more than decoration. They concealed tiny variations at the butt joints, strengthened the corners, and made the straightforward construction feel intentional. Without the braces, the frame looked unfinished. With them, the same square joints became part of the industrial design.
I also learned to install the hanger only after loading the glazing, picture, and backing. Those materials changed the frame’s balance enough that my first pencil mark was no longer centered. Finding the actual balance point after final assembly helped the frame hang level without repeated wall adjustments.
Most importantly, the project demonstrated that handmade decor does not need to imitate factory perfection. The slight differences in grain, stain depth, edge wear, and hardware placement give the frame its personality. Accuracy keeps it square and functional; small imperfections keep it from looking mass-produced. That balance is what makes a rustic industrial picture frame satisfying to build and even better to display.

