
Skincare
How To Build DIY Floating Shelves With Ana White
May
Floating shelves are the magic trick of home storage: the brackets disappear, the clutter floats, and suddenly your wall looks like it went to design school. Even better, building DIY floating shelves with an Ana White-inspired approach keeps the project friendly for beginners, budget-conscious homeowners, renters with permission, and anyone who has ever stared at an empty wall and thought, “This could be doing more.”
The beauty of Ana White’s floating shelf style is its practical simplicity. Instead of buying expensive shelves that may not fit your space, you build a hollow shelf box, create a hidden wall support, slide the shelf over that support, and secure it in place. The result is clean, modern, customizable, and sturdy when installed correctly. No visible metal brackets. No wobbly “please don’t put a coffee mug on me” energy. Just a sleek shelf that looks custom because, well, it is.
This guide walks through planning, materials, cutting, assembly, finishing, installation, safety, and real-world lessons learned from building DIY floating shelves. Whether you want a single shelf above a desk, a pair of kitchen display shelves, or a full wall of storage in a laundry room, this project is a smart way to add function without sacrificing style.
Why Build DIY Floating Shelves Instead of Buying Them?
Store-bought floating shelves are convenient, but they often come with three little surprises: limited sizes, questionable weight ratings, and hardware that makes you mutter things your grandmother would not approve of. Building your own shelves gives you control over the length, depth, thickness, finish, and mounting method.
A DIY floating shelf can be designed to match the exact wall width, line up with studs, fit around windows, or complement existing cabinets. You can paint it white for a built-in look, stain it warm walnut for farmhouse charm, or leave it natural for a Scandinavian-style finish. More importantly, you can build the support system with your wall and intended use in mind.
The Ana White approach is especially appealing because it focuses on simple lumber, beginner-friendly cuts, and a build-first, hang-later process. That means you can assemble and finish the shelf on a workbench, in a garage, or on a pair of sawhorses before installing it. This is far easier than trying to paint or stain a shelf while it is already on the wall, unless your favorite hobby is cleaning drips off baseboards.
How Floating Shelves Work
A floating shelf is not actually floating. Shocking, yes. But unless your lumber has enrolled in wizard school, the support is hidden inside the shelf. Most DIY floating shelves use one of two systems:
- A wooden cleat or frame: A support board is attached to wall studs, with short arms extending outward. The hollow shelf slides over the frame.
- A metal bracket or rod system: Heavy-duty rods or brackets mount to the wall, and the shelf slips over them.
For an Ana White-style DIY project, the wooden frame method is common because it is affordable, customizable, and easy to build with standard tools. The shelf itself is usually a hollow box made from boards or plywood. Once installed, the box hides the support structure and creates the clean, bracket-free look.
Planning Your DIY Floating Shelves
Choose the Right Location
Before buying lumber, choose the wall and decide what the shelf will hold. Decorative objects, framed photos, small plants, spices, and lightweight kitchenware are perfect candidates. Heavy dishes, stacks of books, microwaves, and bowling ball collections need more serious engineering. Floating shelves can be strong, but strength depends on material, depth, bracket design, screw quality, and whether the support is fastened into wall studs.
Use a stud finder to locate studs before finalizing the shelf length. In many homes, studs are spaced 16 inches apart, but old houses enjoy chaos and may not follow the script. Mark stud positions with painter’s tape so you can design the shelf support around real structure instead of wishful thinking.
Pick Practical Dimensions
A common beginner-friendly size is 24 to 48 inches long, 6 to 10 inches deep, and 2 to 4 inches thick. A deeper shelf creates more storage but also puts more leverage on the wall support. For a first project, a moderate depth is easier to keep level and sturdy.
Kitchen shelves often look great at 10 inches deep because they can hold plates, jars, bowls, and mugs. Bathroom shelves may only need 6 to 8 inches. Living room display shelves can be longer and thinner if they are used for decor. The best size is the one that fits your wall, your studs, and your stuff.
Tools and Materials You Will Need
You do not need a professional cabinet shop to build floating shelves. A few basic tools can get the job done. If you can measure carefully, cut straight, and resist the temptation to “eyeball it,” you are already ahead of half the internet.
Tools
- Tape measure
- Pencil
- Stud finder
- Level or laser level
- Miter saw, circular saw, or table saw
- Drill and driver bits
- Pocket-hole jig, optional but helpful
- Clamps
- Sander or sanding block
- Safety glasses and hearing protection
Materials
- 1x boards, plywood, or common boards for the shelf box
- 2×2 or 2×4 lumber for the hidden support frame
- Wood screws
- Wood glue
- Wood filler
- Sandpaper in medium and fine grits
- Paint, stain, or clear topcoat
- Wall anchors only if studs are unavailable and the load is light
For the cleanest finish, choose straight lumber. Sight down the boards at the store. If a board looks like a banana, leave it behind unless you are building a fruit-themed art installation.
Step-by-Step: How To Build DIY Floating Shelves With Ana White Style
Step 1: Measure the Wall and Mark the Studs
Start with the wall, not the lumber pile. Decide where the shelf will go, then use a stud finder to locate studs. Mark the center of each stud with painter’s tape. Use a level to draw a light reference line where the top or bottom of the shelf will sit.
This step determines how strong the installation can be. Screwing the hidden support into studs is the best option. Drywall anchors may work for light decorative shelves, but they should not be trusted for heavy loads. When in doubt, choose studs, stronger hardware, and a more conservative shelf load.
Step 2: Build the Hidden Support Frame
The support frame is the skeleton of the floating shelf. Cut a back board to the shelf length, then cut several short support arms to match the shelf depth minus the thickness of the front face. Attach the arms perpendicular to the back board using screws and wood glue. Pocket holes can make this cleaner and stronger, but standard screws can also work if you pre-drill to prevent splitting.
Keep the frame square. If the arms tilt, twist, or wander off like confused little wooden tourists, the shelf box will not slide on smoothly. Clamp pieces before driving screws, and check alignment as you go.
Step 3: Build the Hollow Shelf Box
The shelf box is the visible part of the project. It usually includes a top, bottom, front face, and two side pieces. The back is left open so the box can slide over the support frame. Cut the pieces carefully and dry-fit them before adding glue.
Apply wood glue along the edges, clamp the pieces, and fasten them with brad nails, screws, or pocket holes depending on your tools and preferred finish. If you use screws or nails on visible faces, plan to fill the holes before painting or staining. For a high-end look, keep the front seam tight and sand it smooth.
Step 4: Test Fit Before Finishing
Before paint or stain enters the chat, slide the shelf box over the support frame. It should fit snugly but not require a wrestling match. If it is too tight, sand the inside edges or adjust the frame. If it is too loose, you may need shims or a small correction strip.
This test fit prevents heartbreak later. Few DIY moments are more dramatic than realizing your freshly painted shelf does not fit over the bracket. That is how innocent people become motivational speakers for “measure twice, cut once.”
Step 5: Sand the Shelf Smooth
Sanding is where a homemade shelf starts looking custom. Begin with medium-grit sandpaper to smooth rough edges, then move to a finer grit for the final pass. Round sharp corners slightly so the shelf feels finished and takes paint or stain evenly.
After sanding, remove dust with a vacuum, tack cloth, or slightly damp cloth. Dust left on the surface can ruin a finish by creating bumps, streaks, or the mysterious texture known as “garage floor chic.”
Step 6: Paint, Stain, or Seal
For painted shelves, use primer first, especially if the wood has knots or uneven color. Then apply thin coats of paint, allowing proper drying time between coats. Semi-gloss or satin finishes are popular because they are easier to wipe clean than flat paint.
For stained shelves, test the stain on scrap wood from the same board. Pine and common boards can absorb stain unevenly, so a pre-stain conditioner can help reduce blotchiness. Finish with a protective clear coat if the shelf will hold kitchen items, bathroom supplies, or anything that may leave rings or moisture marks.
Step 7: Attach the Support Frame to the Wall
Hold the support frame against the reference line and check it with a level. Drill pilot holes through the back board into the studs. Then drive long screws through the frame and into the studs. Use at least two studs whenever possible for better support and less wobble.
Do not skip the level. A slightly crooked shelf will announce itself every time you look at it. Worse, round objects may start rolling to one side, and suddenly your shelf has become a tiny ski slope.
Step 8: Slide On the Shelf Box and Secure It
Once the support frame is firmly attached, slide the hollow shelf box over it. Push it back until it sits tight against the wall. Check the level again. Then secure the shelf to the support frame with screws driven from the top, bottom, or sides where they are least visible.
For painted shelves, you can fill visible screw holes and touch up the paint. For stained shelves, place screws where they will be hidden or use plugs for a more polished look.
Common Mistakes To Avoid
Using Weak Wall Anchors for Heavy Shelves
Wall anchors can be useful, but they are not a magical substitute for studs. A shelf holding candles and framed photos is different from a shelf holding stacks of cookbooks. For serious weight, fasten the support into studs or use a heavy-duty bracket system designed for the load.
Building the Shelf Too Deep
Depth increases leverage. A 12-inch-deep shelf loaded at the front edge puts more stress on the wall than a 6-inch-deep shelf. If you want deep shelves, use stronger supports, more stud connections, and better materials.
Skipping Pilot Holes
Pilot holes help prevent wood splitting and make screws easier to drive accurately. This is especially important near the ends of boards and when fastening the support frame.
Finishing Too Quickly
Paint and stain need time. Rushing coats can create sticky surfaces, uneven sheen, or fingerprints that immortalize your impatience. Let each coat dry properly before handling or installing.
Design Ideas for DIY Floating Shelves
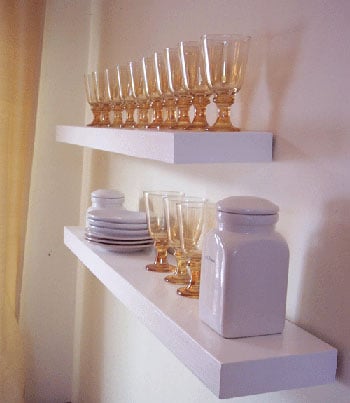
Floating shelves can be practical, decorative, or both. In a kitchen, they can display everyday dishes, glass jars, spices, coffee mugs, or cookbooks. In a bathroom, they can hold rolled towels, candles, small baskets, or skincare essentials. In a living room, they can frame a TV, showcase plants, or give family photos a clean modern stage.
For a built-in look, paint the shelves the same color as the wall. For contrast, stain them darker than surrounding trim. For a modern farmhouse style, pair warm wood shelves with black hardware nearby, even though the shelf hardware itself stays hidden. For a minimalist look, keep the shelves thin, long, and sparsely styled.
When styling, leave breathing room. A floating shelf does not need to hold every object you own. Mix heights, textures, and shapes. A plant, a framed print, a small stack of books, and one sculptural object often look better than a lineup of twelve unrelated knickknacks having a very awkward meeting.
How Much Weight Can DIY Floating Shelves Hold?
There is no universal weight limit for DIY floating shelves because every build is different. The capacity depends on the wall structure, support frame, screw length, shelf depth, material quality, and how the weight is distributed. A short shelf screwed into two studs can be surprisingly strong, while a long, deep shelf attached only to drywall can be trouble wearing a cute finish.
As a general rule, keep heavy objects close to the wall rather than near the front edge. Spread weight evenly instead of placing one heavy item in the middle. If the shelf is for dishes, books, or pantry goods, overbuild the support frame and use studs. For valuable or fragile items, test the shelf gradually before loading it fully.
Budget Tips for Building Floating Shelves
DIY floating shelves can be affordable, especially if you use common boards or plywood. The biggest savings come from building custom sizes instead of buying multiple pre-made shelves. You can also use leftover paint, stain, or lumber from previous projects.
However, do not save money by choosing poor screws or flimsy support material. The hidden frame is not glamorous, but it does the hard work. Spend where it matters: straight boards, strong screws, quality wall attachment, and a durable finish.
Hands-On Experience: What You Learn While Building Floating Shelves
The first thing most DIYers learn while building floating shelves is that walls are not as straight as they look. A wall can appear perfectly normal until you place a level, a square shelf, and a long board against it. Then it reveals its true personality: slightly bowed, uneven, and possibly holding a grudge from 1987. This is why test fitting matters. A small gap at the wall is common, and it can often be softened with careful placement, caulk for painted shelves, or a slight scribe cut for advanced builders.
The second lesson is that the hidden bracket is more important than the pretty outside box. The shelf may get the compliments, but the support frame deserves the applause. A tight, square frame makes installation smoother and gives the shelf that solid, confidence-inspiring feel. If the frame is sloppy, the shelf may wiggle, tilt, or refuse to slide on properly. Taking an extra ten minutes to pre-drill, clamp, and check for square saves a lot of frustration later.
Another real-world experience is learning how different finishes change the mood of the project. White paint makes the shelves blend into the wall and feel crisp. Black paint can look dramatic and modern, but it shows dust faster. A warm stain makes inexpensive wood feel richer, especially when paired with plants, pottery, or brass accents. The finish should match not only the room but also the way the shelf will be used. Kitchen shelves need a wipeable topcoat. Bathroom shelves need moisture resistance. Display shelves can be more decorative.
There is also a styling lesson. After spending hours building a shelf, the temptation is to cover every inch of it with stuff. Resist. Floating shelves look best when they have negative space. Try grouping objects in odd numbers, varying heights, and mixing practical storage with decorative pieces. A shelf with three beautiful items often looks more expensive than a shelf packed like a yard sale table.
Finally, this project builds confidence. Floating shelves look advanced, but the process is approachable: measure, cut, assemble, sand, finish, mount, and secure. Once you understand the basic hidden-frame method, you can adapt it for laundry rooms, offices, pantries, nurseries, and awkward corners. The project teaches patience, accuracy, and the fine art of not panicking when the first dry fit is too snug. By the end, you get more than a shelf. You get a custom piece that solves a storage problem and quietly brags, “Yes, I made that.”
Final Thoughts
Building DIY floating shelves with an Ana White-inspired method is one of the most satisfying woodworking projects for beginners and experienced DIYers alike. It is practical, attractive, and customizable, with enough flexibility to fit almost any room. The key is to plan around studs, build a strong hidden support, keep the shelf box square, finish the wood carefully, and install everything level.
Floating shelves may look effortless when they are done, but the secret is thoughtful construction. Measure carefully, use sturdy materials, respect the wall structure, and do not overload the shelf beyond what your build can handle. Do that, and your finished shelves will look clean, modern, and expensive without requiring a designer budget.
In other words, this is the kind of DIY project that makes your home look better and makes you feel handier every time you walk past it. Not bad for a few boards, some screws, and the courage to turn an empty wall into useful storage.
