
Makeup
Underground EZ Access Hose Storage for Less Than $10
May
A garden hose is one of the most useful tools in the yard, right up until it becomes a green spaghetti monster sprawled across the lawn. It tangles around patio chairs, trips unsuspecting humans, bakes in the sun, freezes in winter, and somehow always ends up exactly where the mower wants to go. A fancy hose reel can solve the problem, but many decent models cost far more than a casual weekend project should. That is where underground EZ access hose storage comes in.
The idea is simple: create a small, hidden storage tube or sleeve near your outdoor faucet, garden bed, or watering zone so the hose can be tucked away neatly, protected from foot traffic, and pulled out quickly when needed. With a short section of PVC drain pipe, corrugated drainage pipe, or even a repurposed plastic container, this project can often be built for less than $10especially if you use leftover materials, a hardware-store offcut, or salvaged pipe from another yard project.
This is not meant to replace a heavy-duty reel for a 150-foot hose. It is a smart, low-profile solution for short hoses, lightweight expandable hoses, drip-irrigation feeder hoses, or a watering hose used near a raised bed. Think of it as a tiny underground garage for your hoseminus the mortgage, the garage door opener, and the suspicious pile of old paint cans.
What Is Underground EZ Access Hose Storage?
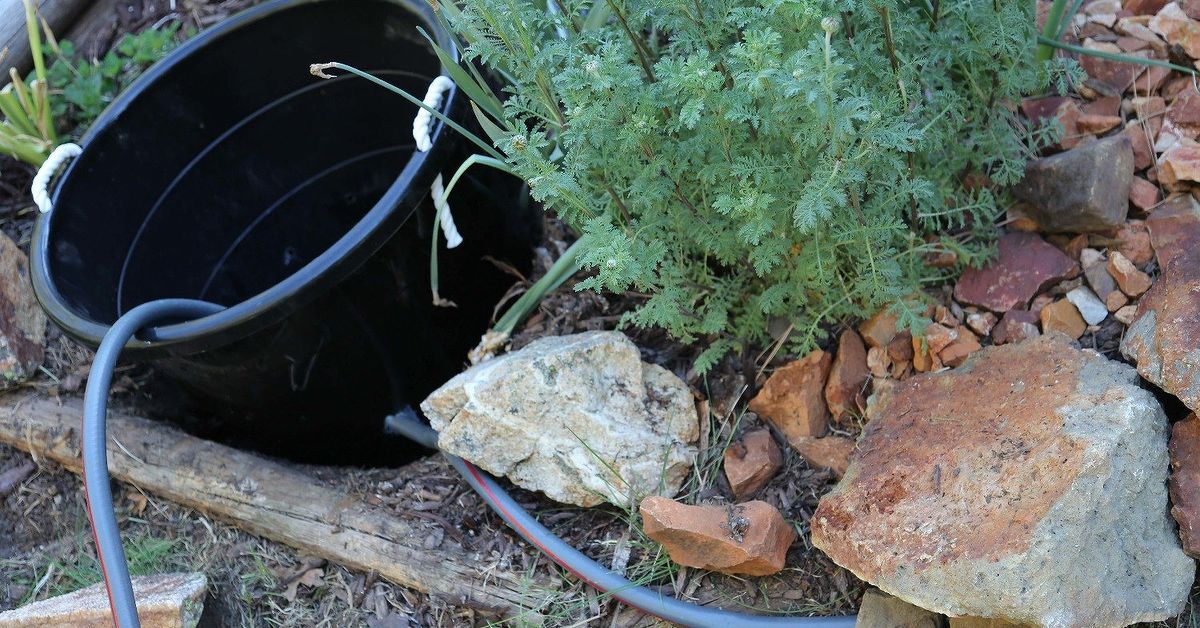
Underground EZ access hose storage is a DIY garden hose storage method that hides a hose below or partially below ground while keeping one end easy to reach. The most common design uses a vertical or angled tube installed in the soil. The hose slides into the tube when not in use and pulls out when it is time to water.
For small gardens, this can be as basic as a 12- to 24-inch piece of 4-inch drainage pipe set into the ground beside a faucet. For a cleaner finish, you can add a cap, grate, flat stone, small paver, or removable cover. The key is access: the hose should be hidden, but not buried forever like a pirate treasure map written by someone with bad handwriting.
Why This Hose Storage Idea Works
Most hose storage problems come from exposure and poor handling. Leaving a hose in the sun can make the material age faster. Leaving water inside during freezing weather can cause cracks. Kinking a hose repeatedly weakens it over time. Tossing it on the ground creates clutter and makes leaks harder to notice. A small underground storage sleeve helps solve several of these issues at once.
It Hides the Hose Without Making It Hard to Use
Decorative hose pots and wall-mounted reels look nice, but they still take up visible space. Underground hose storage keeps the hose low and out of sight. This is especially useful near front yards, small patios, raised garden beds, and narrow side yards where every object seems to shout, “Look at me, I’m yard clutter!”
It Helps Prevent Tripping and Mower Mishaps
A loose hose across a walkway or lawn can become a trip hazard. It can also be chewed up by mower blades, snagged by wheelbarrows, or crushed under outdoor furniture. Tucking the hose into a pipe keeps it contained and helps the yard feel more organized.
It Costs Much Less Than Most Hose Reels
Many hose reels, hose pots, and hose carts cost anywhere from modest to “why does watering tomatoes require a luxury budget?” A DIY underground hose sleeve can be made with a short length of pipe, gravel, and a simple cover. If you already have leftover pipe, the total cost may be close to zero.
Materials You Can Use for Less Than $10
The exact cost depends on what you already have and what your local store sells. A full 10-foot stick of 4-inch PVC pipe usually costs more than $10, but this project does not require a full stick. Look for scrap pieces, short precut sections, leftover drainage pipe, or ask whether your hardware store has damaged or offcut pieces available.
Budget Material List
- One short section of 4-inch PVC drain pipe or corrugated drainage pipe
- A handful of gravel for drainage
- A plastic cap, drain grate, flat stone, or paver as a removable cover
- A short lightweight hose or expandable hose
- Optional: landscape fabric to reduce soil falling into the sleeve
- Optional: zip tie or small hook to keep the hose end easy to grab
If you want the cleanest version, use smooth PVC pipe because the hose slides in and out more easily. Corrugated pipe is cheaper and flexible, but the ridges may catch slightly on some hoses. For a short hose, either can work. For a soft expandable hose, a smooth sleeve is usually easier.
Before You Dig: The Safety Step Nobody Should Skip
Even a small garden project can run into buried utilities. Before digging, contact 811 in the United States or your local utility-marking service. This is the “measure twice, don’t hit a gas line once” part of the project. It may feel excessive for a small hole, but underground lines can be shallower than expected, especially near homes, sidewalks, irrigation systems, and older landscaping.
Also avoid digging directly beside electrical boxes, gas meters, irrigation valves, outdoor lighting wires, or mystery pipes that look like they were installed by a previous homeowner who believed in surprises. Choose a safe location near the faucet but away from obvious utility paths.
How to Build Underground EZ Access Hose Storage
This project is intentionally simple. You are not building a secret bunker for the hose. You are creating a clean sleeve that keeps the hose accessible and mostly hidden.
Step 1: Choose the Right Location
Pick a spot close to your outdoor spigot, raised bed, or watering area. The best location is easy to reach but not in the middle of a walking path. Near the edge of a garden bed, beside a fence post, or behind a shrub can work well. Avoid low spots that collect water after rain.
Step 2: Test the Hose Fit
Before digging, coil or fold the hose loosely and see how much space it needs. A short expandable hose may fit easily in a 4-inch pipe. A traditional rubber hose may need a wider container or a shallow buried box instead. The hose should slide in without being forced, twisted, or sharply bent.
Step 3: Dig a Sleeve Hole
Dig a hole deep enough to hold the pipe section vertically or at a slight angle. A 12- to 18-inch depth works for many small hoses. If you use a longer pipe, keep the opening slightly above soil level so dirt and mulch do not wash inside every time it rains.
Step 4: Add Gravel for Drainage
Place a few inches of gravel at the bottom of the hole. This helps water drain away from the sleeve. Do not seal the bottom unless you are using a removable container that can be cleaned often. A hose storage sleeve should not become a tiny underground soup bowl.
Step 5: Set the Pipe
Place the pipe in the hole and angle it slightly toward the direction you will pull the hose. Backfill around the pipe with soil and tamp gently. Keep the opening clear and stable. If the soil is loose, add a small paver or stones around the top to prevent collapse.
Step 6: Add a Cover
A simple cover keeps leaves, mulch, insects, and curious pebbles out of the sleeve. You can use a drain grate, a plastic cap with holes, a flat stone, or a small paver. The cover should be easy to remove with one hand. If it requires a screwdriver, a prayer, and three minutes of frustration, it is not “EZ access.”
Step 7: Store the Hose Properly
Drain the hose after use, feed it into the sleeve in loose loops, and keep the faucet end or nozzle end visible. A bright zip tie, clip, or small hook can help you grab the hose quickly. Avoid jamming the hose into the pipe, because sharp bends can create kinks and shorten the hose’s life.
Best Hoses for This Project
This storage method works best with short and flexible hoses. Expandable hoses are the easiest to store because they shrink after draining. Lightweight vinyl hoses may also work, though they can kink more easily. Heavy rubber hoses are durable, but they are not ideal for a narrow underground sleeve unless the sleeve is wide and shallow.
Good Choices
- Expandable garden hoses
- Short 10- to 25-foot hoses
- Drip irrigation feeder hoses
- Soaker hose sections near raised beds
- Lightweight drinking-water-safe hoses for vegetable gardens
Not-So-Good Choices
- Long 75- to 150-foot hoses
- Stiff commercial rubber hoses
- Hoses with bulky metal nozzles attached
- Old hoses with cracks, leaks, or permanent kinks
If you water vegetables, herbs, or edible plants, consider using a hose labeled lead-free or drinking-water-safe. Many standard garden hoses are designed for outdoor watering, not drinking water. For edible gardens, it is wise to let the hose run briefly before watering and avoid using hot water that has been sitting in the hose under direct sun.
Design Variations for Different Yards
The beauty of underground EZ access hose storage is that it can be adapted to the yard you actually have, not the fantasy yard from a magazine where nobody owns muddy shoes.
The Raised Bed Sleeve
Install the pipe sleeve just outside a raised vegetable bed. Keep a short hose inside and connect it to the nearby spigot when needed. This is perfect for gardeners who water one specific area every day and do not want a hose crossing the lawn.
The Hidden Patio Edge Version
Place the sleeve beside a patio, deck step, or planter. Add a decorative stone cover so the opening blends into the hardscape. This keeps the hose handy for washing planters, rinsing outdoor furniture, or watering container plants.
The Mulch Bed Disguise
Install the sleeve in a mulched bed near shrubs. Keep the cover slightly above mulch level. The hose stays close to the plants, and the storage disappears into the landscape.
The Shallow Box Option
If your hose is too bulky for a pipe, use a small plastic storage box with drainage holes instead. Bury it so the lid sits just above ground. This version is still inexpensive if you repurpose a container you already own.
Common Mistakes to Avoid
The project is simple, but a few mistakes can turn it from clever to annoying.
Do Not Make the Opening Too Small
If the hose barely fits, you will hate using it. The hose should slide in and out smoothly. A tight pipe creates friction and encourages kinks.
Do Not Let the Sleeve Fill With Water
Drainage matters. Add gravel, keep the top slightly raised, and avoid low areas. Standing water can make the hose dirty and unpleasant to handle.
Do Not Bury the Hose Permanently
This is storage, not plumbing. The hose should remain removable for cleaning, winter storage, repairs, and replacement.
Do Not Skip Winter Care
In freezing climates, disconnect, drain, and store the hose indoors if possible. Even if the sleeve remains outside, the hose will usually last longer when protected from freeze-thaw stress.
Maintenance Tips for a Longer-Lasting Hose
Good storage helps, but hose care still matters. Drain the hose after each use, especially before cold weather. Coil or feed it loosely instead of folding it sharply. Check washers at the faucet connection if you see leaks. Replace cracked washers before blaming the entire hose, the faucet, the moon, or your life choices.
Keep the storage sleeve clean by removing leaves and soil every few weeks. If ants or insects move in, lift the hose out and let the sleeve dry. If the hose smells musty, rinse it, drain it fully, and store it in a sunnier, drier spot for a day before returning it to the sleeve.
Is It Really Possible for Less Than $10?
Yes, but with a realistic definition of “less than $10.” If you buy a brand-new full-length pipe, a decorative grate, premium fittings, and a designer cover, the budget will wave goodbye and leave town. The under-$10 version depends on using a short pipe section, leftover material, or a basic drainage sleeve.
Here is a realistic budget version: use a leftover 4-inch pipe section from a drainage project, add gravel from an existing bag, and cover the opening with a flat stone from the garden. Cost: nearly free. If you buy a short section of pipe or a cheap corrugated drain piece, you can often keep the project close to $10, depending on local pricing.
500-Word Experience Section: Lessons From Using Underground EZ Access Hose Storage
The first thing you learn from underground hose storage is that convenience matters more than perfection. A beautiful hose reel mounted on the wrong wall will still be ignored. A humble pipe sleeve placed exactly where you water every morning will get used constantly. The best location is not always the prettiest spot; it is the spot where your hand naturally reaches when the basil looks dramatic and the tomatoes are staging a moisture protest.
In practice, the easiest setup is near a raised bed or container garden. A short expandable hose works especially well because it shrinks after draining and does not fight you while you tuck it away. Traditional hoses can work too, but they need more patience. If the hose is stiff, the storage sleeve should be wider or shorter. Forcing a stubborn hose into a narrow pipe feels like trying to stuff a sleeping bag back into its factory sacktechnically possible, emotionally unnecessary.
Another useful lesson is to make the top of the sleeve obvious enough for you but invisible enough for everyone else. A flat stone cover works well because it blends into the landscape and can be lifted quickly. A plastic cap is cleaner, but it can look a little too “plumbing aisle chic” unless you hide it with mulch or plants. A drain grate is practical because it allows airflow and reduces debris, but small leaves may still sneak in because leaves apparently have life goals.
Drainage is the difference between a clever hose holder and a muddy pocket of regret. A few inches of gravel under the pipe helps a lot. It is also smart to set the pipe opening slightly above the soil or mulch line. If the opening sits too low, rainwater, mulch, and soil will slide inside. After one heavy storm, you may pull out a hose that looks like it spent the weekend spelunking.
The project also teaches you to respect hose length. A 10- or 25-foot hose near a specific watering zone is perfect. A 100-foot hose belongs on a reel, cart, or large storage box. Underground EZ access storage is about quick daily use, not wrestling a rubber python into a mailbox-sized hole. When the hose length matches the job, the system feels effortless.
One small upgrade that makes a big difference is adding a grab loop. Use a zip tie, cord loop, or clip near the hose end so you can pull it out without reaching deep into the sleeve. Keep the nozzle separate if it is bulky. Store the hose first, then attach the nozzle when needed, or leave the nozzle just under the cover if space allows.
Finally, this storage method changes the way the garden feels. The yard looks cleaner. The hose stops migrating across the walkway. Watering becomes quicker because the tool is already where it belongs. It is not glamorous, but it is satisfying in the way only a cheap, useful DIY fix can be. For less than the price of lunch, you get a tidier garden, fewer hose tangles, and the smug joy of solving a problem with a piece of pipe.
Conclusion
Underground EZ access hose storage is a practical, low-cost solution for gardeners who want a cleaner yard without buying an expensive hose reel. With a short section of pipe, basic drainage, and a simple cover, you can hide a small hose near the exact place you use it most. The result is tidy, convenient, and surprisingly satisfying.
This project works best for short hoses, expandable hoses, and garden zones that need frequent watering. It is not ideal for long, heavy hoses, and it should always be installed with safe digging practices in mind. Contact your local utility-marking service before digging, choose a well-drained location, and keep the hose removable for cleaning and winter care.
Note: This article is based on real-world DIY garden storage practices, safe digging guidance, hose-care recommendations, and outdoor watering best practices from reputable U.S. home improvement, utility safety, gardening, and extension resources.
