
Beauty Unlocked
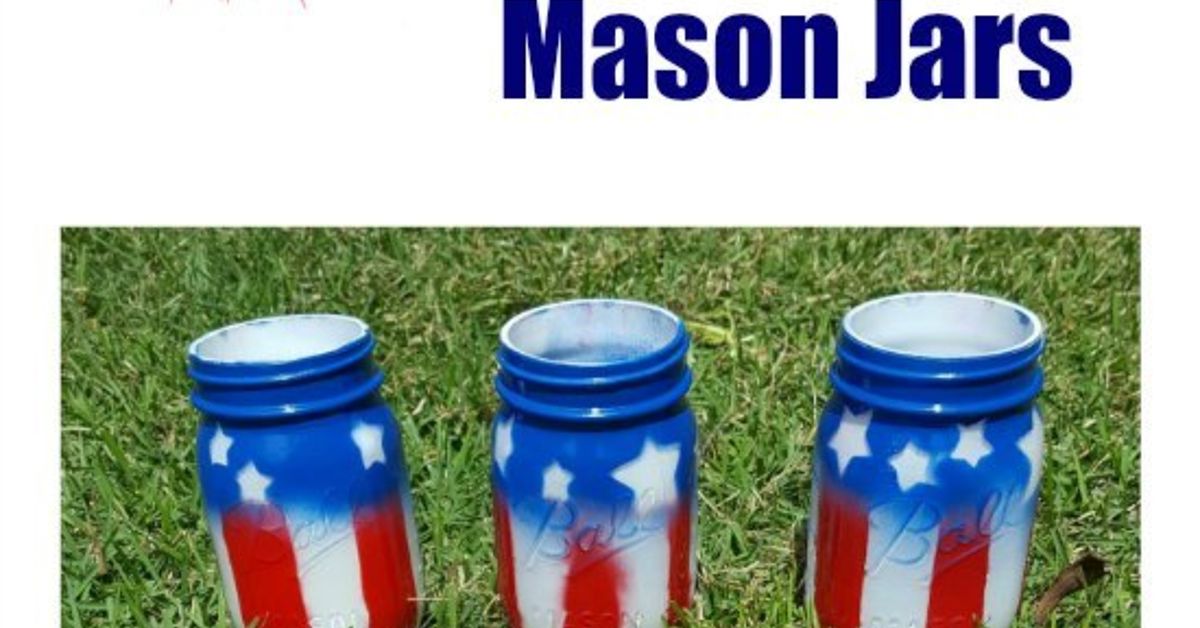
How to Make American Flag Mason Jars
Aug
American flag Mason jars are the kind of DIY project that makes a table look festive without requiring you to own a laser cutter, a craft room, or an emotional support glue gun. With a few clean jars, red, white, and blue paint, star stickers, painter’s tape, and a little patience, you can turn ordinary glass jars into patriotic centerpieces for the Fourth of July, Memorial Day, Veterans Day, Labor Day, summer barbecues, classroom crafts, porch decor, or a backyard party where the potato salad mysteriously disappears before the burgers are done.
This guide explains how to make American flag Mason jars step by step, including materials, painting techniques, sealing tips, design variations, troubleshooting, and practical ways to use the finished jars. The goal is simple: create patriotic Mason jar decor that looks handmade in the charming way, not handmade in the “I painted this during a power outage” way.
Why American Flag Mason Jars Are Such a Popular DIY Craft
Mason jars have a long American history. Originally designed for food preservation, they are now used for everything from pantry storage to wedding centerpieces, candle holders, flower vases, bathroom organizers, and seasonal decorations. Their shape is familiar, sturdy, affordable, and forgiving. In other words, they are the blue jeans of the craft world.
American flag Mason jars combine that classic jar shape with patriotic colors. They are easy enough for beginners, customizable enough for experienced crafters, and budget-friendly enough to make in batches. A single jar can become a utensil holder. A set of three can become a red, white, and blue centerpiece. A glowing jar with star cutouts can become a lantern for a summer evening table.
Materials You Will Need
Before you begin, gather everything in one place. This prevents the classic crafting tragedy of having wet paint on your fingers while searching for the blue paint that is definitely “somewhere.”
Basic Supplies
- Clean Mason jars, pint or quart size
- Acrylic craft paint or multi-surface paint in red, white, and navy blue
- Foam brushes or small flat paintbrushes
- Painter’s tape
- Star stickers, vinyl stars, or a star stencil
- Fine-grit sandpaper for distressing
- Clear acrylic sealer or dishwasher-safe decoupage sealer
- Rubbing alcohol and a lint-free cloth
- Drop cloth, parchment paper, or newspaper
- Twine, ribbon, raffia, or jute cord
- Optional: LED tea lights, faux flowers, small flags, or wooden tags
Choosing the Right Mason Jars
Clear glass jars work best because paint adheres more evenly to a clean surface. Pint jars are great for candles, pencils, and party favors. Quart jars work better for flower arrangements, table centerpieces, or porch displays. Wide-mouth jars are easier to fill with flowers or utensils, while regular-mouth jars have a classic vintage look.
You do not need brand-new jars. Reused jars can work beautifully as long as they are clean, odor-free, and free of greasy residue. If the jar once held pickles, wash it twice unless you want your patriotic centerpiece to smell like a deli sandwich.
Step-by-Step Instructions: How to Make American Flag Mason Jars
Step 1: Clean the Jars Thoroughly
Wash each jar with warm water and dish soap. Remove labels, adhesive, dust, and any leftover food residue. Dry the jars completely. Then wipe the outside with rubbing alcohol to remove oils from your hands. This small step makes a big difference because paint sticks better to clean glass.
Step 2: Plan Your Flag Design
The U.S. flag has red and white stripes with a blue union and white stars. For a Mason jar craft, you do not need to paint all fifty stars or thirteen perfect stripes unless you want to test your patience and your snack supply. A simplified flag-inspired design is more practical and still instantly recognizable.
The most popular design places a blue field with stars on the upper portion of the jar and red-and-white stripes around the rest. Another easy option is to create a three-jar set: one red jar, one white jar, and one blue jar with stars. When placed together, the jars suggest the American flag without requiring tiny brush gymnastics.
Step 3: Apply the Base Coat
Turn the jar upside down on parchment paper or hold it by the rim. Apply a thin coat of white paint first if you want brighter red and blue colors. Glass is slick, so do not panic if the first coat looks streaky. That is normal. The second coat is where the magic starts behaving like magic.
Use thin layers instead of one thick layer. Thick paint can drip, bubble, or peel. Let each coat dry according to the paint label before adding another. Most jars need two to three coats for solid coverage.
Step 4: Tape the Stripes
Once the white base is dry, wrap painter’s tape around the jar to create horizontal stripes. Press the tape down firmly along the edges to reduce bleeding. For a rustic design, the stripes do not need to be perfectly even. A little handmade character is charming. A giant red blob across the middle is less charming, but still fixable.
Paint the exposed areas red. Remove the tape while the paint is slightly tacky, not fully hardened. This helps prevent the tape from pulling up dried paint.
Step 5: Create the Blue Star Field
Use painter’s tape to block off a rectangle or wide vertical panel for the blue field. On a round Mason jar, a simple front-facing blue panel usually looks better than trying to wrap the blue area all the way around. Paint the section navy blue and allow it to dry.
For stars, you have several options. Stick white vinyl stars onto the blue area, use a stencil and dab white paint through it, or place star stickers on the glass before painting blue and peel them off after the paint dries to reveal clear star shapes. The sticker-resist method looks especially nice if you plan to place LED lights inside the jar.
Step 6: Distress for a Vintage Farmhouse Look
After the paint is completely dry, lightly rub raised areas of the jar with fine-grit sandpaper. Focus on the lettering, rim, and edges. This creates a weathered farmhouse effect that looks intentional, not like the jar got into a fight with your craft drawer.
Distressing is optional. If you prefer a clean, modern patriotic Mason jar, skip the sanding and keep the colors crisp.
Step 7: Seal the Paint
Painted glass benefits from a protective topcoat. Use a clear acrylic sealer or a decoupage sealer made for glass. Apply thin, even coats and let each coat dry fully. If you want the jars to be more durable, choose a sealer designed for glass and follow the curing instructions carefully.
Even when sealed, these jars should be treated as decorative items. Hand-washing is safer than dishwashing. Do not soak painted jars in water, and avoid scrubbing them with abrasive pads.
Step 8: Add Finishing Touches
Tie jute twine, gingham ribbon, red-and-white baker’s twine, or navy ribbon around the neck of the jar. Add a wooden tag, small charm, or paper label if you are using the jar as a gift. Fill the jar with faux hydrangeas, mini flags, sparklers for display only, wrapped candy, paper straws, napkins, or utensils.
Creative Design Ideas for American Flag Mason Jars
Rustic Farmhouse Flag Jars
Use chalky-finish paint, muted red, creamy white, and deep navy. Sand the raised lettering after painting and finish with twine. These jars look great on a wooden tray with white flowers and small flags.
Glowing Star Lantern Jars
Place star stickers on a clean jar before painting. Paint over them, let the paint dry, and peel the stickers away to reveal clear stars. Add LED tea lights inside. This creates a soft glow that looks festive on patios, mantels, and picnic tables.
Three-Jar Centerpiece Set
Paint one jar red, one jar white, and one jar blue. Add white stars to the blue jar and tie all three together visually with matching ribbon. Fill them with flowers, cutlery, or paper pinwheels.
Kid-Friendly Patriotic Jars
For kids, skip the complicated taping and use sponge brushes, star stickers, and washable craft paint. The final result may not be magazine-perfect, but it will have personality. Also, kids love stickers, and stickers are basically tiny craft currency.
Practical Ways to Use American Flag Mason Jars
American flag Mason jars are more than shelf decorations. Use them as utensil holders for a barbecue, centerpieces for a patriotic party, flower vases for a summer table, LED lanterns for a porch, desk organizers, favor jars, candy containers, or gift packaging. They also make thoughtful handmade gifts for teachers, neighbors, veterans, hosts, or anyone who appreciates Americana decor.
For a Fourth of July party, line three jars down the center of the table and fill them with forks, spoons, and napkins. For Memorial Day, keep the look more respectful and simple with white flowers and a small ribbon. For Veterans Day, add a handwritten thank-you tag and use the jar as a small gift container.
Tips for a Better Finish
Use Thin Paint Coats
Thin coats dry smoother and adhere better to glass. Heavy coats may look efficient at first, but they often create drips and uneven texture. Crafting is one of the few places where doing less at once usually makes you look more talented.
Let Paint Cure Before Handling
Dry paint and cured paint are not the same. A jar may feel dry to the touch but still be soft underneath. Give the paint time to harden before sealing, sanding, or filling the jar.
Do Not Paint Areas That Touch Food
If you plan to use the jars for wrapped candy or utensils, paint only the outside. Avoid painting the inside if food, drinks, or eating utensils will touch the surface. For drinking glasses, use products specifically labeled safe for that purpose and follow all instructions.
Use LED Lights Instead of Real Candles
LED tea lights are safer, cooler, and easier to use. If you use real candles, never leave them unattended, avoid lids, and make sure the jar is not painted or decorated in a way that can overheat. When in doubt, choose LED. Your centerpiece does not need a dramatic fireworks reenactment indoors.
Common Mistakes and How to Fix Them
Paint Is Peeling
Peeling usually happens when the glass was not cleaned well, the paint was applied too thickly, or the jar was handled before curing. Remove loose paint, clean the surface, and repaint using thin coats. A proper sealer can also help protect the finish.
Stripes Are Bleeding Under the Tape
Make sure the tape edges are pressed down tightly. You can also paint a light coat of the base color over the tape edge first, let it dry, and then apply the stripe color. This seals the edge and helps create cleaner lines.
The Stars Look Messy
Use vinyl stickers or adhesive stencils for sharper stars. If painting by hand, choose a slightly rustic style so the stars do not need to be identical. Handmade stars are allowed to have personality. They are stars, not tax forms.
The Colors Look Too Bright
For a vintage look, choose barn red, antique white, and navy instead of bright primary colors. Distressing with sandpaper also softens the finish and gives the jars a classic Americana feel.
Experience Notes: What Actually Helps When Making American Flag Mason Jars
After making several versions of American flag Mason jars, the biggest lesson is that preparation matters more than artistic talent. A clean jar, thin coats, and enough drying time will beat rushed painting every time. The first jar is usually the “learning jar.” It teaches you how your paint behaves, how much pressure to use with the brush, and whether your tape is truly sealed. By the second jar, you begin to feel like a person who owns a craft apron on purpose.
One useful trick is to paint the jar white first, even if only part of the final design will be white. Red and blue look richer over a white base, and the stripes appear cleaner. Another helpful habit is to keep a damp cotton swab nearby. If paint bleeds under the tape or a star edge gets fuzzy, you can gently clean it before the paint dries. This tiny rescue tool can save a jar from looking like it was decorated by a raccoon with patriotic intentions.
For parties, the three-jar centerpiece is the easiest design to repeat. Paint one jar red, one white, and one blue, then add stars to the blue jar. It is faster than painting a full flag pattern on every jar, and it photographs beautifully. Fill the red jar with forks, the white jar with napkins, and the blue jar with paper straws or small flags. It looks organized, festive, and far more impressive than the amount of work involved.
If you want a more elevated look, choose matte or chalky paint and distress the raised lettering. The embossed words on many Mason jars are perfect for sanding because they catch the light after distressing. Add jute twine and white flowers, and suddenly your project looks like it belongs on a farmhouse table next to lemonade and a pie cooling in the window. Whether or not there is actually pie is between you and your grocery store.
The most important experience-based advice is to decide how the jars will be used before you decorate them. If they are for flowers, keep the inside unpainted and add water carefully. If they are for LED lights, use star cutouts or thinner paint so the glow can show through. If they are for utensils, avoid glitter that sheds. If they are for outdoor use, seal them well and bring them inside during rain. Painted glass can handle a party, but it should not be asked to survive a thunderstorm like a tiny decorative soldier.
Finally, do not chase perfection. American flag Mason jars look best when they feel handmade, warm, and personal. Slightly uneven distressing, brush texture, and small variations from jar to jar add charm. Make a set, place them where people gather, and enjoy the fact that you created patriotic decor with a few jars and paint. That is the real win: simple materials, cheerful results, and no need to explain why there is blue paint on your elbow.
Conclusion
Learning how to make American flag Mason jars is an easy way to create patriotic decor that feels personal, affordable, and festive. With clean jars, the right paint, careful taping, simple star details, and a protective sealer, you can make jars that work as centerpieces, lanterns, utensil holders, flower vases, or handmade gifts. Keep the design rustic or crisp, playful or elegant, simple or detailed. The best version is the one that fits your table, your celebration, and your patience level.
Whether you are decorating for Independence Day, honoring veterans, hosting a backyard barbecue, or simply adding red, white, and blue charm to your home, American flag Mason jars are a craft worth making. They are practical, reusable, and cheerful enough to make even the snack table look like it has a plan.

