
Beauty Tools & Accessories
How to Make a Mid-Century Modern Birdhouse
Jul
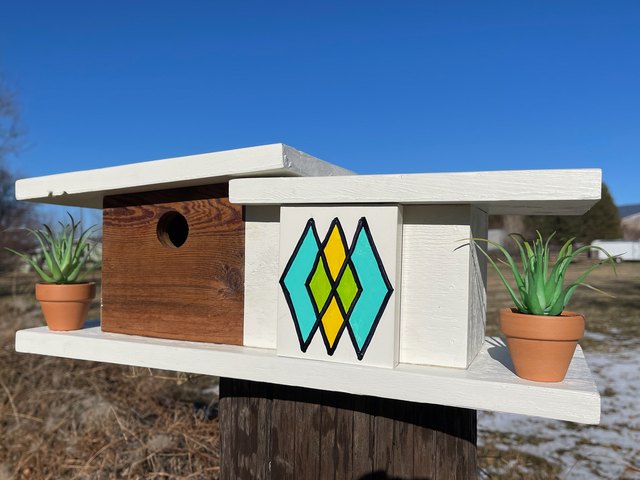
A birdhouse can be useful without looking like a tiny wooden barn that lost its livestock. With a low-sloped roof, clean geometric lines, natural wood, and one carefully chosen retro accent, you can build a mid-century modern birdhouse that belongs beside a stylish ranch homeor at least makes your backyard look as though it owns a very tasteful record collection.
The trick is balancing architecture with actual bird needs. Birds do not care whether the accent panel is “Atomic Age mustard.” They care about correct dimensions, ventilation, drainage, protection from predators, and a dry place to raise their young. This guide combines those practical requirements with classic mid-century modern design principles, including simple forms, broad roof planes, asymmetry, minimal ornament, and a connection to natural materials.
What Makes a Birdhouse Mid-Century Modern?
Mid-century modern architecture is strongly associated with low horizontal forms, flat or gently sloping roofs, clean lines, geometric shapes, functional layouts, natural materials, and minimal decoration. Those ideas translate surprisingly well to a small nesting box.
For this project, the mid-century character comes from five features:
- A low shed roof instead of a traditional peaked roof
- An asymmetrical entrance placement or accent panel
- A combination of natural cedar and one restrained color
- Thin vertical or horizontal decorative lines
- A simple box shape without ornamental trim
However, every decorative feature must remain secondary to bird safety. Avoid fake windows, exposed metal edges, deep ledges, mirrored pieces, dangling decorations, and anything that creates a convenient foothold for predators. Your birdhouse should suggest Palm Springs, not a miniature amusement park.
Choose the Bird Before Choosing the Entrance Hole
A birdhouse is more accurately called a nest box, and different cavity-nesting species require different entrance sizes, floor dimensions, mounting heights, and habitats. A hole that is too large may invite larger competitors or predators. A hole that is too small may turn your beautiful project into an extremely fashionable wooden brick.
The sample plan in this guide has an interior floor measuring approximately 5 1/2 by 5 1/2 inches and an interior depth of about 8 inches. It can be adapted for several small songbirds by changing the entrance hole. Always confirm the appropriate plan for the species and habitat in your region before cutting. Cornell Lab’s NestWatch provides species-specific nest-box plans and placement guidance.
| Target Bird | Typical Round Entrance | General Placement |
|---|---|---|
| House wren | 1 1/8 inches | Shrubby yards, woodland edges, or gardens |
| Black-capped chickadee | 1 1/8 inches | Woodland edges, shaded yards, or mixed forests |
| Tufted titmouse | 1 1/4 inches | Deciduous woods and wooded suburban areas |
| Tree swallow | 1 3/8 inches | Open areas, preferably near water |
| Eastern or western bluebird | 1 1/2 inches | Open fields, meadows, or large lawns |
This build uses a 1 1/8-inch entrance as an example for chickadees or wrens. Adjusting only the hole does not automatically make a box ideal for every species, so also check the recommended interior dimensions, habitat, spacing, and mounting height.
Materials and Tools
Recommended Materials
- One untreated cedar or pine board, approximately 3/4 inch thick
- Exterior-rated screws, approximately 1 1/4 to 1 5/8 inches long
- Exterior wood glue for fixed joints
- Two corrosion-resistant screws for the pivoting cleanout side
- One small exterior turn button, hook, or removable screw for the cleanout door
- Optional thin cedar strips for the decorative screen
- Optional light-colored exterior water-based paint or stain
- A metal pole, mounting bracket, and predator baffle
Untreated cedar is an excellent choice because it is durable outdoors, easy to cut, and attractive without a heavy finish. Pine is affordable and workable but may weather more quickly. Avoid pressure-treated lumber, heavily glued scrap wood, and mystery boards that previously lived a glamorous life as a chemical shelf in someone’s garage. Cornell’s NestWatch generally recommends untreated, unpainted cedar or pine, particularly when the material’s history is unknown.
Tools
- Tape measure and pencil
- Combination square or speed square
- Circular saw, table saw, or jigsaw
- Drill and drill bits
- 1 1/8-inch hole saw or Forstner bit
- 3/8-inch drill bit for drainage holes
- 1/4-inch drill bit for ventilation
- Clamps
- Sandpaper
- Safety glasses and hearing protection
Mid-Century Modern Birdhouse Cut List
The following dimensions create an exterior box roughly 7 inches wide and 7 inches deep, with a roof that slopes gently toward the back.
| Part | Quantity | Dimensions |
|---|---|---|
| Front | 1 | 7 inches wide by 11 1/2 inches high |
| Back | 1 | 7 inches wide by 10 1/4 inches high |
| Side panels | 2 | 5 1/2 inches deep, sloping from 11 1/2 inches at the front to 10 1/4 inches at the back |
| Floor | 1 | 5 1/2 by 5 1/2 inches |
| Roof | 1 | 9 by 9 inches |
| Mounting strip | 1 | 2 by 16 inches, optional |
| Decorative slats | 3 | Approximately 1/2 by 1/2 by 8 inches |
The roof is intentionally oversized. Position it with roughly 1 1/2 inches of overhang at the front, 1 inch on each side, and at least 1/2 inch at the back. The broad floating roof plane creates the mid-century silhouette while also helping shield the entrance and wall joints from rain.
How to Build the Birdhouse Step by Step
1. Draw the Side-Panel Roof Slope
Mark both side panels at 11 1/2 inches high along the front edge and 10 1/4 inches high along the back edge. Connect the marks with a straight line and cut along it. The modest slope is enough to move water toward the back without making the birdhouse look like it is leaning into a hurricane.
Stack the two side blanks together while marking and cutting if your tools allow it. Matching panels will help the roof sit evenly.
2. Cut and Sand the Main Pieces
Cut the front, back, sides, floor, and roof. Sand splintered exterior edges, but do not polish the interior surfaces until they become slick. A slightly rough interior gives young birds more grip.
Round only the dangerous or badly splintered corners. The clean, square edges are part of the modern design, so there is no need to soften the entire box into a wooden marshmallow.
3. Drill the Entrance Hole
For the sample chickadee or wren design, mark the center of a 1 1/8-inch entrance approximately 7 1/4 inches above the bottom edge of the front panel. This keeps the bottom of the entrance more than 6 inches above the finished floor.
Place scrap wood beneath the panel before drilling. The backing board reduces tear-out as the hole saw exits. Sand the hole carefully so no sharp fibers remain.
Do not add a perch. Most cavity-nesting birds can enter without one, while a perch may make it easier for predators or aggressive birds to reach the entrance. State wildlife guidance and Audubon-oriented nest-box resources consistently discourage decorative perches.
4. Add an Interior Fledgling Ladder
On the inside face of the front panel, make shallow horizontal saw kerfs below the entrance. Space them roughly 1/2 inch apart and keep them about 1/8 inch deep. These grooves create a small climbing surface that can help nestlings reach the exit.
You can also roughen the area with a chisel or coarse rasp. Do not attach fabric, mesh, or plastic netting inside the box because claws and feet can become caught.
5. Drill Drainage and Ventilation
Drill four drainage holes in the floor, each approximately 3/8 inch in diameter. Position them near the corners rather than directly beneath the center of the nest. Cornell recommends drainage openings and a recessed floor so water can escape instead of collecting around nesting material.
Drill two 1/4-inch ventilation holes near the top of each side panel, or leave narrow ventilation gaps beneath the roof. Keep the openings protected by the roof overhang. Ventilation is especially important in warm climates, but oversized openings can allow excessive rain or light into the chamber.
6. Recess the Floor
Position the floor approximately 1/4 inch above the lower edges of the walls. This small recess keeps the floor from sitting directly against wet surfaces and reduces the chance that wind-driven rain will reach the nest.
Mark the floor position on the front, back, and fixed side. Predrill all screw holes to reduce splitting, particularly near the ends of cedar boards.
7. Assemble the Fixed Walls
Attach the front and back panels to the left side with exterior glue and screws. Add the floor, keeping it level and recessed. Use clamps to hold the pieces square while driving the screws.
Check the box diagonally from corner to corner. Equal diagonal measurements indicate that the structure is square. A slightly imperfect decorative slat looks handmade. A badly twisted nesting chamber looks like zoning officials should become involved.
8. Create the Cleanout Door
Use the right side panel as a pivoting cleanout door. Hold it in position and drive one corrosion-resistant screw through the front and another through the back near the upper corners of the side panel. Leave the screws just loose enough for the panel to swing outward.
Secure the lower edge with a removable screw, small hook, or wooden turn button. Do not glue this panel. Seasonal access makes inspection, maintenance, and removal of old nesting material much easier.
9. Install the Oversized Shed Roof
Center the roof from side to side and shift it forward to create a generous entrance overhang. Predrill and attach it to the front, back, and fixed side. Avoid fastening through the pivoting cleanout panel.
A shallow groove cut into the underside near the roof edges can act as a drip line, encouraging water to fall before it travels toward the walls. This detail is optional, but it is the kind of small practical feature that mid-century designers would probably approve of while quietly judging your lawn furniture.
10. Add the Mid-Century Decorative Details
Attach three thin vertical cedar strips to the left side of the facade, away from the entrance. Keep them shallow and flush enough that they do not become climbing steps. Another option is a thin rectangular accent panel placed beside, rather than beneath, the entrance.
Good color combinations include:
- Natural cedar with muted teal
- Warm white with walnut-brown trim
- Light tan with a small burnt-orange accent
- Pale gray with natural wood slats
- Soft sage with cream trim
Use strong colors sparingly. Dark roofs and dark walls can absorb more heat, so a large black or charcoal finish is a poor choice for a box receiving direct summer sun. Light exterior colors, shade, thicker wood, and adequate ventilation can help reduce dangerous interior temperatures.
How to Finish the Birdhouse Safely
The simplest finish is no finish at all. Untreated cedar will gradually weather to a silvery gray while retaining its clean architectural character.
When color is essential to the design, apply a light exterior paint or stain only to the outside. Keep the interior, floor, ventilation openings, entrance edge, and cleanout surfaces unfinished. Allow the coating to dry and air thoroughly before installing the box. Penn State Extension recommends light, neutral finishes on the exterior only when a finish is used.
Do not pour sealer into joints after assembly. A birdhouse should smell like wood, not like the paint aisle of a hardware store during a heat wave.
Where and How to Mount It
A free-standing metal pole or smooth PVC-covered post is generally safer than a low tree branch or swinging wire. A pole is easier to protect with a predator baffle and less accessible to climbing animals. Cornell and New Jersey Audubon both emphasize secure mounting and predator guards for many small nest boxes.
For chickadees, a height of roughly 5 to 15 feet may be suitable, depending on the species and habitat. Wrens may accept boxes in gardens or brushy areas, while bluebirds and swallows generally need more open surroundings. Face the entrance away from prevailing wind and harsh afternoon sun whenever possible.
Keep the flight path clear. Do not point the entrance directly toward a wall, busy doorway, bird feeder, or heavily traveled patio. Avoid placing several boxes too close together unless the target species tolerates neighbors.
Install a metal or stovepipe-style baffle below the box when appropriate. Decorative architecture is nice, but successful fledging is the real design award.
Common Birdhouse-Building Mistakes
Using the Wrong Entrance Size
A generic opening may attract the wrong species or expose smaller birds to competition. Select a target bird before drilling.
Adding a Cute Little Perch
The perch is usually for humans, not birds. Leave it off.
Forgetting the Cleanout Door
A permanently sealed box is difficult to inspect, repair, or clean. Include a hinged or pivoting panel from the beginning.
Ignoring Summer Heat
Dark finishes, thin walls, full afternoon sun, and poor airflow can create dangerous conditions. Use thick wood, ventilation, a generous roof, and a shaded location appropriate for the species.
Making Decoration More Important Than Function
Deep platforms, miniature fences, fake chimneys, and attached metal ornaments may trap water or help predators. Mid-century modern design works best here because it already favors simplicity.
Mounting the Box and Forgetting It
Inspect mounting hardware and exterior damage periodically. After the nesting season, check whether the box needs cleaning or repair. Avoid unnecessary disturbance once birds are actively nesting. Annual maintenance recommendations vary by species and region, so follow a reputable local monitoring guide.
Practical Build Experience: What a Real Weekend Project Usually Teaches You
The first lesson from building a modern birdhouse is that a simple-looking design is not necessarily a careless design. In fact, clean lines are less forgiving than rustic trim. On a cottage-style birdhouse, a slightly crooked roof can be called charming. On a mid-century modern birdhouse, it looks as though the architect left during lunch and never returned.
A typical build goes more smoothly when every part is marked before the saw is turned on. The two side panels deserve special attention because their slopes need to match. Cutting one panel and tracing it onto the other is usually more reliable than measuring the roof angle twice. It also reduces the classic woodworking mystery in which two boards are supposedly identical but appear to have attended different schools of geometry.
Drilling the entrance before assembling the box is another major convenience. The front panel can rest flat on scrap lumber, allowing the hole saw to remain controlled. Without a backing board, cedar often tears as the bit exits, leaving a fuzzy crater that requires more sanding. A small amount of patience at this stage produces a cleaner facade and a safer entrance edge.
Dry-fitting the box reveals problems early. During a realistic first assembly, the most common surprise is that the floor fits perfectly until glue, clamps, and optimism are added. Test the floor between the walls, mark its recessed position, and drill pilot holes before applying adhesive. This keeps the assembly stage from turning into a frantic search for a smaller floor.
The cleanout side also benefits from testing. Pivot screws that are too tight prevent the panel from opening. Screws that are too loose allow the wall to rattle in the wind. Tighten them gradually until the panel swings with gentle pressure but remains aligned with the front and back.
Decorating the birdhouse is where restraint becomes surprisingly difficult. Once the natural cedar, retro color samples, and little wooden strips are arranged on the bench, every combination begins to look essential. The best result usually comes from removing one or two ideas. A light main body, natural roof, and three slim facade slats often communicate the style more effectively than five colors, a fake carport, and a tiny satellite dish.
Mounting can require more planning than building. A tree may look convenient, but a free-standing pole with a baffle often provides better stability and predator protection. Before installing the box, observe the area at different times of day. A location that seems pleasantly shaded in the morning may receive intense western sun by late afternoon.
The final experience is waiting. Birds may investigate immediately, ignore the box for a season, or use it when you have stopped checking every eleven minutes. That delay does not mean the project failed. Habitat, food, competition, entrance orientation, and local bird populations all influence occupancy. A properly built box remains useful even when the first residents are merely spiders conducting an unauthorized open house.
Once birds begin carrying nesting material inside, resist the urge to hover. Observe from a respectful distance and follow established monitoring practices. The most satisfying moment is not when someone compliments the roofline. It is when a small bird lands at the entrance, pauses briefly, and disappears into a structure that is stylish, dry, ventilated, and safe.
Conclusion
Learning how to make a mid-century modern birdhouse is an enjoyable way to combine backyard wildlife support with distinctive architectural design. The low shed roof, natural wood, asymmetrical facade, and restrained color palette give the project its retro personality. Correct entrance dimensions, drainage, ventilation, rough interior surfaces, safe mounting, and seasonal access make it a functional nesting site rather than an outdoor decoration with a hole in it.
Start with the bird species and local habitat, then adapt the visual design around those requirements. Keep the interior untreated, skip the perch, protect the box from predators, and place it where heat and weather can be managed. Done properly, the finished birdhouse will look like a miniature modernist home while working like the secure nesting cavity it was intended to be.
SEO Metadata

