Skincare
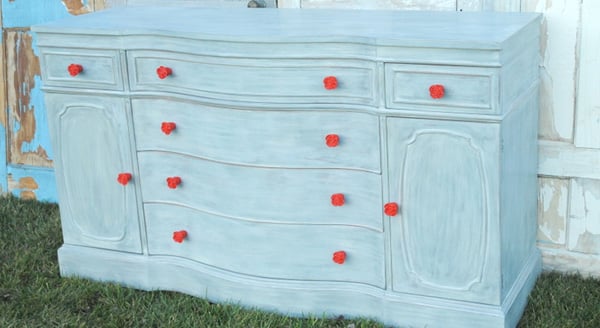
Fresh Blue Look For An Old Buffet
Jun
An old buffet can be a funny piece of furniture. It may have survived three house moves, two questionable decorating eras, and at least one phase when someone thought faux fruit on top was a good idea. Yet beneath the scratched brown finish, tired hardware, and mysterious drawer crumbs, there is often a sturdy storage hero waiting for a second act.
A fresh blue finish can turn a dated buffet into the kind of piece people assume came from a boutique furniture shop with tiny price tags and suspiciously good lighting. Whether you use it in a dining room, entryway, kitchen, living room, or as a coffee bar, a painted blue buffet adds personality without demanding a full-room renovation.
This guide walks through how to give an old buffet a polished blue makeover, from choosing the right shade and paint finish to preparing the surface, avoiding common DIY mistakes, and styling the finished piece so it looks intentional rather than “I had paint left over.”
Why Blue Is a Brilliant Choice for an Old Buffet
Blue is one of the most flexible colors in home design. A pale blue buffet can feel airy and coastal, a dusty blue sideboard can look vintage and collected, and a deep navy buffet can bring instant drama to a dining room. The same basic furniture shape can shift from farmhouse to traditional, modern, coastal, or eclectic just by changing the blue paint color and hardware.
Unlike some trendier colors that may feel exciting for approximately eleven minutes, blue tends to work well with a wide range of finishes. It pairs beautifully with warm wood floors, white walls, brass hardware, silver accents, black lighting, woven baskets, and natural stone. A blue buffet can also give visual balance to a room filled with beige, cream, gray, or wood tones.
Choose a Blue That Works With Your Room
Before committing to a paint color, look at the undertones already living in the room. Warm cream walls, honey-toned floors, and brass fixtures often look great with muted blue-green, slate blue, denim blue, or dusty navy. Cooler white walls, black metal accents, and gray flooring can work beautifully with crisp marine blue, cobalt, or blue-gray.
Always test your blue paint on a small hidden section of the buffet or on a sample board. Paint can look completely different in morning sunlight, afternoon shade, and evening lamp light. A color that looks like elegant French blue in the store may look like a melting popsicle under yellow dining-room bulbs.
Pick the Right Finish
The sheen matters almost as much as the color. Matte and chalk-style finishes create a soft, aged look and can help camouflage small imperfections. Satin is often the most practical choice for a buffet because it has a gentle glow, wipes clean easily, and does not highlight every bump or brush mark. Semi-gloss creates a more polished, furniture-like finish, especially on a formal sideboard or a buffet with decorative trim.
For a hardworking piece that will hold serving dishes, drinks, keys, or a coffee machine, choose a durable furniture, cabinet, or trim paint rather than ordinary wall paint. Wall paint is designed for walls. Your buffet deserves more respect than being dressed like a hallway.
Decide Whether Your Buffet Should Be Painted
Most old buffets are excellent candidates for paint, especially pieces that are scratched, stained, faded, chipped, mismatched, or simply too orange-brown for the room. Solid wood furniture, veneer furniture in good condition, laminate pieces, and many older dining-room sideboards can all be updated successfully with proper preparation.
However, pause before painting a piece with significant historical, financial, or family value. A rare antique, signed furniture piece, or heirloom with an original finish may be worth preserving. When in doubt, research the maker, inspect the underside for labels or markings, and consider getting an appraisal before opening the paint can.
Inspect the Furniture First
Open every drawer. Check that doors close properly, feet sit evenly, and drawer bottoms are not sagging. Look for veneer that is lifting, loose trim, water damage, woodworm holes, cracked panels, or old repairs that need attention. Paint can improve appearance, but it cannot convince a wobbly leg to suddenly become emotionally stable.
Tighten screws, glue loose joints, replace missing drawer stops, and fill dents or holes with stainable or paintable wood filler. Let repairs dry fully before sanding. A little repair work early on can make the finished buffet feel solid and expensive instead of freshly painted but still slightly haunted.
A Safety Note for Very Old Painted Furniture
If the buffet has old paint and you do not know its age or history, avoid aggressive dry sanding until you understand the existing finish. Older painted surfaces may contain hazardous materials, including lead-based paint. Test the finish or consult a qualified professional before creating dust, especially when working indoors or around children and pets.
What You Need for a Blue Buffet Makeover
Gathering the right tools before starting makes the job calmer and cleaner. It also prevents the classic DIY problem of holding a wet paintbrush while searching the garage for a screwdriver from 1998.
- Drop cloths, cardboard, or plastic sheeting
- Screwdriver or drill for removing hardware and doors
- Degreasing cleaner or mild soap solution
- Clean rags and tack cloths
- Wood filler and putty knife
- Sandpaper in medium, fine, and extra-fine grits
- Sanding block or orbital sander
- Bonding primer suitable for wood, veneer, or laminate
- Furniture, cabinet, enamel, chalk-style, or trim paint in blue
- High-quality angled brush for details
- Fine-finish foam roller or microfiber roller for flat panels
- Optional clear protective topcoat
- New knobs, pulls, hinges, or decorative hardware
How to Paint an Old Buffet Blue
1. Empty the Buffet and Create a Proper Work Zone
Remove everything from the buffet, including drawers, shelves, doors, handles, knobs, hinges, and decorative hardware. Take photos before removing complicated hardware so you remember where everything goes later. Label screws in small bags if the buffet has different hardware sizes.
Work in a well-ventilated area with enough space to walk around all sides of the furniture. A garage, covered porch, workshop, or protected outdoor space is ideal. Place the buffet on drop cloths and elevate it slightly with furniture risers or sturdy blocks if possible. Raising it makes painting the lower edges much easier and saves your back from filing a formal complaint.
2. Clean Before You Sand
Cleaning is not the glamorous step, but it is one of the most important. Buffets often collect furniture polish, cooking residue, fingerprints, dust, and years of mystery film. Paint does not bond well to grease, wax, or silicone polish, no matter how motivational your playlist is.
Wipe every surface with a suitable cleaner or a mild degreasing solution. Pay special attention to drawer fronts, handles, cabinet doors, and the buffet top. Let the piece dry completely before moving to repairs or sanding.
3. Repair Dings, Chips, and Loose Veneer
Use wood filler for nail holes, deep scratches, chipped corners, and small dents. Press it into the damaged area, smooth it with a putty knife, and allow it to dry according to the product directions. Once dry, sand the repair until it blends into the surrounding surface.
If veneer is lifting, apply wood glue beneath the loose section and hold it flat with painter’s tape, clamps, or weighted books protected by wax paper. Do not paint over loose veneer and hope for the best. It will eventually peel, and it will choose a day when guests are visiting.
4. Sand Lightly for Better Adhesion
You do not always need to strip a buffet down to bare wood. In many cases, the goal is simply to remove shine, smooth rough areas, and give primer something to grip. Use medium-grit sandpaper on glossy or damaged surfaces, then move to a finer grit for smoothing.
For flat surfaces, a sanding block or orbital sander can save time. For carved edges, grooves, and trim, use folded sandpaper or a flexible sanding sponge. Sand gently around veneer edges so you do not wear through the thin wood layer.
After sanding, vacuum all dust and wipe the buffet with a tack cloth or slightly damp lint-free cloth. Dust left behind can create tiny bumps in the paint finish, and those bumps will somehow become visible only after you have finished every single coat.
5. Apply a Bonding Primer
Primer is especially important when painting a dark buffet a lighter blue, covering glossy varnish, painting laminate, sealing repaired areas, or working with wood that has knots or stains. A good bonding primer improves adhesion and creates a more even color base for the blue paint.
Use a brush for corners, carved details, trim, and inside edges. Use a fine-finish roller for broad flat surfaces such as drawer fronts, cabinet doors, and side panels. Apply a thin, even coat and let it dry completely.
Once the primer is dry, lightly sand with fine sandpaper to remove drips, dust nibs, or brush marks. Wipe away the dust before applying your blue paint.
6. Paint in Thin, Smooth Coats
Thin coats are the secret to a finish that looks deliberate rather than bulky. Start with the detailed areas using an angled brush, then roll the larger flat areas while the brushed paint is still wet. This helps blend the finish and reduces visible brush strokes.
Apply the first blue coat in long, controlled passes. Do not overload the brush or roller. If the paint looks slightly uneven after the first coat, that is normal. Let it dry fully, then lightly sand any rough spots before applying the second coat.
Most buffets need two coats for full coverage. Deep navy, rich teal, or bright cobalt may need a third coat, particularly over dark wood or a strong previous finish. Patience is cheaper than repainting the entire thing after discovering drips on a Sunday night.
7. Add Contrast Where It Counts
A blue buffet does not have to be blue from every angle. Consider leaving the top in stained wood for a two-tone look, painting the interior shelves a softer pale blue, or lining the drawers with patterned paper. A creamy white interior can make glassware and serving pieces stand out. A dark navy exterior with brass hardware can feel classic and tailored.
You can also paint only the cabinet body while leaving drawer fronts natural, or paint the main structure blue and use a slightly lighter blue on doors. These small variations add depth without making the buffet look like it joined a circus.
8. Protect the Finish and Let It Cure
Some furniture paints are durable enough to use without an extra topcoat, while chalk-style and lower-sheen paints may benefit from wax, polyurethane, or another compatible protective finish. Follow the paint manufacturer’s directions carefully, particularly when combining products from different brands.
Dry paint is not always fully cured paint. Your buffet may feel dry in a few hours, but the finish often needs several days or longer to harden completely. Avoid stacking heavy dishes, sliding decor across the surface, or hosting a full holiday buffet immediately after painting. Give the finish time to become tough.
Hardware Can Change the Entire Personality of a Blue Buffet
New hardware is the jewelry of a furniture makeover. It can turn a simple painted buffet into something that feels custom-made. Brass pulls bring warmth to navy, dusty blue, and teal finishes. Matte black knobs create a more modern or industrial look. Antique bronze works beautifully with muted blue-green and vintage-inspired paint colors.
Before buying hardware, measure the distance between existing pull holes. Choosing pulls with the same center-to-center measurement saves you from drilling new holes and patching old ones. If you want to change the hardware layout, fill the old holes carefully, sand smooth, and measure twice before drilling.
For a budget-friendly option, clean and repaint original hardware. Old brass can be polished, black hardware can be refreshed, and plain knobs can be upgraded with a metallic finish. Sometimes the original hardware has more character than anything hanging in a big-box store aisle under fluorescent lighting.
Styling a Fresh Blue Buffet
Once the paint is dry and cured, styling helps the buffet feel like part of the room. In a dining room, use the top for a lamp, mirror, framed art, serving tray, candles, or a few sculptural objects. In an entryway, add a catchall tray, vase, small lamp, and basket underneath for shoes or bags.
A blue buffet also makes an excellent coffee station. Add a coffee maker, mugs, canisters, a small tray for syrups, and hooks or shelves above it. In a living room, it can hold board games, blankets, books, or media equipment while acting as a strong color anchor.
Keep the top from becoming too crowded. A buffet looks best when it has a few purposeful layers rather than every decorative object you have ever received as a gift. Let the blue finish have a moment. It worked hard for it.
Common Blue Buffet Makeover Mistakes to Avoid
Skipping Surface Prep
Paint can peel, bubble, or scratch quickly when applied over wax, grease, glossy varnish, or dusty surfaces. Clean, sand lightly, and use primer when needed.
Using Thick Paint Coats
Heavy coats create drips, uneven texture, slow drying, and soft finishes. Several thin coats almost always look better than one dramatic paint avalanche.
Choosing Paint Without Testing It
Blue changes dramatically depending on room lighting, surrounding colors, and finish sheen. Test samples before committing to an entire buffet.
Rushing Reassembly
Putting drawers, doors, hardware, and heavy serving dishes back too soon can scratch or dent fresh paint. Allow the finish time to cure before returning the buffet to daily duty.
Ignoring the Inside
A beautifully painted exterior can lose some charm when the drawers are dusty, sticky, or unfinished inside. Clean the interior thoroughly and consider lining drawers or painting shelves for a more complete makeover.
Real-World Lessons From a Fresh Blue Buffet Makeover
Blue buffet makeovers often look simple in before-and-after photos: brown furniture goes in, stylish blue furniture comes out, everyone applauds, and somehow there is always a perfect bowl of lemons nearby. The real experience is a little more human. There may be sanding dust in unusual places, a misplaced screw, one paint drip that seems to regenerate overnight, and at least one moment when the original brown finish suddenly looks less offensive than it did yesterday.
The biggest lesson is that preparation usually determines whether the makeover feels polished. Consider a typical 1970s dining-room buffet with a dark glossy finish, brass handles, and a top covered in faint water rings. The first instinct may be to grab a roller and cover it with bright blue paint immediately. But once the paint hits old furniture polish or slick varnish, it can slide, separate, or dry unevenly. Spending extra time cleaning, lightly sanding, and priming may not feel exciting, but it is the difference between “custom sideboard” and “blue object that scratches when you look at it sternly.”
Another common surprise is how much the color depends on the room. A soft dusty blue can look warm and charming beside cream walls and oak floors, yet appear gray or slightly green beside cool white paint and chrome fixtures. This is why sample boards are worth the few extra dollars. Place the sample near the buffet’s future home, look at it morning and night, and compare it with the flooring, wall color, curtains, and nearby furniture. The right blue is not always the prettiest chip on the paint wall. It is the one that behaves well in your actual room.
Hardware also creates a much bigger transformation than most people expect. A navy buffet with polished brass pulls can feel formal and traditional. Swap those pulls for matte black bar handles, and the same buffet suddenly looks cleaner and more contemporary. Add glass knobs, and it leans vintage. Keep the original handles but clean them well, and the piece may retain just enough history to feel special rather than generic.
One of the most satisfying experiences is discovering that an old buffet can become more useful after its makeover. A former dining-room sideboard can move into an entryway and hold shoes, mail, umbrellas, and dog leashes. It can become a coffee bar in a kitchen, a craft storage station in a family room, or a media console in a living room. Blue gives the furniture enough visual personality to lead the space instead of fading into it.
The final lesson is to resist perfectionism. A vintage buffet may have small dents, uneven wood grain, and a few signs of its previous life. Those details are not necessarily flaws. When the blue paint is smooth, the hardware is intentional, and the styling is simple, a little character makes the piece feel more authentic. A fresh blue buffet should not look like it was manufactured by robots in a silent warehouse. It should look like a useful, loved piece of furniture that got a very good second chance.
Note: For very old painted furniture, take extra care before sanding or stripping unknown finishes. Safe preparation is more important than a faster makeover.
Conclusion
A fresh blue look can make an old buffet feel completely new without erasing its personality. With careful cleaning, smart repairs, light sanding, the right primer, durable paint, and thoughtful hardware, a forgotten sideboard can become a standout feature in almost any room.
The best part is that this project is not just about changing color. It is about making useful furniture feel relevant again. Instead of replacing a sturdy old buffet, you can give it a fresh role, a bold new finish, and a place in your home that feels intentional. Blue paint may not solve every decorating problem, but it can make a tired buffet look like it finally got the memo.
