Hair Care
How do I Wire a 110 Breaker Box?
Jun
Note: This article is for educational planning and homeowner awareness only. Wiring a breaker box is dangerous, code-regulated work that can cause shock, electrocution, fire, failed inspections, insurance problems, and a very bad afternoon. Always hire a licensed electrician and follow your local electrical code, permit rules, utility requirements, and inspector guidance.
Understanding the “110 Breaker Box” Question
When people ask, “How do I wire a 110 breaker box?” they usually mean one of three things: adding a 120-volt circuit to a residential panel, installing a small subpanel for 120-volt loads, or replacing an old breaker box that feeds standard household outlets and lights. The phrase “110 volts” is common, but in modern U.S. homes, the more accurate term is usually 120 volts. Your toaster, lamp, phone charger, television, and suspiciously loud blender all live in this 120-volt world.
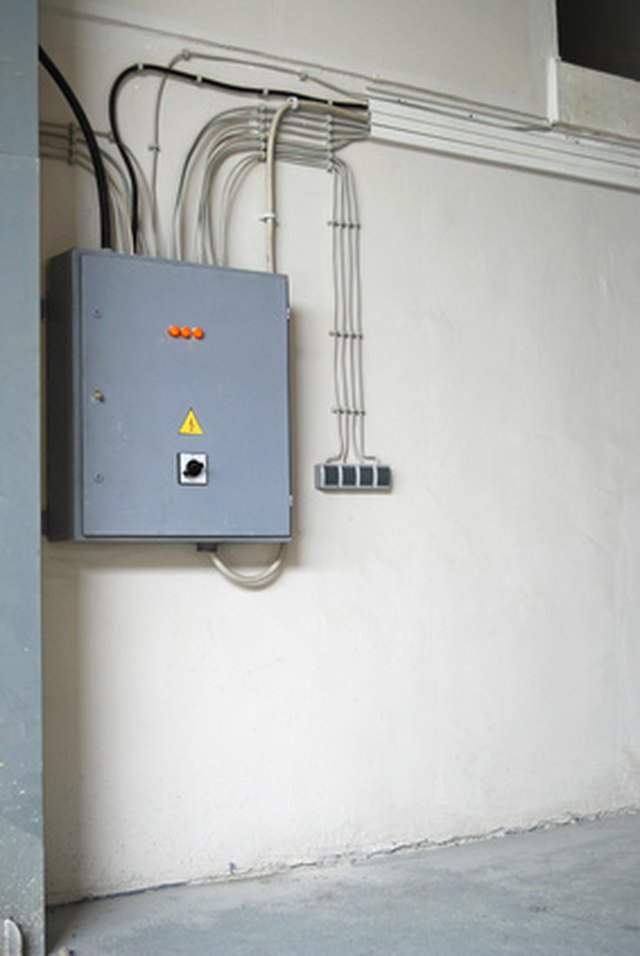
A residential breaker box, also called an electrical panel, service panel, load center, or panelboard, distributes electricity to branch circuits around the house. Breakers are not decorative switches. They are safety devices designed to shut off power when a circuit is overloaded or shorted. That is why the question should not really be, “How fast can I wire this?” It should be, “How do I make sure this is designed, permitted, installed, protected, labeled, and inspected correctly?” Less glamorous, yes. Less likely to turn your wall into a smoke machine, also yes.
First, Know What a Breaker Box Actually Does
A breaker box receives power from a utility service or from another panel and divides that power into smaller branch circuits. Each breaker protects a specific circuit at a specific amperage. In many homes, common 120-volt circuits are 15 amps or 20 amps. A 15-amp circuit is often used for lighting or general rooms, while 20-amp circuits are common for kitchens, bathrooms, garages, laundry areas, and other higher-demand spaces.
The breaker must match the wire size, the circuit use, the panel listing, and the local code. This is one of the most important ideas in residential electrical work. A bigger breaker is not an upgrade if the wiring cannot safely carry the current. Installing a larger breaker on undersized wire is like putting racing tires on a grocery cart and calling it a sports car. It may look confident right before something goes wrong.
Main Panel vs. Subpanel: The Big Difference
Before anyone thinks about wiring a 110 breaker box, they need to know whether the box is a main service panel or a subpanel. A main service panel is typically the first major disconnect point after the utility meter. It is where the home’s electrical grounding and bonding arrangement is established. A subpanel is fed from another panel and distributes power to additional circuits in another area, such as a detached garage, workshop, basement, addition, or outbuilding.
This distinction matters because neutral and grounding conductors are handled differently. In a main service panel, bonding is part of the service equipment design. In a subpanel, neutrals and equipment grounding conductors must remain isolated from each other. Mixing them together in the wrong place can energize metal parts, create shock hazards, and make troubleshooting miserable. It is one of those details that looks small on paper and enormous when an inspector raises an eyebrow.
Permits, Codes, and Inspections Are Not Optional Decorations
Electrical work in the United States is governed by the National Electrical Code, local amendments, utility rules, and authority-having-jurisdiction requirements. The NEC is widely used as the benchmark for safe electrical design and installation, but your city, county, or state may add its own requirements. That means two homes in two different locations may need different permits, different inspection steps, or different protection devices.
For breaker box work, permits are especially important. An inspector checks whether the installation is safe, properly grounded, correctly protected, and appropriate for the intended load. If work is hidden behind drywall or tucked inside a panel without inspection, problems may stay invisible until a breaker trips, an appliance fails, a wire overheats, or a buyer’s home inspector discovers the electrical equivalent of a mystery casserole.
What a Safe 120-Volt Circuit Design Considers
A safe 120-volt branch circuit is not just “one hot wire and good vibes.” It requires a complete design. The electrician must consider the load, the circuit amperage, conductor size, breaker type, cable or conduit method, grounding path, box fill, device ratings, voltage drop, environmental conditions, and whether GFCI or AFCI protection is required.
Load Calculation
Every circuit should be planned around what it will power. Lighting has different needs than a garage freezer. A bathroom receptacle circuit has different demands than a bedroom outlet. A workshop full of saws, chargers, dust collectors, and one radio playing classic rock too loudly may need more than one circuit. Load planning prevents nuisance tripping and reduces the temptation to rely on extension cords, which should never become permanent wiring.
Breaker and Wire Compatibility
The breaker protects the wire, not just the appliance. A 15-amp breaker is commonly paired with 14-gauge copper conductors in many residential branch circuits, while a 20-amp breaker is commonly paired with 12-gauge copper conductors. Local code, cable type, insulation rating, temperature limits, and installation conditions may affect what is allowed. The panel label also matters because breakers must be listed or classified for use in that specific panel. “It fits” is not the same as “it is approved.” A butter knife also fits in a toaster. Please do not let that become your electrical philosophy.
GFCI and AFCI Protection
Modern residential circuits often require extra protection. GFCI protection helps reduce shock risk where electricity and moisture may meet, such as bathrooms, kitchens, garages, basements, laundry areas, outdoor receptacles, and similar locations. AFCI protection helps reduce fire risk from dangerous arcing faults in wiring. In some locations, dual-function AFCI/GFCI breakers or devices may be used to provide both types of protection.
These devices are not fancy upsells. They exist because ordinary breakers do not detect every dangerous condition. A standard breaker responds to overloads and short circuits, but it may not trip for a ground fault or an arcing condition that can still injure someone or start a fire. In other words, breakers are excellent bodyguards, but sometimes they need specialized teammates.
The Safe High-Level Process
Because panel wiring can be deadly, this article will not provide a do-it-yourself live-panel wiring tutorial. However, it is useful to understand the safe high-level workflow a qualified electrician follows.
1. Plan the Circuit or Panel Purpose
The process begins with a clear purpose. Is the breaker box feeding a workshop? A shed? A basement remodel? A few lighting circuits? A dedicated appliance? The answer affects panel size, breaker spaces, feeder requirements, grounding, load calculation, and whether the installation needs 120 volts only or a 120/240-volt feeder.
2. Verify Capacity
An electrician checks whether the existing service and panel can support the new load. A panel may have empty spaces but not enough capacity. This is the classic “there is room in the suitcase, but the airline scale disagrees” problem. Service capacity, load calculations, and breaker limitations must all be evaluated.
3. Select Listed Equipment
The panel, breakers, connectors, conductors, grounding bars, neutral bars, and enclosures must be approved for the installation. Outdoor panels need weather-rated enclosures. Detached structures may require additional grounding electrodes and special feeder arrangements. Breakers must match the panel’s approved compatibility list.
4. De-Energize and Verify
Qualified workers do not assume power is off because a switch moved. They verify de-energization with proper test equipment and safe work practices. This is a crucial step because panels can contain backfed circuits, mislabeled breakers, multi-wire branch circuits, generator connections, solar equipment, or other surprises. Electrical surprises are rarely the fun kind, like finding twenty dollars in an old coat.
5. Install Conductors Correctly
Conductors must be routed, secured, protected, identified, and terminated according to code and manufacturer instructions. Terminals have torque requirements. Cable clamps must protect insulation. Conduit fill and bend rules may apply. Sharp edges, loose connections, and crowded boxes can lead to heat, arcing, and failures.
6. Keep Neutrals and Grounds Correct
Neutral and ground rules are central to panel safety. In a subpanel, the neutral bar and grounding bar must not be bonded together. Equipment grounding conductors provide a fault path; neutrals carry normal return current. Confusing the two can put current where it does not belong.
7. Label Everything
A properly labeled breaker box is a gift to your future self. Labels should clearly identify what each breaker controls: “Kitchen counter outlets,” “Basement lights,” “Garage freezer,” “Bathroom receptacles,” and so on. Labels like “misc,” “old room,” or “Steve’s circuit???” may be emotionally honest, but they are not helpful during troubleshooting.
8. Test and Inspect
After installation, the work should be tested and inspected. This can include verifying correct voltage, polarity, grounding continuity, GFCI and AFCI operation, breaker fit, conductor termination, panel labeling, working clearances, and compliance with local requirements. The inspection is not an insult to the installer. It is a second set of trained eyes on a system that must protect people every day.
Common Mistakes When Wiring a 110 Breaker Box
Using the Wrong Breaker
One of the most common mistakes is using a breaker that physically fits but is not approved for the panel. Different manufacturers design breakers and bus connections differently. A mismatched breaker can overheat, fail to trip correctly, or damage the panel.
Oversizing the Breaker
If a circuit keeps tripping, replacing the breaker with a larger one is not a fix. It is a warning sign wearing a fake mustache. Breakers trip for a reason: overloads, short circuits, ground faults, arc faults, faulty equipment, damaged wiring, or incorrect circuit design. The cause must be identified, not overpowered.
Bonding Neutral and Ground in a Subpanel
This mistake is common in garage and workshop projects. In a subpanel, neutrals and grounds should remain separate. Bonding them together downstream of the service equipment can create parallel current paths and shock hazards.
Skipping GFCI or AFCI Protection
Older homes may not have the same protection required in newer work. When modifying or extending circuits, updated requirements may apply. Areas involving moisture, finished living spaces, kitchens, laundry rooms, garages, basements, and outdoor outlets often need special protection.
Poor Panel Working Clearance
Breaker boxes need clear access. They should not be hidden behind shelves, buried behind paint cans, or squeezed between holiday decorations and a treadmill nobody has touched since 2019. Clear working space helps electricians and emergency responders access the panel safely.
When You Should Call a Licensed Electrician Immediately
Call a licensed electrician if you see scorch marks, melted insulation, buzzing from the panel, breakers that feel hot, repeated tripping, burning smells, flickering lights across multiple rooms, aluminum branch wiring, Federal Pacific or Zinsco-era equipment concerns, water intrusion, rust inside the panel, missing covers, double-tapped breakers, or unlabeled mystery circuits. Also call if you are installing a subpanel, upgrading service, adding large appliances, finishing a basement, wiring a detached structure, or doing anything that requires utility coordination.
There is no shame in calling a professional. Electricity is invisible, fast, and completely uninterested in your confidence level. Hiring a licensed electrician is not just paying for labor. You are paying for training, tools, permits, code knowledge, insurance, troubleshooting experience, and the ability to notice the thing that would never appear in a five-minute online video.
Cost Factors for Wiring or Upgrading a Breaker Box
The cost of wiring a 110 breaker box or adding 120-volt circuits depends on the project scope. A simple dedicated circuit may be relatively modest, while a subpanel, service upgrade, or detached-building feeder can cost much more. Pricing depends on permit fees, panel type, breaker type, conductor length, wall access, grounding requirements, local labor rates, inspection needs, drywall repair, trenching, and whether the existing service has enough capacity.
Special breakers, such as GFCI, AFCI, or dual-function models, cost more than standard breakers but may be required. Outdoor-rated equipment, conduit, weatherproof fittings, and long feeder runs also increase cost. The cheapest estimate is not always the best choice. A safe electrical system should be judged by workmanship, code compliance, proper permits, and long-term reliability, not just the size of the invoice.
Real-World Experiences: Lessons from Breaker Box Projects
One of the most common real-world experiences with breaker box projects is discovering that the job is bigger than expected. A homeowner may start with a simple goal: add a few outlets in the garage for tools. Then the electrician opens the existing panel and finds no available capacity, outdated breakers, poor labeling, or a panel already packed tighter than a suitcase before vacation. Suddenly, the “quick outlet project” becomes a conversation about load calculation, a subpanel, or a panel upgrade. This is not upselling by default; often it is the electrical system telling the truth.
Another frequent lesson is that labeling matters more than people think. Many homeowners inherit panels with handwritten legends like “front,” “back,” “lights,” and the deeply unhelpful “other.” During a real project, an electrician may spend significant time identifying circuits before any new work begins. A circuit breaker finder, careful testing, and a patient room-by-room check can turn a confusing panel into a useful map. Homeowners often say the new labels are one of their favorite parts of the job because the next tripped breaker no longer feels like solving a haunted-house puzzle.
Subpanel projects also teach a major lesson about planning ahead. A garage workshop may only need one 120-volt circuit today, but future needs can grow quickly. Add a freezer, battery chargers, better lighting, a dust collector, a heater, or an electric vehicle charger, and yesterday’s “small panel” may feel undersized. A good electrician will ask about future use, not just today’s immediate problem. That extra conversation can prevent expensive rework later.
Older homes bring their own personality. Sometimes that personality is charming hardwood floors and original trim. Sometimes it is brittle insulation, abandoned knob-and-tube wiring, overloaded circuits, and junction boxes hiding in places that make everyone sigh. In these homes, wiring a breaker box is rarely a standalone task. It may involve correcting previous work, improving grounding, adding GFCI protection, replacing damaged cable, or separating circuits that should never have been sharing the same breaker.
Many homeowners also underestimate how important inspections are. A passed inspection provides confidence that the work met local standards at the time of inspection. It can also help during insurance questions, refinancing, or selling the home. Unpermitted panel work, on the other hand, can become a future headache. It may function for years and still be wrong. Electrical systems do not hand out gold stars for “seems fine so far.”
The biggest experience-based takeaway is simple: treat the breaker box as safety equipment, not just a project box. A neat panel, correctly sized circuits, proper protection, clean labeling, and professional inspection make daily life safer and easier. The best electrical work is boring after it is finished. Nothing smells hot, nothing buzzes, nothing trips for no reason, and nobody has to sprint to the panel because the microwave and toaster formed an alliance.
Conclusion
So, how do you wire a 110 breaker box? The safest answer is: you understand the purpose, plan the load, follow the code, use listed equipment, keep neutral and ground rules straight, provide required AFCI and GFCI protection, label everything clearly, and hire a licensed electrician to perform and verify the work. In modern U.S. homes, what people call “110” is usually 120 volts, and while that may sound ordinary, it is still dangerous when handled incorrectly.
A breaker box is the control center of your home’s electrical safety system. Done correctly, it quietly protects wires, appliances, and people. Done carelessly, it can create hidden hazards behind walls and inside metal enclosures. Respect the panel, respect the code, and let qualified professionals handle the live work. Your home will be safer, your inspector will be happier, and your breaker box will remain exactly as exciting as it should be: not exciting at all.
